Tech In Plain Sight: Microwave Ovens

Our homes are full of technological marvels, and, as a Hackaday reader, we are betting you know the basic ideas behind a microwave oven even if you haven’t torn one apart for transformers and magnetrons. So we aren’t going to explain how the magnetron rotates water molecules to produce uniform dielectric heating. However, when we see our microwave, we think about two things: 1) this thing is one of the most dangerous things in our house and 2) what makes that little turntable flip a different direction every time you run the thing?

First, a Little History

Westinghouse Powercaster which could, among other things, toast bread in six seconds

People think that Raytheon engineer Percy Spenser, the chief of their power tube division, noticed that while working with a magnetron he found his candy bar had melted. This is, apparently, true, but Spenser wasn’t the first to notice. He was, however, the first to investigate it and legend holds that he popped popcorn and blew up an egg on a colleague’s face (this sounds like an urban legend about “egg on your face” to us). The Raytheon patent goes back to 1945.

However, cooking with radio energy was not a new idea. In 1933, Westinghouse demonstrated cooking foods with a 10 kW 60 MHz transmitter (jump to page 394). According to reports, the device could toast bread in six seconds.  The same equipment could beam power and — reportedly — exposing yourself to the field caused “artificial fever” and an experience like having a cocktail, including a hangover on overindulgence. In fact, doctors would develop radiothermy to heat parts of the body locally, but we don’t suggest spending an hour in the device.

Continue reading “Tech In Plain Sight: Microwave Ovens”

Simple Plywood Lamp Has Neat Hidden Switch

Shortly after the development of the electric light came the light switch, presumably. Of course, obvious switches are old-hat, and this neat lamp build from [Giovanni Aggiustatutto] goes with a design that’s altogether more coy.

The lamp itself is a minimalist modern design, with a cube-like body constructed out of plywood. It was easily constructed by simply stacking up several layers of plywood to create the form. Inside the housing, a bulb holder was installed hooked up to a Shelly smart relay to enable the lamp to be used as a smart device. The relay also has a switch input for direct control. This is hooked up to a micro-switch that is tucked into the base. Tilting the lamp to one side triggers the micro-switch and turns the lamp on and off as desired.

Overall, it’s a simple build that is elegant and functional. It eschews switches on the lamp cord and other fussy details, while featuring both smart control and a direct switch as well. We’ve featured some other great lamps before, too. Video after the break.

Continue reading “Simple Plywood Lamp Has Neat Hidden Switch”

Riding Mower Repair Uncovers Miniature Culprit

Most people would be pretty upset it the lawn mower they spent $4,000 USD on had a major failure within the first year of owning it. But for [xxbiohazrdxx], it was an excuse to take a peek under the hood and figure out what brought down this state-of-the-art piece of landscaping gear.

It should be said that, at least technically, the Husqvarna TS 348XD in question was still working. It’s just that [xxbiohazrdxx] noticed the locking differential, which is key to maintaining traction on hilly terrain, didn’t seem to be doing anything when the switch was pressed. Since manually moving the engagement lever on the transmission locked up the differential as expected, the culprit was likely in the electronics.

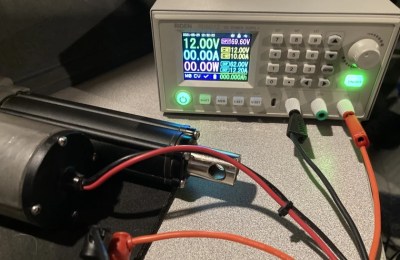
Testing the dead actuator.

As [xxbiohazrdxx] explains, the switch on the dash is connected to a linear actuator that moves the lever on the transmission. The wiring and switch tested fine with a multimeter, but when the actuator was hooked up to a bench power supply, it didn’t move. Even more telling, it wasn’t drawing any power. Definitely not a good sign. Installing a new actuator would have solved the problem, but it was an expensive part that would take time to arrive.

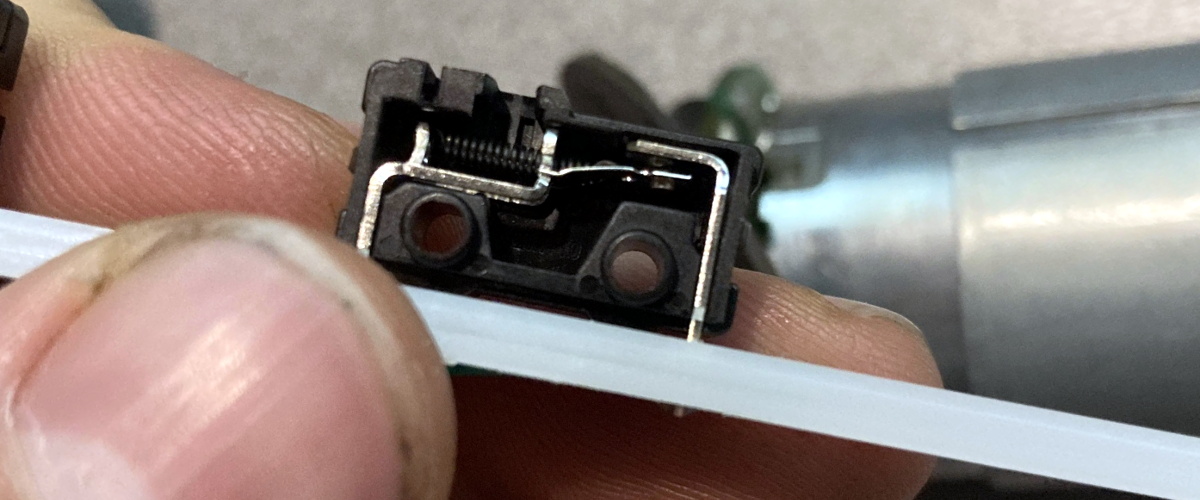
Repairing the dead actuator seemed worth a shot at least, so [xxbiohazrdxx] cracked it open. The PCB looked good, and there were no obviously toasted components. But when one of the internal microswitches used to limit the travel of the actuator was found to be jammed in, everything started to make sense. With the switch locked in the closed position, the actuator believed it was already fully extended and wouldn’t move. After opening the switch itself and bending the contacts back into their appropriate position, everything worked as expected.

A tiny piece of bent metal kept this $4,000 machine from operating correctly.

As interesting as this step-by-step repair process was, what struck us the most is [xxbiohazrdxx]’s determination to fix rather than replace. At several points it would have been much easier to just swap out a broken part for a new one, but instead, the suspect part was carefully examined and coaxed back to life with the tools and materials on-hand.

While there’s plenty of folks who wouldn’t mind taking a few days off from lawn work while they wait for their replacement parts to arrive, not everyone can afford the luxury. Expedient repairs are critical when your livelihood depends on your equipment, which is why manufacturers making it harder and more expensive for farmers to fix their tractors has become such a major issue in right to repair battles all over the globe.

DIY Ergonomic Game Pad Lends A Hand

Does it seem like everyone you game against can do everything faster than you? Chances are good that they have some kind of dedicated game pad or macro pad with a bunch of custom shortcuts. If you can’t beat ’em, join ’em, but why buy one when you can build your own? [lordofthedum] did the smart thing when they built their own version of the Azeron game pad, which is an outrageously expensive but ergonomic and cool-looking macro pad that reminds us of the DataHand ergonomic keyboard.

Each finger hovers over a C-shaped group of three switches — one actuates by moving the finger forward, another by moving backward, and the third by pushing down like a regular button. The thumb gets a 4-way joystick. All of these inputs are wired up to an Arduino Pro Micro, which has sort of become the standard for DIY macro pads and keyboards. We think this looks fantastic, and really raises the bar for DIY macro pads.

Need a few more keys, but still want a thumb joystick? Check out the smooth and sweet Sherbet game pad.

ESP8266 Keeps Tabs On The Kid’s Tablets

Assuming you have a child and it’s no longer womb-bound, there’s a fairly high chance they’ve already had some experience with the glowing beauty that is the LCD display; babies of only a few months old are often given a tablet or smartphone to keep them occupied. But as the child gets to the age where they are capable of going outside or doing something more constructive, staring slack-jawed and wide-eyed at their tablet becomes a concern for many parents.

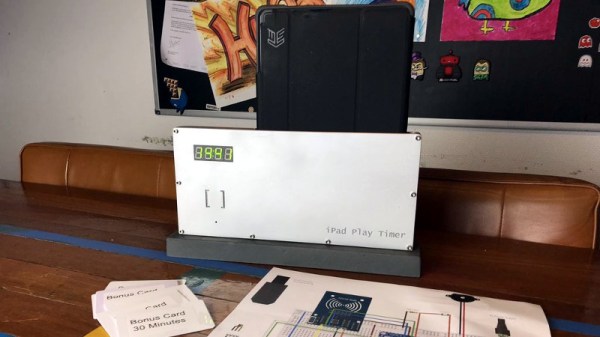
[Richard Garsthagen] is one such parent. He wanted a way to monitor and control how much time his children were using their iPad, so he came up with an automated system based on the ESP8266. Not only does it keep track of how long the tablet is being used, it even includes a reward system which allows the parent to add extra usage time for good behavior.

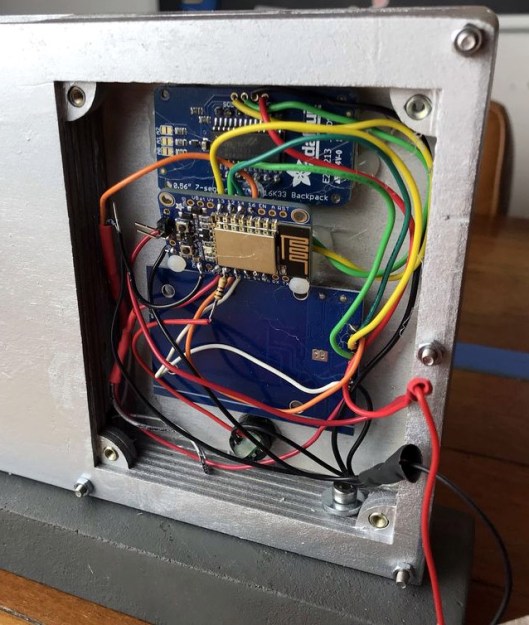
At the most basic level, the device is a sort of “holster” for the child’s tablet. When the tablet is placed in the slot, it presses a microswitch at the bottom of the cavity which stops the timer. When the switch is open, the LED display on the front of the device counts down, and the ESP8266 pushes notifications about remaining time to the child’s device via IFTTT.

Time can be added to the clock by way of RFID cards. The cards are given out as a reward for good behavior, completion of chores, etc. The child only needs to pass the card in front of the system to redeem its value. Once the card has been “spent”, the parent can reset it with their own special card.

It’s a very slick setup, making perfect use of the ESP8266. Reading the RFID cards, updating the timer, and using IFTTT’s API keeps the little board quite busy; [Richard] says it’s completely maxed out.

You might be wondering what happens when the clock reaches zero. Well, according to the video after the break…nothing. Once the time runs out, a notification simply pops up on the tablet telling them to put it away. Some might see this as a fault, but presumably it’s the part of the system where humans take over the parenting and give the ESP8266 a rest.

This isn’t the first time we’ve seen a microcontroller used to get the little hackers on schedule. At least (so far) none of them have gone full Black Mirror and started tracking when the kiddos are watching it.

Continue reading “ESP8266 Keeps Tabs On The Kid’s Tablets”

Roll Your Own Rotary Encoders

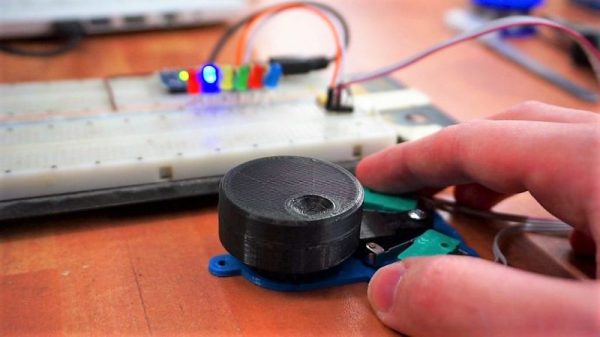
[miroslavus] hasn’t had much luck with rotary encoders. The parts he has tested from the usual sources have all been problematic either mechanically or electrically, resulting in poor performance in his projects. Even attempts to deal with the deficiencies in software didn’t help, so he did what any red-blooded hacker would do — he built his own rotary encoder from microswitches and 3D-printed parts.

[miroslavus]’s “encoder” isn’t a quadrature encoder in the classic sense. It has two switches and only one of them fires when it turns a given direction, one for clockwise and one for counterclockwise. The knob has a ratchet wheel on the underside that engages with a small trip lever, and carefully located microswitches are actuated repeatedly as the ratchet wheel moves the trip lever. The action is smooth but satisfyingly clicky. Personally, we’d forsake the 3D-printed baseplate in favor of a custom PCB with debouncing circuitry, and perhaps relocate the switches so they’re under the knob for a more compact form factor. That and the addition of another switch on the shaft’s axis to register knob pushes, and you’ve got a perfectly respectable input device for navigating menus.

We think this is great, but perhaps your project really needs a legitimate rotary encoder. In that case, you’ll want to catch up on basics like Gray codes.

Continue reading “Roll Your Own Rotary Encoders”

Inside A Microswitch

We’ve taken a few microswitches apart, mostly to fix those pesky Logitech mice that develop double-click syndrome, but we’ve never made a video. Luckily, [Julian] did, and it is worth watching if you want to understand the internal mechanism of these components.

[Julian] talks about the way the contacts make and break. He also discusses the mechanical hysteresis inherent in the system because of the metal moving contact having spring-like qualities

Continue reading “Inside A Microswitch”