A Portable CNC Mill

Proxxon

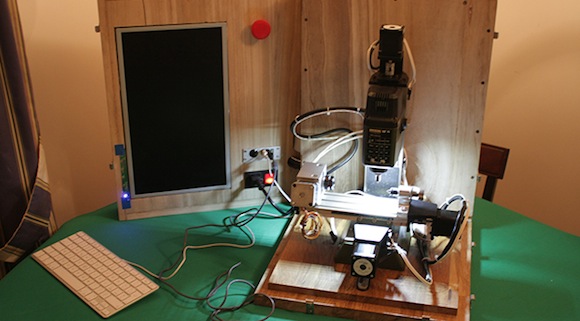
Second only to a lathe, a mill is one of the most useful tools to have in a shop. For [juppiter], though, a proper multi-ton mill would take up too much space and be a considerable investment. His solution to his space problem is actually very clever: he converted a small, inexpensive benchtop mill to CNC control, and put everything in a nice box that can be tucked away easily (Italian, here’s the translation).

The mill [juppiter] chose for the conversion was a Proxxon MF70, a very small mill made for jewelers and modelers. After buying a CNC conversion kit that included a few NEMA 17 motors, bearings, and mounting plates, [juppiter] set to work on driving these motors and controlling them with a computer. For the stepper drivers, a few industrial motor drivers were sourced on eBay, driven by an i3 miniITX computer built into the mill’s box. Control is through a touchscreen LCD and a Bluetooth keyboard and mouse.

So far, [juppiter] has crafted a very elegant wood and brass CNC controller that allows him to jog the axes around and set the home position. It’s an excellent build that really shows off the power and ability of these inexpensive desktop mills.

Ask Hackaday: How Do You Give A Project Away?

lcr

A few weeks ago, we caught wind of a DIY version of ‘smart tweezers’ from [Kai]’s workbench that are able to measure SMD resistors, caps, and inductors. At that time, [Kai] hadn’t quite finished the software portion of his build, leaving him with a pile of parts and non-working PCBs. The code is finished now, meaning [Kai] has a very capable and very inexpensive version of LCR meter tweezers. He’d like to give back to the open source community and figure out a way to get his tweezers into the hands of makers the world over now. The only problem is he doesn’t know quite how to do that.

We’ve seen smart tweezers before, and they’re still available commercially for about $300. [Kai]’s version brings down the price significantly, so there is a market for these LCR tweezers. The problem, it seems, is getting these tweezers manufactured.

We’re assuming that soldering hundreds of thousand of SMD parts isn’t what [Kai] thinks is a good time; this leaves a Kickstarter as a non-starter, unless he can contract out the manufacturing. Seeed Studio might be a good place for [Kai] to sell his wares, but we’re wondering what Hackaday readers would do in [Kai]’s situation. Obviously he deserves to compensated for his work either through licensing or royalties, but as far as actual advice and recommendations we’re turning to Hackaday readers.

DIY SMD Stencils Made With A Craft Cutter

Unless you’d like to spend hours with a toothpick and a tub of solder paste, stencils are the way to go whenever you’re placing SMD parts. While most commercial and industrial SMD stencils are made out of laser cut stainless steel, [Peter] figured out a piece of plastic and a $300 craft cutter is equally well suited for the job.

[Peter] has spent some time making SMD stencils out of polyester film in the form of overhead transparency sheets. This turned out to be a wonderful material; it’s dimensionally stable, commonly available, and just the right thickness suggested for SMD stencils. The polyester film was cut on a Silhouette Cameo, basically a desktop-sized vinyl cutter aimed at the craft market.

Stock, the Silhouette Cameo rounds off corners, not something [Peter] wanted with features only fractions of a millimeter. He came up with a tool to convert the paste layer of a Gerber file into separately drawn line segments, allowing him to cut SMD stencils for 0.3 mm pitch components.

It’s a great piece of work to make very fine pitch stencils, but we’re wondering if this tool could be used on the much less expensive Cricut paper and vinyl cutter that is unfortunately locked down with some very restrictive software.

Overclocking Microcontrollers

We’re all familiar with overclocking desktop computers; a wonderful introduction to thermal design power and the necessities of a good CPU cooler. [Marcelo] wanted to see how far he could overclock a microcontroller – in this case an ATMega328 – and ended up with a microcontroller designed for 20 MHz running at 30 MHz.

To verify that his uC could run at higher clock speeds, [Marcelo] began his experiments by uploading a piece of code that toggled a few pins as fast as possible. He needed to upload this code with a common 16 MHz crystal – AVRDude simply won’t work when a chip is clocked at higher speeds.

After successfully demonstrating his microcontroller will turn pins on and off at 30 MHz, [Marcelo] wanted to see if he could do something useful. By editing a single setting in his Arduino boards.txt file., [Marcelo] was able to have his overclocked microcontroller read and reply to characters sent over a serial connection. It worked, demonstrating an overclocked microcontroller could be useful in some situations.

As for what [Marcelo] plans to do with his faster microcontroller, he’s thinking of improving a ATMega-powered VGA color generator. A higher clock speed means he can push more pixels out to a VGA monitor.

Making A TARDIS Bigger On The Inside

tardis-pan

Over Thanksgiving, [Greg] had a little time on his hands and decided he needed an afternoon project. Having a few bits of plywood, an xacto knife, and some blue paint on hand meant a miniature TARDIS would take shape on his workbench. After finishing the model, [Greg] continued improving it with a blinky LED when the thought of adding an interior to the TARDIS entered his mind. An idea too good to pass up, really.

The TARDIS, of course, is smaller on the outside, so [Greg] needed a way to virtually model the interior of [9] and [10]’s home. After playing around with Blender for a few days, [Greg] had a reasonable 3D facsimile of the TARDIS interior. Now the only problem was to display it behind the front door.

[Greg] whipped up a small app for his phone that reads a zebra print pattern behind the door and overlays the 3D modeled TARDIS interior. Yes, it’s only viewable through augmented reality, but tilting the desktop TARDIS from side to side makes the entire console room visible. You can check out [Greg]’s TARDIS interior in the video after the break.

Continue reading “Making A TARDIS Bigger On The Inside”

Toner Transfer For Resist And Silk Screen Using Printable Vinyl

This toner transfer method uses a different material than we normally see. The red sheet being peeled back isn’t toner transfer paper. It’s printable vinyl used for both the resist and the silk screen.

The application process is almost the same as any other toner transfer PCB fabrication material. The printable vinyl stick is first adhered to a piece of paper before feeding it through a laser printer. It is acceptable to clean the vinyl with alcohol before printing if you think there may be a finger print or other oil on its surface. After printing it is carefully aligned with the board and ironed on.

[Mincior Vicentiu] thinks there are a few big benefits to this material. It seems that as you heat the toner it expands and hardens, but the vinyl actually softens to make room for this. We can imagine that this helps alleviate the smudging that sometimes occurs when ironing toner that is simply printed on paper. The other advantage is that the vinyl peels off quite easily after ironing, where as you need to soak paper in water and carefully massage it off of the toner.

[via Dangerous Prototypes]

Buzzed Buzzer Gives You A Breathalyzer Test While Ringing In The New Year

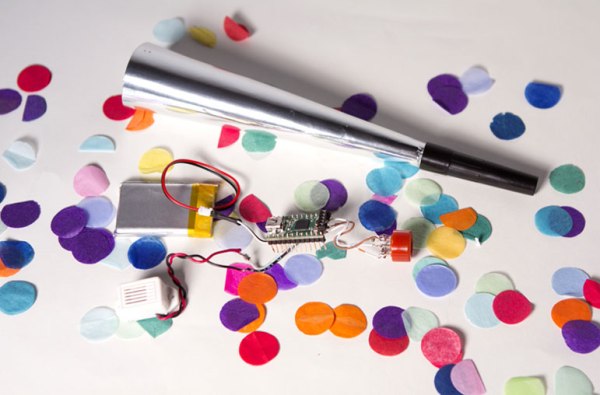
We’re not sure if there’s enough time to get a parts order delivered, but no geeky New Year’s party will be complete without a party buzzer that doubles as a Breathalyzer. The Buzzed Buzzer hides all of the necessary bits inside of a paper and plastic party favor. We guess it only buzzes if you’re over the limit? Actually that’s not the case at all. The accuracy of the sensor used in the project really just measures the presence of alcohol and can’t quantify BAC.

A Teensy 2.0 microcontroller board drives the project. Powered by a Lithium cell, it monitors an MQ-3 Alcohol gas sensor and drives a buzzer. The components are just small enough to be hidden by the cone of the party buzzer. You can see a demonstration of this in the short clip after the jump.

This is a fun project, but we’re still big fans of getting the crowd involved with this large LED meter which is hooked up to the same style of alcohol sensor.

Continue reading “Buzzed Buzzer Gives You A Breathalyzer Test While Ringing In The New Year”