Robotic Rat Torments And Depresses Real Rats

robotic-rat-torments-real-rats

Animal testing has always been a subject of much debate. On one hand, it allows us to determine if something is probably safe for humans. On the other hand, it’s injuring and killing the very animals that help us escape that same fate. Any way you look at it, be thankful you’re not a lab rat. Being a mammal, they share a similar physiology with us. They are also easy to breed and easy to dispose of. These characteristics make them the prime subject for testing the safety of drugs and treatments that might one day be used on humans. Scientists at Waseda University in Tokyo, Japan, have created a new rat nemesis – the WR-3, a robot designed specifically to stress and depress lab animals in the name of science.

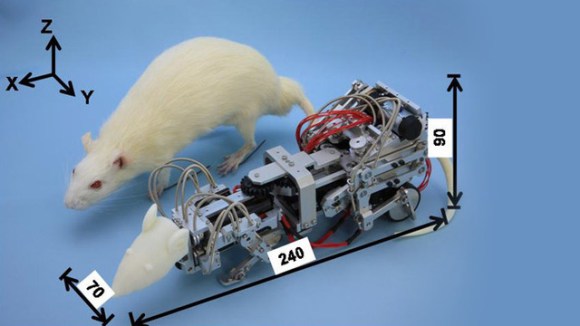
Depression isn’t normally something rats have to worry about in the wild. So, the WR-3 tries to instill it upon them. The robot has three functions: attacking continuously (relentlessly rams the victim), attacking interactively (attacks for 5 seconds whenever the victim moves, then stops), and chasing (stays right next to the victim but never attacks). The scientists found that the best way to make the rats depressed was to attack them continuously in their youth, then attack interactively as they get older.

With the data the scientists gain from these new experiments, they hope to learn more about human depression and hopefully come up with more successful treatments. There isn’t a lot of specific information we could find about the WR-3, but we’ll keep you posted.

[via Gizmodo]

UC Davis Students Build Coffee Can Radar Project Inspired By MIT

student-built-coffee-can-radar

Blinking lights is a lot of fun, but if you’re getting an EE degree the cool stuff becomes a bit more involved. In this case, building your own radar is the thing to do. Here’s a coffee can radar setup being shown off by a group of UC Davis students. Regular readers will recognize the concept as one we looked at in December. The project was inspired by the MIT OpenCourseware project.

One of the cans is being used as a transmitter, the other as the collector. The neat thing about this rig is that the analysis is performed on a PC, with the sound card as the collection device. The video after the break shows off the hardware as well as the results it collected. About a minute and a half into the clip they show a real-time demonstration where a student walks in front of the apparatus while another takes a video of the plot results. As the subject moves away from the receiver the computer graph changes accordingly. The rest of the video covers some operational theory and pcb assembly.

Continue reading “UC Davis Students Build Coffee Can Radar Project Inspired By MIT”

Temperature Controlled Wine Cellar Substitute

temperature-controlled-wine-cellar-substitute

Serious wine enthusiasts keep their bottles in a room built for the task. If you don’t have that kind of space you can still fabricate a similar storage environment. This foam box keeps stored wine at a controlled temperature. It also keeps light off of the precious goods. [Michael] built it himself to use in his apartment and published a description of the build process.

He picked up some foil-coated foam board from the home store. Six sections come together into a box about the size of a mini-fridge; 24″ by 24″. A square hole was cut in the center of the top section. This receives the smaller of two heat sinks mounted to a Peltier cooler. The temperature inside is monitored by a thermistor which [Michael] tore out of an old iPod battery. To give him some visual feedback on the internal temperature he added that yellow and black striped meat thermometer.

Since this is for long-term storage, we’d bet the system is rather efficient. As long as the door isn’t frequently opened the temperature change should be quite slow thanks to the insulation and the cool liquid in wine bottles.

Prototyping A Modular LED Matrix

led-matrix-modular-prototype

[Will] was toying with the idea of creating a scrolling LED marquee to display messages as his wedding in May. But you’ve got to crawl before you can walk so he decided to see what he could do with the MAX7219 LED driver chips. They do come in a DIP package, but the 24-pin 0.1″ pitch chip will end up being larger than the 8×8 LED modules he wanted to use. So he opted to go with a surface mount part and spun a PCB which makes the LEDs modular.

These drivers are great when you’re dealing with a lot of LEDs (like the motorcycle helmet of many blinking colors). Since they use SPI for communications it’s possible to chain the chips with a minimum of connections. [Will] designed his board to have a male header on one side and a female socket on the other. Not only does it make aligning and connecting each block simple, but it allows you to change your mind at any time about  which microcontroller to use to command them. For his first set of tests he plugged the male header into a breadboard and drove it with an Arduino. We hope to hear back from him with an update when gets the final device assembled in time for the big day.

Wireless Base Station Eavesdrops On Robot Communications

wireless-base-station-evesdrops-on-robot-communications

The good [Doctor Iguana] has been working on a pair of robots which communicate with each other using mRF24J40MA wireless transceivers. This presents a challenge in debugging, as he really didn’t have an easy way of monitoring those communications. His solution was to build his own base station which lets him use a computer to monitor what each robot is saying.

He spun his own board for the project. USB connectivity is provided by an FTDI chip, the FT232RL. This converts the USB communications in to serial for the dsPIC33 microcontroller. The FTDI chip comes with a fairly fine-pitch, but the footprint can still be fabricated using toner transfer if you’re fairly familiar with the process. [Dr. Iguana] took some close-up images of the unpopulated board which might make you a little nervous with the soldering iron. The other end of the board hosts the same Microchip wireless module as he used in his robots.

After a bit of rework (noted on the photo labels) he got this up and running. Now he can capture all of the wireless communications and see if problems are due to the sender or the receiver.

Hack Removes Firmware Crippling From NVIDIA Graphics Card

If hardware manufacturers want to keep their firmware crippling a secret, perhaps they shouldn’t mess with Linux users? We figure if you’re using Linux you’re quite a bit more likely than the average Windows user to crack something open and see what’s hidden inside. And so we get to the story of how [Gnif] figured out that the NVIDIA GTX690 can be hacked to perform like the Quadro K5000. The thing is, the latter costs nearly $800 more than the former!

[Gnif] wanted the card for gaming and to support multiple monitors. It has no problem driving up to three screens under Windows. But the Linux drivers only allow this on the professional counterpart to the GTX690, the Quadro K5000. It turns out that the card responds to a device ID as assigned by a series of analog values. These can be tweaked by swapping, yanking, or adding resistors in just the right places. As with that Agilent multimeter unlock of his which we saw a few days ago, he somehow managed to figure out the secret sauce that unlocks the power hidden in this card.

Heat Your House With Propane (but Not In The Way You’re Thinking)

geothermal-heat-pump-charged-with-propane

[Ralph Doncaster] has a geothermal heat pump which is responsible for providing heat for his home. He’s been looking into some hacks that would make it more efficient and decided that the freon (R-22) needed to be tweaked. Some would say the stuff is bad for the environment, so he decided to go a different route. He replaced the Freon with propane, using this rig to make the fuel-grade propane more like cooling-grade propane called r-290.

He purchased the gauge set which is used whenever a technician services an A/C system (but you can also see it in this other A/C propane hack). That’s important because it’s responsible for making sure the old coolant is recaptured (his hose failure nixed this part of the plan) and the new coolant goes where it should at the correct pressure. But before dumping in propane from the local hardware store he needs to dry it out. Fuel-grade propane can have moisture in it, which can be bad for the cooling system. He bought a drier device, the grey bulb seen above, and soldered it on one end to a propane torch fitting and to a valve connection on the other. Now he could remove moisture as he pressurized the system.

Everything is working again, and the cooling side of the system gets much colder. He plans to do more testing as time goes by.