How Fast Is Your Flash?

What’s cooler than learning about timers and interrupts on AVRs? Well, if you’re like [Matt], you can use that learning experience to build something useful – in this case, a timer for various camera flashes.

There are two ways to measure the speed of a flash. The first is the lag between when a button is pressed and when the flash goes off. As long as this is consistent, everything’s okay. The second type of speed is the pulse width. When looking at a xenon flash as time vs. brightness, they have a large spike at the beginning followed by a significant amount of decay. LED flashes are pretty much one cycle of a square wave.

To measure both types of flash speed, [Matt] used a $0.50 photodiode an a 3.5mm jack that ties into the flash remote. These bits are wired up to an Arduino, a little bit of fun work with timers and interrupts happens, and [Matt] learns how fast his flash is.

Nexus 7 Dash

Suburu Dash Mounted Nexus 7 Looks Like Stock

Nexus 7 tablets, being cheap and really quite decent for the price, have long since been used in the dashboards of people’s cars. Sometimes they’re mounted quite good — sometimes not so good — but every once in a while, someone gets it right.

Usually the reason mods like this don’t work out so well is because people are worried about damaging their car’s interior. But [tsubie320] had a better idea — buy a radio bezel off eBay to mess around with — that way he can always revert to stock when he sells the vehicle.

With a crisp-new-freshly-injection-molded-bezel in hand, he got to work. Funny enough, Nexus 7’s tend to be almost the exact size of double DIN stereo slots — hence their appeal. He wrapped the tablet in blue painter’s tape and positioned it in the bezel. Using fiberglass, he created a new shell for the tablet to sit inside of the bezel. Lots of sandpaper later and a whole bunch of bondo, he was done. Continue reading “Suburu Dash Mounted Nexus 7 Looks Like Stock”

Tubes On A Chip

The tubes you’ll find in guitar amps and high-end stereos were first designed in the 30s and 40s, and when you get to really, really advanced tube technology you’d be looking at extremely small tubes made in the 70s for military applications. For 40 years, there really haven’t been many advances in tube technology. Now, at last, there’s something new.

The Nutube 6P1, as this curious invention is called, is a full triode or half of a 12ax7 you’ll find in just about every tube amp ever. Unlike the 12ax7, it consumes 2% of the power required of a normal tube, is 30% of the size of the normal tube, and lasts for 30,000 hours.

This new tube-chip thing was brought to life by Korg, makers of fine musical equipment and Noritake Co., manufacturers of vacuum fluorescent displays. There’s no word on what these tubes will be used in and there’s no data sheet. There will be further announcements this year, so don your speculation spectacles and head to the comments.

[Mike] Shows Us How To Use An Armature Growler

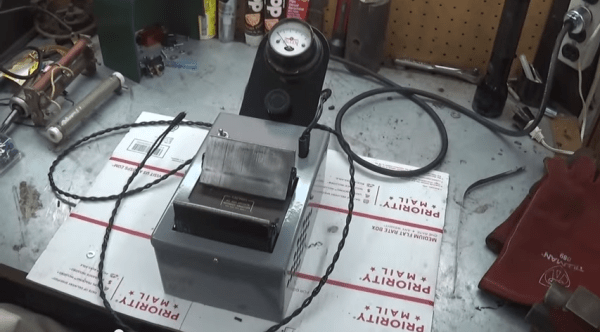
[Mike] has put up a great video  on his [SmallEngineMechanic] YouTube Channel about a tool we don’t see very often these days. He’s using an armature growler (YouTube link) to test the armature from a generator. Armature growlers (or just growlers for short) were commonplace years ago. Back when cars had generators, just about every auto mechanic had one on hand. They perform three simple tests: Check armature windings for shorts to other windings, for open windings, and for shorts to the armature body. [Mike’s] particular growler came to him as a basket case. The wiring was shot, it was rusty, and generally needed quite a bit of TLC. He restored it to like new condition, and uses it to help with his antique engine and genset addiction hobby.

Growlers essentially are a transformer primary with a V-shaped frame. The primary coil is connected to A/C mains. The armature to be tested sits in the “V” and through the magic of induction, some of the windings become the secondary coils (more on this later). This means some pretty high voltage will be exposed on commutator of the armature under test, so care should be taken when using one!

Testing for shorts to the ground or the core of the armature is a simple continuity test. Instead of a piezo beep though, a short will trigger the growler to turn on, which means the armature will jump a bit and everything will emit a loud A/C hum. It certainly makes testing more interesting!

Checking for open windings is a matter of energizing the growler’s coil, then probing pairs of contacts on the commutator.  Voltage induced in the windings is displayed on the growler’s meter. Open windings will show 0 volts. Not all the armature’s windings will be in the field of the growler at once – so fully testing the armature will mean rotating it several times, as [Mike] shows in his video.

The final test is for shorted coils. This is where things get pretty darn cool. The growler is switched on and a thin piece of ferrous metal – usually an old hacksaw blade, is run along the core of the armature. If a short exists, the hacksaw blade will vibrate against the core of the armature above the shorted windings. We’re not 100% clear on how the coupling between the growler’s primary and two windings causes the blade to vibrate, so feel free to chime in over in the comments to explain things.

Most commercial shops don’t troubleshoot armatures anymore, they just slap new parts in until everything works again. As such the growler isn’t as popular as it once was. Still, if you work with DC motors or generators, it’s a great tool to have around, and it’s operation is a pretty darn cool hack in itself.

Click past the break for [Mike’s] video!

Continue reading “[Mike] Shows Us How To Use An Armature Growler”

Get Serious With Amateur Radio; Design & Build A Single-Sideband Transceiver From Scratch Part 1

Amateur radio is the only hobby that offers its licensed operators the chance to legally design, build, and operate high power radio transceivers connected to unlimited antenna arrays for the purpose of communicating anywhere in the world. The most complicated part of this communication system is the single-sideband (SSB) high frequency (HF) transceiver. In reality, due to the proliferation of low-cost amateur equipment, there only exists a very small group of die-hards who actually design, build from scratch, and operate their own SSB transceivers. I am one of those die-hards, and in this post I will show you how to get started.

Continue reading “Get Serious With Amateur Radio; Design & Build A Single-Sideband Transceiver From Scratch Part 1”

Automated Etch-a-Sketch Re-Produces Famous Artwork

Unless you’re some incredibly gifted individual with more dexterity than a fighter jet pilot, making anything on a Etch-a-Sketch is hard. So [Evan] decided to motorize it, and cheat a little bit.

She’s using an Arduino Uno to control two stepper motors that she has bound to the Etch-a-Sketch knobs using a short piece of rubber tube and Gorilla Glue. She 3D printed some custom motor mounts to allow the motors to be positioned directly above the knobs, and a ULN2803 to switch the 12V required for the steppers.

After she had the hardware all setup, she coded a simple Python script to take in .PNGs and produce vector art to be sent through the Arduino. In case you’re wondering, an Etch-a-Sketch has approximately 550 x 370 pixels, or about 500 x 320 for the “safe zone”.

Due to the limitations of the Etch-a-Sketch, like its inability to stop writing, some images might require some editing before sending it off to your new Etch-a-Sketch printer.

Continue reading “Automated Etch-a-Sketch Re-Produces Famous Artwork”