Custom Media Center Maintains Look Of 70s Audio Components

Slotting a modern media center into an old stereo usually means adding Bluetooth and a Raspberry Pi to an amp or receiver, and maybe adding a few discrete connectors on the back panel. But this media center for a late-70s Braun hi-fi (translated) goes many steps beyond that — it fabricates a component that never existed.

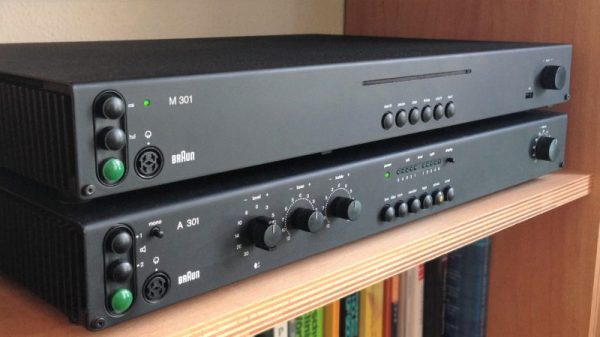
The article is in German, and the Google translation is a little spotty, but it’s pretty clear what [Sebastian Schwarzmeier] is going for here. The Braun Studio Line of audio components was pretty sleek, and to avoid disturbing the lines of his stack, he decided to create a completely new component and dub it the “M301.”

The gutted chassis of an existing but defunct A301 amplifier became the new home for a Mac Mini, Blu-Ray drive, and external hard drive. An HDMI port added to the back panel blends in with the original connectors seamlessly. But the breathtaking bit is a custom replacement hood that looks like what the Braun designers would have come up with if “media center” had been a term in the 70s.

From the brushed aluminum finish, to the controls, to the logo and lettering, everything about the component that never was shows an attention to detail that really impresses. But if you prefer racks of servers to racks of audio gear, this media center built into a server chassis is sure to please too.

Thanks to [Sascho] and [NoApple4Me] for the nearly simultaneous tips on this one.

Generator Monitor Gives The Phone Company The Boot

Part of the problem with having an alarm system is its reliance on land line telephone service. Some of them are getting away from this practice, but there are still many legacy systems out there that require a check to be sent in to Ma Bell every month in addition to the alarm system fees. Like these antiquated systems, [jgyates] was having a similar problem with the generator at his home which could only be monitored with a link to a cell network. Now that there’s a Raspberry Pi in every house, however, [jgyates] has a generator monitor that isn’t beholden to the phone company.

The hardware setup is little more than connecting the communications lines from the generator’s controller (in this case, a Generac Evolution controller) to the serial communications pins on a Raspberry Pi 3. [jgyates] did most of the work in Python, and his code is able to monitor almost every aspect of this generator and report it over WiFi or Ethernet, as well as control the generator settings from anywhere that has an Internet connection.

Even if you don’t have a generator with this particular controller, it will be a good guide for converting a monitor of any type into one that doesn’t require a land line or cell network connection. To that end, there have been lots of projects that convert even simple, old, analog household devices to report data over the LAN.

Hackaday Links: April 9, 2017

[Federico Musto], one of the Arduinos in the Arduino vs. Arduino saga (which finally came to an end last September) may have fabricated his academic record. This news comes from Wired, providing documents from the registrars at MIT and NYU stating [Musto] never attended these institutions. Since this story came out, [Musto] has edited his LinkedIn, listing his only academic credential as a kindergarten in Torino, Italy.

[shininglaser] built a tinnitus machine. What’s a tinnitus machine? It’s a device that, when activated, produces this sound: eeeeeeeeeeeeeeeeeeeeeeeeeeeeeeeeeeeeeeeeeeeeeeeeeeeeeeeeeeeeeeee. [shininglaser] built this tinnitus machine out of a pair of speakers, a cardboard box, a few batteries, and some sort of board with an epoxy-coated blob. We have no idea what the circuit looks like, but you could do this with any normal signal pulsing at around 15-18kHz (address pins on a CPU for bonus nerd cred) or a simple 555 timer.

This is a hackers bar. This bar in Roppongi, Tokyo is, “a place where you can enjoy live programming and business making…. The term ‘hacker’ is applied to someone who possesses top skills and knowledge to provide innovative and quick solutions even to the most difficult tasks.” It appears they have daily events/talks for JavaScript, Python, R, and Swift.

Captain Crunch needs our help. He’s facing some serious surgery, and even if it’s successful, there’s going to be a lot of stuff insurance doesn’t cover.

We can use Libreboot again. A few months ago, the Libreboot project left the GNU project after an issue with an employee at the Free Software Foundation. Hackaday chose not to report on this only because the accusations levied against the FSF were hearsay. I should emphasize this: the only reason we chose not to report on this is because the accusations were hearsay. Now the Libreboot project is under more democratic management and they’re working on the Thinkpad X220, the greatest Thinkpad of all time. Neat.

Here’s a quick and easy tip to get metal fume fever. Build a foundry out of a galvanized trash can! No, don’t worry about that galvanized coating, it’ll burn off. Oh, he’s doing this indoors. What’s carbon monoxide? Why am I sleepy?

Hackaday Prize Entry: Obsolete Time Lite

There are very few constants in the world of home-made electronics. Things that you might have found on the bench of a mid-1960s engineer working with germanium PNP transistors just as much as you might find on the bench of one in 2017 working on 32-bit microcontrollers. One of these constants is the humble Altoids tin. The ubiquitous mint container is as handy a size for the transistor circuits of previous decades as it is for the highly integrated circuits of today, and has become something of a standard form factor.

One thing you might not expect in an Altoids tin though is a vacuum tube, even one protruding through the lid. [opeRaptor] though has done just that, though, with a very nicely executed design for a NIXIE clock in your favorite mint container. We’re writing this up as a Hackaday Prize entry so at this stage in the competition the boards are still in design for the prototype, but the difficult power supply to make 180 V DC from a single cell is already proven to work, as it the clock circuitry. The final clock will be a very compact device given the size of the tin, and will contain an ESP8266 board for wireless network connectivity.

For a project at this early stage, there is frustratingly little real work to go on aside from some renders, but there is at least a video showing the PSU working driving a NIXIE, which we’ve put below the break.

Continue reading “Hackaday Prize Entry: Obsolete Time Lite”

Industrial Indicator Makes The Move From PLC To FPGA

Industrial controls are fun to use in a build because they’re just so — well, industrial. They’re chunky and built to take a beating, both from the operating environment and the users. They’re often power guzzlers, though, so knowing how to convert an industrial indicator for microcontroller use might be a handy skill to have.

Having decided that an Allen-Bradley cluster indicator worked with the aesthetic of his project, a Halloween prop of some sort, [Glen] set about dissecting the controls. Industrial indicators usually make that a simple task so that they can be configured for different voltages in the field, and it turned out that the easiest approach to replacing the power-hungry incandescent bulbs with LEDs was to build a tiny PCB to fit inside the four-color lens.

The uniquely shaped board ended up being too small for even series resistors for the LEDs, so a separate driver board was also fabbed. The driver board is set up to allow a single 5-volt supply and logic levels of 3.3-volt or 5-volt, making the indicator compatible with just about anything. The finished product lends a suitably sinister look to the prop.

If you’re not familiar with the programmable logic controllers such an indicator would be used with in the field, then maybe you should try running Pong on a PLC for a little background.

The Cubic Cyphercon Badge

Last week in Milwaukee was Cyphercon, Wisconsin’s premier hacker conference. You can’t do a hacker con without either an electronic conference badge or a 45 hanging off a lanyard, and the Cyphercon 2017 badge doesn’t disappoint. It’s an electronic cube, lovingly designed by the folks at tymkrs. It’s also a puzzle box with security holes and wireless communications. It’s a mesh network of badges, and one of the best conference badges we’ve ever seen.

The most obvious feature of the Cyphercon 2.0 badge is the extra dimension. From the outset, the design of this badge was a 3-dimensional cube, constructed out of beautifully crafted PCBs and soldered together at the edges. The techniques to bring PCBs into the third dimension are really nothing new — we’ve seen 3D PCBs before — but never at this kind of volume. There were over four hundred badges constructed for Cyphercon, and every single joint was hand-soldered. This is something your assembly house just won’t do, and I would hate to think about the poor solder monkeys that would be forced to assemble 3D badges for a larger con.

3D isn’t the only trick up the Cyphercon badge. There are cutouts in each side of the cube exposing LEDs, microprocessors, busses, and a single USB port. This USB port allows the wearer to recharge the battery, yes, but if you install a terminal emulator on your laptop and plug in the badge, you’re dropped into a world of mystery, intrigue, and suffocation. This badge is a text adventure game, with the goal of a game to reassemble a relay-based computer from parts scrounged from around a missile silo. Once the relay computer is complete, the badge turns into an emulator for a vintage time-sharing operating system. In this OS, you’re able to write code and deploy it to other badges. This is seriously impressive stuff.

Between the cubic Cyphercon badge, the Hunter S. Rodriguez badge heading to Vegas this summer, and badges that are Nintendo emulators, this is looking like a great year for electronic conference badges. The artistry and skill here is amazing, and we can’t wait to see what else the community will come up with.

Below, you can check out a few videos on the Cypbercon badge. [Wire]’s explanation of how the badge was created over the last nine months is in there, as is the Cyphercon badge panel talk.

Continue reading “The Cubic Cyphercon Badge”

Shoelace Locks Keep Your Fancy Footwear Firmly Attached

Remember the 1980s, when velcro sneakers were the hip new thing? (Incidentally, VELCRO® is a registered trademark for VELCRO® brank hook-and-loop fasteners but we use it here as a general term for the fastening technology). Only the coolest kids in school had a fresh pair of Zips. Velcro left a bit to be desired though. The hooks and loops would wear out, and the sneakers always seemed to pop apart at the worst possible moments — like when running or jumping. These days, velcro seems to be relegated to the elderly, which gives it the stigma of “old people shoes”.

So what is an aspiring hacker to do, just tie their shoelaces like a simple plebe? [Pentland_Designs] has the answer with his shoelace locks. The design is his take on the classic plastic clip found on backpacks and jackets. [Pentland_Designs] has added a twist though — a “button” which flexes a plastic ring, releasing the main body of the clip. This means the user doesn’t have to bend down when taking off their shoes. This isn’t just good for folks with disabilities. Anyone with back problems will tell you that avoiding a couple of deep bends at the end of the day helps a lot.

Check out the video of [Pentland_Designs] Shoelace locks after the break. For more shoe-tech, check out these LEGO self-lacing shoes, or this teardown of Nike’s self-lacing offering.

Continue reading “Shoelace Locks Keep Your Fancy Footwear Firmly Attached”