DIP Switch Adjusted Voltage Regulator

dip-settable-variable-supply

It couldn’t be simpler but you have to admit that a small adjustable portable power supply like this one will be really handy.

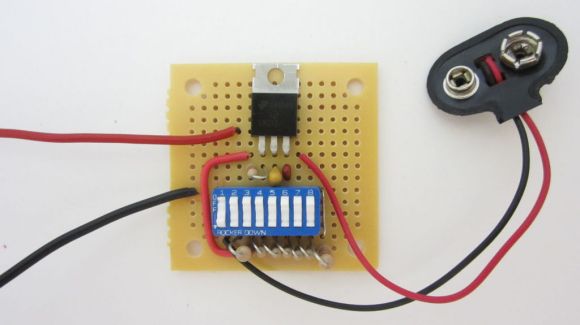
The main part of the PSU is an LM317 linear voltage regulator which we’re already familiar with. The output voltage is adjustable based on a voltage divider between two of the pins. The set of eight DIP switches allows you to tweak that voltage divider. Switch number one connects the 9-volt battery connector to the regulator, serving as a power switch. Each of the other seven switches adjusts the output voltage by 1.5 volts. The output of the regulator connects to your target device using alligator clips which are not in frame above.

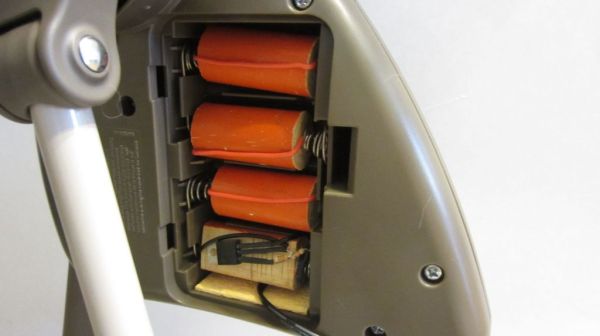
[Jason] says he takes this with him when thrift store hunting for cheap electronics. It can mimic most combinations of Alkaline cells letting you power up electronic toys to ensure they work. But we would find it equally useful for getting that early prototype away from the bench supply for testing before finalizing a dedicated portable supply.

Continue reading “DIP Switch Adjusted Voltage Regulator”

Dummy Batteries Let You Use An AC Adapter

We find it frustrating when battery operated consumer electronics don’t include a way to connect an external power supply. We try not to purchase disposable alkaline cells if we can avoid it, and this dummy battery AC adapter hack will aid in our mission.

The battery compartment shown above is for a motorized baby swing. It accepts C sized batteries (who has those just lying around?) and lacks a barrel jack to connect a wall wart adapter. [Jason Smith] mentions you can get around this by connecting your positive and ground wires directly to the conductor springs. But using a dummy battery makes it a bit easier to remove the adapter if you do want to use battery power.

Each of the orange dummy is a wooden dowel with a screw at each end. The screws are connected with a piece of jumper wire, shorting the two terminals. This completes the circuit in the battery compartment and allows him to power everything from the adapter cell at the bottom. The adapter uses an LM317 adjustable voltage linear regulator. He used fixed resistor values to dial in his target voltage. The equipment should be rather forgiving as battery voltage starts higher than the printed value and drops as the cells are used up.

This technique has been around for a long time. One of our favorites was a hack that converted an Apple Magic Trackpad to USB power.

Continue reading “Dummy Batteries Let You Use An AC Adapter”

Hackaday Links: November 4, 2012

Wait, you’re using a Dremel to cut PCBs?

Cutting copper-clad board or – horrors – depanelizing PCBs is a pain if you don’t have the right tool. Over at Hub City Labs they’re using a small, cheap metal shear & break. Bonus: it can cut and bend sheet metal, so the Hub City folks can also make enclosures.

Color Codes? Yes, Color Codes.

[Joe] sent in a cool utility he whipped up called resisto.rs. Plug in a resistor value, and it’ll spit out the 4-band, 5-band, and surface mount labels for that resistor value. Pretty neat.

Parallel Ports

Parallel ports may be a dying breed, but that didn’t stop [Electroalek] from putting together a VU meter that connects to his LPT port. It’s an extremely simple design; just connect some LEDs and resistors to the pins of a parallel port, and you can easily control them via software on a computer. Playing around with an LPT port used to be common knowledge, so we’re glad to see [Electroalek]’s work here.

The power is out, but Radio Shack is still open

[Jason] is stuck in New Jersey without power and needed a way to charge his phone. He whipped up a cell phone charger using an RC car battery and an LM317 voltage regulator. It’s an easy circuit to piece together, and judging from [Jason]’s picture will hopefully keep his cell phone charged until the power comes back on.

Shooting 50 Nerf darts all at once

If [Rob]’s project log is to be believed, it looks like they’re having a lot of fun over in the Sparkfun warehouse. They decided to have a full-scale Nerf gun war for a summer intern’s last day. [Rob] came up with a DIY Nerf shotgun that shoots 50 darts across the room, just waiting to be found sometime in the next decade.

There’s a great video of [Rob] firing the single barrel (yeah, they made a trident-shaped one as well) gun at well prepared but unsuspecting coworkers. Be sure to check out the comments of this post to see Hackaday readers frothing at the mouth because PVC pipe isn’t a pressure vessel guys. You’ll all surely die.

Convert A Speaker To A Battery-powered Amplifying Party Box

[Matt the Gamer] loved his pair of Minimus 7 bookshelf speakers. That is until a tragic hacking accident burned out the driver and left him with a speaker-shaped paper weight. But the defunct audio hardware has been given new life as a single portable powered speaker. Now he can grab it and go, knowing that it contains everything he needs to play back audio from a phone or iPod.

The most surprising part of the build is the battery. [Matt] went with a sealed lead-acid battery. It just barely fits through the hole for the larger speaker, and provides 12V with 1.2 mAh of capacity. He uses an 18V laptop power supply when charging the battery. The PSU is just the source, his own circuit board handles the charging via an LM317 voltage regulator. Also on the board is an amplifier built around a TDA2003A chip. He added a back panel which hosts connections for the charger and the audio input. Two switches allow the speaker to be turned on and off, and select between battery mode and charging mode. As a final touch he added a power indicator LED to the front, and a drawer pull as a carrying handle.

Ambilight Clone Built From Arduino And ShiftBrite Modules

[Don] put together a guide that will help you build your own Ambilight Clone for about $40 plus the cost of an Arduino. He’s using it with the HTPC seen above, and utilized modular concepts in building it so that you can easily disconnect your Arduino board when you want to use it for prototyping.

For RGB light sources [Don] grabbed six ShiftBrite modules. These are fully addressable cascading modules which make for very easy hardware setup. Instead of buying a driver shield he built his own using an LM317, heat sink, and wall wart to source enough current to drive all of the modules.

We really enjoy the mounting scheme used. Each module is attached to a piece of acrylic which is then mounted using the standard threaded VESA mounting holes on the back of the monitor. As with other Ambilight clones this one uses the Boblight package to get color information from the video as it plays.

Power Up With Knowledge

The LM317 is a favorite for many people who want quick, cheap, reliable and ajustable power. It only takes a few parts to set up and it does its job rather well. Sometimes though, you just need a power supply.While there are a million tutorials out there, not many go as in depth as [Phil] does in his 2 newest videos.

Covering everything from the wall outlet to the final output, [Phil] explains each part step by step, stating what it does and the math and formulas behind it all to produce quality results. He then goes over to a working model and reviews each part showing its real output on a oscilloscope, which is very handy if you do not have one yourself.

In the second video he takes that knowledge and builds it all up into a professional looking bench top model with LCD meter readout and varnished paper to complete the front look. If you’re looking to build your first bench supply or want a better grasp on what exactly is happening in the one you have now, you should join us after the break for these 2 quality productions.

Continue reading “Power Up With Knowledge”

Birthday Gift Is A Constant Reminder Of Impending AARP Membership

birthday_countdown_timer

Sometimes milestone birthdays can be a bit depressing. 30 is rough, and 40 tougher – but 50…that’s a big one!

[Ryan’s] uncle is going to be turning 50 shortly, and in the interest of good-natured fun, he has constructed a handy birthday countdown timer for his uncle, lest he forget (or tries to avoid) the big day.

The device displays the amount of time left before his uncle’s birthday, playing an audio clip of “Don’t fear the Reaper” when the clock strikes 00:00. This is accomplished by using the MSP430’s internal clock to keep time, while also interfacing with a Nokia 3310 LCD panel to display the countdown timer. The music is provided by the circuit board from a greeting card he gutted for the project, which was wired to the LaunchPad in order to be triggered at the right moment. Everything was crammed inside an Altoids tin, as you can see in the picture above.

Though not overly complicated, it’s a fun little project, and we’re hoping his uncle gets a big kick out of it. Once his birthday has come and gone, [Ryan] plans on converting the piece into a permanent desktop clock for his uncle.