MSP430-based Wristwatch Project

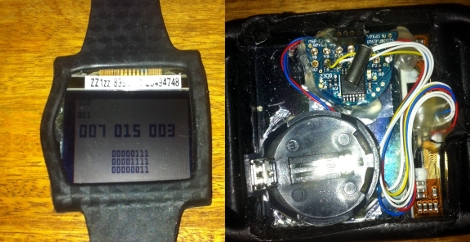
[Nav] is working on a scratch-built wristwatch. Although it is based on an MSP430 microcontroller, it’s not the ready-to-hack ezCronos that you might be thinking of. Instead, [Nav] started with a different TI development tool that we’ve looked at before, the ez430-F2013.

The breakout board for the F2013 is small enough to meet his needs, but still provides easy soldering with 0.1″ vias that break out each pin. To make sure the timepiece is accurate he added a 32.768 kHz clock crystal. A small, square, LCD screen acts as the face of the watch, but we didn’t find specific part information for the display.

Currently the watch can run for a few days on the CR2032. We’d bet some work with sleep modes for the microcontroller can help with that. The watch has a couple of buttons that let you control it, and [Nav] discovered that he could fit everything into the watch case for an iPod nano. That’s creative!

We’ve seen other hacks with tiny batteries. The next logical step here would be to swap out the disposable coin cell for something that can be topped off with an external charger.

Hackaday Links: September 28, 2011

Disposable coffee maker

[Sepehr] didn’t have a coffee maker, and the local coffee shops were all out of joe. He got his fix by making a drip coffee maker out of disposable cups and knives.

Flexible braille display

Thin film technology is being developed to help the visually impaired. This flexible OLED display has embedded muscle cells which create a braille display. [Thanks Aaron]

Printable iPhone tripod mount

Looking to make those iPhone videos a little more stable, and the pictures a little less blurry? Try out this printable tripod mount that [Chris] came up with.

Arduino macro photos

Speaking of photographs, [Daniel] wrote in to share some macro pictures he took of an Arduino. They’re sure to be of interest to those readers who love everything Arduino.

Carpeting a mouse

Add a unique texture to your mouse by covering part of the body with fabric. The lower half of the mouse case above is covered in a carpet-like material [translated]. [Thanks Clicker]

Ambilight Clone Built From Arduino And ShiftBrite Modules

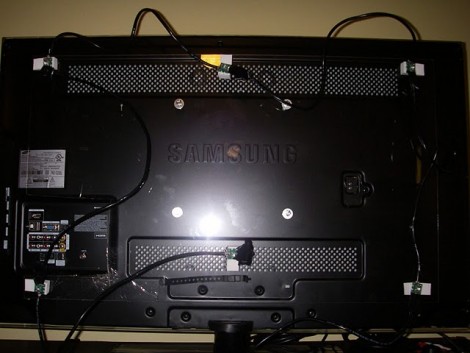
[Don] put together a guide that will help you build your own Ambilight Clone for about $40 plus the cost of an Arduino. He’s using it with the HTPC seen above, and utilized modular concepts in building it so that you can easily disconnect your Arduino board when you want to use it for prototyping.

For RGB light sources [Don] grabbed six ShiftBrite modules. These are fully addressable cascading modules which make for very easy hardware setup. Instead of buying a driver shield he built his own using an LM317, heat sink, and wall wart to source enough current to drive all of the modules.

We really enjoy the mounting scheme used. Each module is attached to a piece of acrylic which is then mounted using the standard threaded VESA mounting holes on the back of the monitor. As with other Ambilight clones this one uses the Boblight package to get color information from the video as it plays.

Which Resistor Values Should You Order For All Circumstances?

A hard drive crash, and some other happenings that aren’t entirely clear to us, led [Devbisme] to put in a parts order. As he wanted to make the most of his shipping costs, he decided to fill out the order with parts that he’ll use eventually. He’s been working with surface mount designs and wanted to move from using resistors with 0805 packages to the 0603. Having nothing on hand, he devised a way to account for almost all standard values with the fewest number of different resistors.

That’s a mouthful, but what he actually did was figure out what combinations of resistors can best be wired in parallel to achieve a different standard resistance value. This way, if he doesn’t have a specific value he can solder one 0603 surface mount resistor on top of another one to get there. He ended up writing a Python program to best calculate this set of values. It came up with a set that lets him synthesize 159 of the 168 standard resistor values within +/- 4% using just 19 actual resistor values. His method requires anywhere from one to three resistors to get to each value. Soldering three 0603 packages on top of each other might not be the most fun, but it makes for easy parts inventory management.

Sustainability Hacks: Solar Battery/smartphone Charger

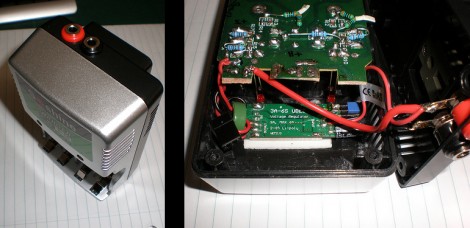
[Michael] took a battery charger meant to be connected to mains power and converted it to work with a solar panel. This was a traditional 4 cell charger which charges the batteries in pairs. He kept that functionality, but added USB charging with a special over-current feature. That’s because his Android phone has a fast and slow USB charging mode. The slow mode makes sure that it draws 500 mA or less to stay within USB specifications. But the fast mode draws more current when the phone detects that the USB connection is attached to a wall charger. [Michael] added a switch that patches a pull-up resistor to the data line, signaling to the phone that it’s okay to switch to fast charging mode.

As for the power supply itself, you can see that [Michael] snapped off the part of the circuit board that housed the original regulator. He’s added his own 5V switching regulator which offers a wide input voltage range. This is connected to two banana plug sockets which can be connected to the solar panel.

Making A Simple Addressable Array From LED Strips

led_array_from_led_strips

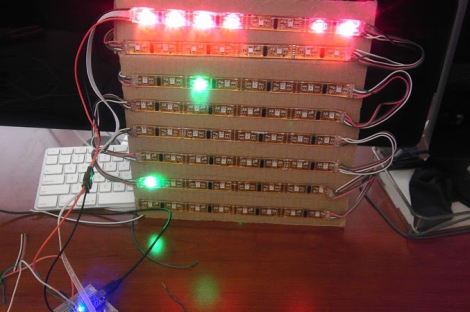
[Patrick] was prepping for some future projects he had in mind, for which he will need a simple 2D array of addressable LEDs. While it is certainly possible for him to build his own LED array and control hardware, he thought he would try out some off the shelf products to see if something might fit his needs.

He picked up a strip of addressable RGB LEDs from Adafruit, and while they worked very well, they were a bit too pricey for the amount of LEDs he knew he would need. He picked up a strip of similar LEDs without PWM capabilities built-in, and gave those a spin – they worked well enough, so he got to work building his LED array.

While LED strips might not jump right out as the best way to make an LED array, they can be easily cut and rearranged without any issue, provided you solder in a couple of wires to connect the disjointed strips. [Patrick] did just that, and wrote a small Arduino library that allows for easy control of the grid.

We’re not sure if he plans on scaling these arrays any larger than 8×8, but we are definitely interested to see what he has in store for them.

Check out a quick video of his LED array in action below.

Continue reading “Making A Simple Addressable Array From LED Strips”