Wet Spill Vacuum Cleaner Attachment

wet-spill-vacuum-attachment

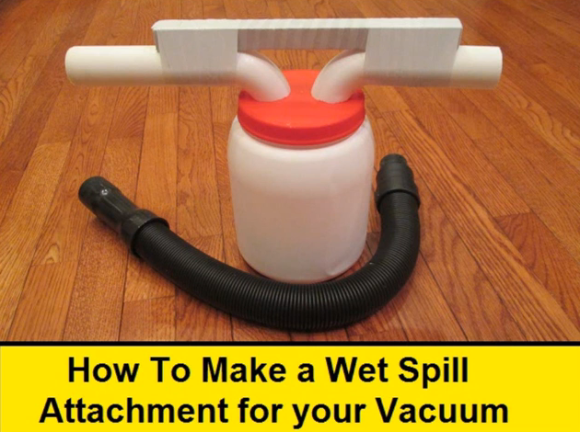
You’ve got to hand it to [Lou], not only does he know how to build simple items, he also knows how to sell their worth. Here’s a wet spill vacuum cleaner attachment which you can build on the cheap. A picture of the final product fails to have the same impact as his video showing its use in cleaning up a simulated cat disgorging from the carpet.

From the picture we’re sure you’ve already figured out how it work. The air and damp matter come in one side and are dropped into the jar as the air is sucked out the other. [Lou] suggests raiding your recycling bin for the jar. The intake and outflow are both pieces from a PVC P-trap intended for a sink drain. They have a threaded flange which keeps the part from pulling all the way through the 1.5″ holes drilled in the lid.

This is going to work best with a high-flow shop vacuum. So while you’ve got the tools out, why not build a dust separator as well?

Continue reading “Wet Spill Vacuum Cleaner Attachment”

Heading To New York To Judge The RedBull Creation Contest!

We had a ridiculous amount of fun last year in the RedBull Creation Contest. This year, however, we’re not participating as competitors, we’re judging! I will be there representing Hackaday as a judge as well as getting behind the scenes coverage. Sometimes the best stuff gets missed when all you get is the highlight reel.

The format this year is returning to what it was in 2011. The 6 teams will meet in New York this weekend to compete in a 72 hour build off. I can’t wait to see what they’re going to come up with.  You can see what each team did to get into this stage in the video above.

I’ll be recording video during the event so you can follow along. I’ll try really hard to give a real view of what an amazing event like this is like. I imagine it will be a whirlwind of activity, so I’ll do my best to capture it.

Beck’s Beer Bottle Sound Recording

This beer bottle includes recorded audio etched into the glass. But you certainly won’t find half an album included with your next sixer. This is a one of a kind item that took a team of engineers to craft.

The idea comes from Phonographic Cylinders invented by [Thomas Edison]. Analog audio was etched into cylinders made of wax which could then be played by a needle and amplifying horn. The beer bottle is a similar size of cylinder, but etching the audio signal into glass is a horse of a different color. The video below includes a recounting of the development process from the guys who pulled it off. It includes using hard drive parts and special processing filters that remove harmonics introduced by the milling rig.

We’re sure you’ve figured it out by now; this is an advertisement. We say good! This is the kind of advertising we want. It’s topical, well targeted, and worth paying attention to. We felt the same way about the recent Oreo campaign and that Skittles hack. We hope that ad execs will take note of this.

By the way, it is possible to do this stuff at home. Check out the guy who made an Edison Cylinder wedding ring.

Continue reading “Beck’s Beer Bottle Sound Recording”

Upgrading A Hackerspace’s Shelving

shelving

Shelving is probably one of the most underappreciated items in the shop. Think about it; would you rather have a place to store boxes, or a fancy new thickness planer, laser cutter, or pick and place machine. The folks over at the 23B hackerspace were growing tired of their disintegrating Ikea shelving unit and decided to make some shelves. They didn’t phone this one in, either: these shelves will be around far longer than you or I.

[Chris], the creator of these wonderfully useful pieces of metal, was inspired by a video featuring [Jamie Hyneman] of Mythbusters fame. An entire 80 foot section of M5 Industries, [Jamie]’s shop, is covered in shelving units constructed out of square steel tubing, put together in a way that’s easy to construct and able to handle amazing amounts of random stuff.

The new shelves for the 23B shop follow a similar design as the shelves over at M5, only a bit smaller in scale. It’s a wonderful beginner’s project for a welding and fabrication class, and more than sturdy enough to handle a few pull-ups.

Dummy Batteries Let You Use An AC Adapter

We find it frustrating when battery operated consumer electronics don’t include a way to connect an external power supply. We try not to purchase disposable alkaline cells if we can avoid it, and this dummy battery AC adapter hack will aid in our mission.

The battery compartment shown above is for a motorized baby swing. It accepts C sized batteries (who has those just lying around?) and lacks a barrel jack to connect a wall wart adapter. [Jason Smith] mentions you can get around this by connecting your positive and ground wires directly to the conductor springs. But using a dummy battery makes it a bit easier to remove the adapter if you do want to use battery power.

Each of the orange dummy is a wooden dowel with a screw at each end. The screws are connected with a piece of jumper wire, shorting the two terminals. This completes the circuit in the battery compartment and allows him to power everything from the adapter cell at the bottom. The adapter uses an LM317 adjustable voltage linear regulator. He used fixed resistor values to dial in his target voltage. The equipment should be rather forgiving as battery voltage starts higher than the printed value and drops as the cells are used up.

This technique has been around for a long time. One of our favorites was a hack that converted an Apple Magic Trackpad to USB power.

Continue reading “Dummy Batteries Let You Use An AC Adapter”

AuPod, The Solid Gold IPod Nano Watch

aupod


The 6th generation iPod nano makes a wonderful watch, but something milled out of aluminum doesn’t lend itself to more formal events. [Ted] liked the idea of an iPod nano watch, but wanted to kick things up a notch and fabricate an 18k gold iPod nano. It took 500 hours and $2500 in materials, but we’d say it’s worth it.

The new 18k gold enclosure for the watch was fabricated using the lost wax casting method. First, all the electronics and buttons were removed from the iPod, then a negative mold was made in silicone rubber. A positive wax mold was made with the silicon mold, and finally another negative mold – this time in plaster – was made by vaporizing the positive wax mold in a furnace.

[Ted] used two one-ounce coins as the source of gold for his nano enclosure, spun into the plaster mold. From there, it’s just a simple but tedious matter of cutting the sprues off, shaping, filing, buffing, and polishing. With a new leather strap, the iPod is reassembled in its new enclosure.

Wonderful work, and amazingly impressive from someone who doesn’t consider himself a jeweler.

Building A Strandbeest

flexing-jansen-mechanism

[Jeremy] may have given up on his big hexapod project, but that doesn’t mean he’s out of the world of legged robots just yet. He’s embarked on another project, much more elegant and beautiful than a simple hexapod. This time, he’s building a Strandbeest, the same machine designed by walking machine extraordinaire [Theo Jansen].

Coming up with the correct lengths and joints of a Strandbeest leg linkage isn’t something you can just pull out of your head, so after [Jeremy] found the inspiration for his new project he dug into the related literature on Strandbeest legs. He found the work of [Dominique Studer] and set to work making his own mechanical legs.

Right now, [Jeremy] has a prototype of the Strandbeest leg linkage made out of wood. It still needs a little bit of work, but soon enough there will be a PVC pipe Mountainbeest trolling the backwoods near [Jeremy]’s house.

Continue reading “Building A Strandbeest”