Ground Effect Aerodynamics On An RC Car

Ground effect aerodynamics will return to Formula 1 in a big way in the 2022 season, hopefully washing away the bad taste left in fan’s mouths after the recent controversial season decider. [Engineering After Hours] has experimented with F1 aerodynamics on RC cars before, and decided that it was time to try and implement a proper ground-effect design himself.

The aim of ground effect aerodynamics is to create a constriction for airflow between the bottom of the car and the ground underneath. This constriction accelerates the flow beneath the car, and as per Bernoulli’s principle, causes a corresponding pressure drop, sucking the car down onto the track. Viscosity also plays a role; from the car’s perspective, the road beneath the vehicle is moving backwards at some speed, pulling on the fluid thanks to the boundary layer on the ground itself. This further helps increase the strength of the effect.

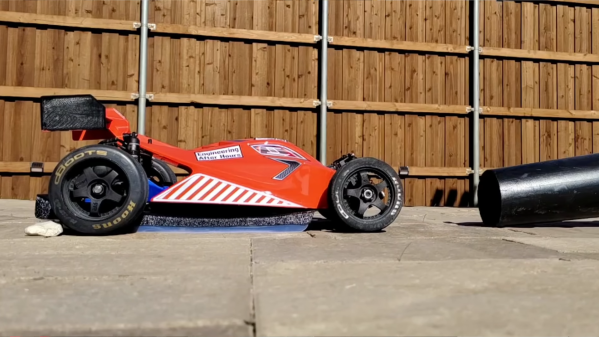
A vacuum-formed undertray complete with side skirts was installed on the RC car in order to generate ground effect downforce. A quick test with a leaf blower indicates the system works, and that the side skirts are a key component.

Lateral acceleration was significantly improved by around 20% in testing with the ground effects installed, though [Engineering After Hours] admits that without a wind tunnel, the results aren’t the most scientific. However, with the undertray being relatively lightweight, we suspect the aero elements are likely providing plenty of benefit without too much of a negative effect on acceleration or handling.

Check out some of the other aero experiments [Engineering After Hours] has undertaken, too. Video after the break. Continue reading “Ground Effect Aerodynamics On An RC Car”

RC Sub Built With A Water Bottle

Submarines are one of the harder modes of transport to build in radio-controlled form. Doing so involves tangling with sealing electronics from water ingress and finding a way to control the thing underwater. It’s a challenge, but one relished by [Project Air] in his latest build.

The body of the sub was built from a drink bottle, serving as a stout container upon which could be mounted all the necessary hardware. Filling the bottle with water allowed buoyancy to be adjusted to a neutral level. Twin brushless motors were used for drive, while servos were waterproofed using a combination of rubber gaskets, olive oil, and sealing spray.

Control was via a floating 2.4 GHz receiver, as high-frequency radio signals don’t penetrate water very far. The floating box also carries an FPV transmitter to allow the sub to be piloted via video feed. Rather than using a ballast system, the sub instead dynamically dives by thrusting itself beneath the water’s surface.

Unfortunately, water sloshing around in the partially-filled drink bottle meant controlling the sub in pitch was virtually impossible. To fix this, [Project Air] filled the bottle completely, and then used some plugged syringes on the outside of the body to adjust buoyancy. The long heavy tether was also replaced with a much shorter one, and the sub became much more fun to drive around under water.

The build was actually built for a friendly contest with [DIY Perks], a fellow Youtuber whose efforts we covered recently. It also bears noting that better results can be had by using lower-frequency radio gear. Video after the break.

Continue reading “RC Sub Built With A Water Bottle”

Build Your Own Submarine

If you are tried of building things that fly, why not try a submarine like [DIYPerks] did? As you can see in the video below, the key is to control buoyancy, and the mechanism used is impressive. The sub has two giant syringes fore and aft to compress or decompress water. The plungers are now 3D-printed actuators that travel on a lead screw. Two high-torque motors and some batteries sandwiched in acrylic disks make up the rest. This is a big vessel — you won’t be trying this in your bathtub and maybe not even your pool unless it is a big one.

Of course, everything needs to be watertight. Instead of trying to waterproof a power switch, this sub uses a reed switch so that a nearby magnet can turn it on. Not an original idea, but we always think it is more elegant than seals and potting compounds.

Continue reading “Build Your Own Submarine”

A Guide To Designing A Custom RC Controller

These days, there are tons of RC controllers out there of all shapes and sizes. However, if you want to build something with just the right amount of buttons and sticks for your application, you might want to design something yourself. That’s precisely what [Sebastian] did. 

The project actually began some time ago, with [Sebastian] sharing his process for building a custom ergonomic enclosure through the use of clay and photogrammetry, which we’ve covered before.

Inside that shapely housing, the build relies on a STM32 microcontroller, hooked up to a series of potentiometers, buttons, and a thumbstick (more potentiometers). A NRF24L01 module is used to handle the radio transmission side of things.

Overall, [Sebastian] has produced a great guide to designing a custom RC controller from the ground up, rather than simply instructing one how to replicate his own build. Armed with these skills, any maker should be able to whip up their own entirely bespoke controllers. Video after the break.

Continue reading “A Guide To Designing A Custom RC Controller”

When Benchies Fly

Most of us have printed a few benchies to test our 3D printers. The intrepid little boat has a variety of features that tax different parts of the printing process. However, the guys at [FliteTest] had a different idea. They set out in a competition to build a giant flying benchie. They aren’t quite done, but they did make some interesting progress, as you can see in the video below.

In all fairness, the benchies are not, themselves, 3D printed. Foamboard, however, is a bit more practical.  Inevitably, you can’t help but think of a flying boat when you see the results.

Continue reading “When Benchies Fly”

You Can 3D Print Your Own RC Motorbikes

Radio control cars have been a popular toy for decades, but their motorcycle counterparts have always lagged behind due to balance issues and compromised agility. At the same time, a little toy motorbike can be mesmerizing in action. [brettt3] built a few of his own design that look remarkably fun to play with.

Modeled after the Ducati Draxter and Suzuki GSX-RR, the 3D printed bodies do a great job of aping their full-size counterparts. With a lick of paint and some finer touches, these could be absolutely exquisite, but they look awesome in the bare plastic nonetheless. The bikes use a belt drive to deliver power from a motor in the body to the rear wheel. To keep them upright, a weighted front wheel is used as a passive gyroscope for stabilization.

But the finest touch is arguably the rider which sits atop each motorcycle. Articulated and with hands resting on the handlebars, the rider moves with the steering of the bike, creating an eerie realism that we can’t get enough of. There’s even a tiny micro-servo in the head which allows the rider to swivel and look in the direction of motion as you’d expect.

Files are available for those wishing to recreate these designs at home. Alternatively, dive deeper into gyro-stabilised designs to learn more about how it all works. Video after the break.

Continue reading “You Can 3D Print Your Own RC Motorbikes”

helicopter

Re-Engineering An RC Helicopter Via Tinkercad

Radio control toys can be great fun to play with. However, at the bottom end of the market, sometimes you find you’ve bought something that just doesn’t work quite right. [saulemmetquinn] found that with a cheap RC helicopter, and set about re-engineering the design in Tinkercad.

The entire frame of the original helicopter was discarded, replaced with one made out of CAD-designed and 3D printed components. The end result is far lighter and less cumbersome than the original design, while also managing to look a lot more like an actual helicopter. It also served to correct some of the problems which [saulemmetquinn] stated made the original toy difficult to fly.

Assembling your own tiny helicopter motors and mechanisms would be quite difficult, and time consuming. [saulemmetquinn] was instead able to leverage the good parts of the original design, and build something better from that. It’s very much the essence of hacking, right there.

We’ve seen other toy helicopters hacked too, like the famous Syma S107G. If you’ve got your own tiny flying hacks, be sure to drop us a line.