Voja’s EEPROM Emulator From 1991

We’re glad we’re not the only hacker-packrats out there! [Voja Antonic] recently stumbled on an EPROM emulator that he’d made way back in 1991. It’s a sweet build, so take your mind back 25 years if you can. Put on “Nevermind” and dig into a nicely done retro project.

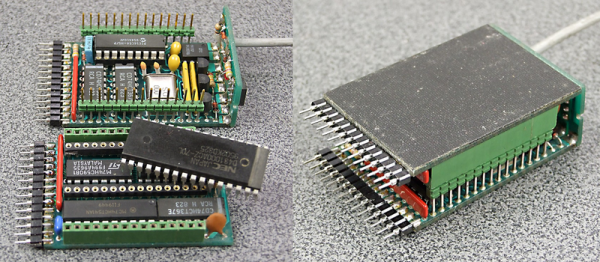
The emulator is basically a PIC 16C54 microcontroller and some memory, with some buffers for input and output. On one side, it’s a plug-in replacement for an EPROM — the flash memory of a bygone era. On the other side, it connects via serial port to a PC. Instead of going through the tedious process of pulling the EPROM, erasing and reprogramming it, this device uploads new code in a jiffy.

722351466362213815

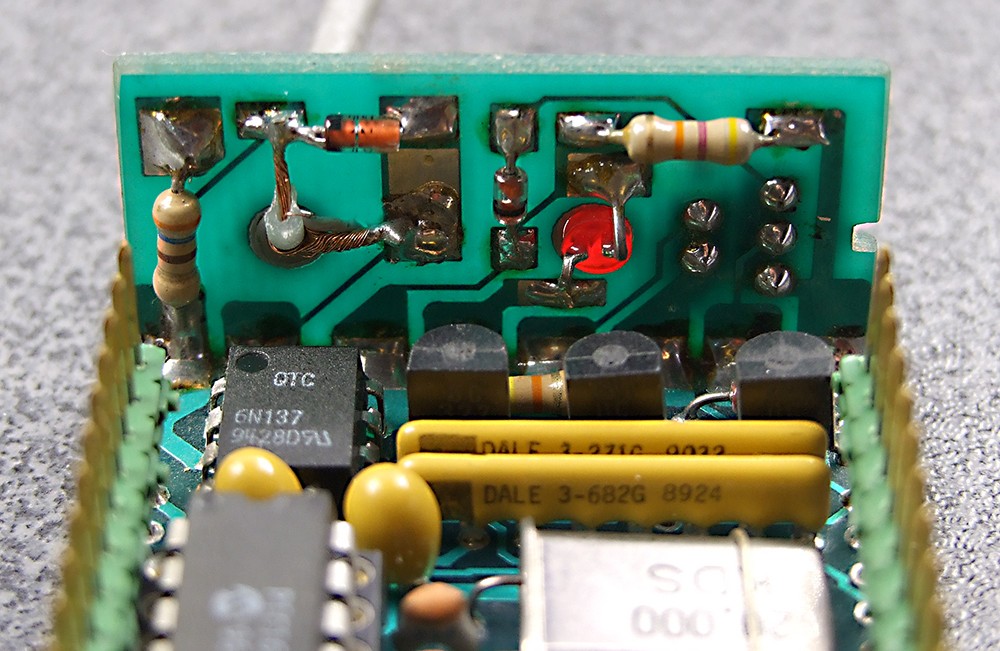
No need to emulate ancient EPROMS? You should still check out this build — the mechanics are great! We love the serial-port backplane that is soldered on at a 90° angle. The joint is a card-edge connector electrically, but also into a nice little box, reminiscent of [Voja]’s other FR4 fabrication tricks. The drilled hole with the LED poking out is classy. We’re never going to make an EPROM emulator, but we’re absolutely going to steal some of the fabrication techniques.

[Voja] is a Hackaday contributor, badge-designer, mad hacker, inspired clock-builder, and developer of (then) Yugoslavia’s first DIY PC.

How To Design, Manufacture, And Document A Hardware Product

It’s pretty awesome to have a hardware design hero jump at the chance to work on a Hackaday conference badge. I am of course talking about Voja Antonic.

I’ve gotten to know him over the last two years when we were introduced and he agreed to work on some original articles. He’s long been a hacker and shared his story of technology despite politics and society changing around him. His Galaksija computer was the first personal computer available in Yugoslavia with over 8,000 kits sold. Since those days he never stopped refining his design and fabrication skills. For instance, his method of making cases from FR4 is beyond compare, and reading some of his wisdom from hardware design in the casino industry is the kind of fascinating stuff that rarely makes it out for others to enjoy.

But I digress — the point is Voja’s been around the block, he knows what he’s doing, and he does it at an amazingly high level. He did an incredible job with the Hackaday | Belgrade conference badge. It features a 16×8 LED display, IR comms hardware, 5 user buttons, USB programming, an option for an accelerometer module, and has spectacular life running on two AAA batteries. It was a hit at the conference, and so was his talk discussing the design and fabrication. Check it out below and then join me below the fold.

Continue reading “How To Design, Manufacture, And Document A Hardware Product”

It’s Alive! — Badge For Hackaday Belgrade

Hackaday Belgrade — our first ever conference in Europe — is coming up fast. One of the really exciting things for me is the hardware badge which [Voja Antonic] designed for the conference. He’s done a great job with hardware choices and I think we’ve hit the sweet spot for badge hacking. Let’s jump into the hardware and firmware details after the break.

Get your ticket now for ten hours of talks and workshops, evening concerts, and of course badge hacking the entire time. Earlybird sales close Monday. We’re still in the process of going through talk proposals but we’ll publish a post next week announcing all of the speakers.

Continue reading “It’s Alive! — Badge For Hackaday Belgrade”

True Random Number Generator For A True Hacker

How can you generate random bits? Some people think it’s not easy, others will tell you that it’s pretty damn hard, and then there are those who wonder if it is possible at all. Of course, it is easy to create a very long pseudorandom sequence in software, but even the best PRNG (Pseudorandom Number Generator) needs a good random seed, as we don’t want to get the same sequence each time we switch on the unit, do we? That’s why we need a TRNG (True Random Number Generator), but that requires special hardware.

Some high-end microprocessors are equipped with an internal hardware TRNG, but it is, unfortunately, not true for most low-cost microcontrollers. There are a couple of tricks hackers use to compensate. They usually start the internal free running counter and fetch its contents when some external event occurs (user presses a button, or so). This works, but not without disadvantages. First, there is the danger of “locking” those two events, as a timer period may be some derivative of input scan routine timing. Second, the free running time (between switching on and the moment the unit requests a random number) is often too short, resulting in the seed being too close to the sequence start, and thus predictable. In some cases even, there is no external input before the unit needs a random seed!

Despite what has already been discussed, microcontrollers do have a source of true randomness inside them. While it might not be good enough for crypto applications, it still generates high enough entropy for amusement games, simulations, art gadgets, etc.

Continue reading “True Random Number Generator For A True Hacker”

How To Build Beautiful Enclosures From FR4 — Aka PCBs

Most hobbyists say that it is easier to build a functional prototype of an electronic device, than to make the enclosure for it. You could say that there are a lot of ready-made enclosures on the market, but they are never exactly what you need. You could also use a 3D printer to build a custom enclosure, but high-end 3D printers are too expensive, and the cheaper ones produce housings which are often not robust enough, and also require a lot of additional treatment.

Another way is to build the enclosure out of FR4, a material which is commonly used in PCB production. Such enclosures are low-cost, with thin walls but yet very strong, nice looking, pleasant to the touch and have excellent thermal and moisture stability. FR4 offers some more possibilities – efficient wiring with no wires inside the housing, integrated UHF or SHF antennas or RFID coils, capacitive switches, electrical shielding, selective semi-transparency, water or air tightness, and even integration of complex mechanical assemblies.

Here I shall explain the process of building those “magic” enclosures. It is based on nearly fifty years of personal experience and more than a hundred enclosures, built for most of my projects. Here are two examples – this case for a hardware password manager is just a few centimeters long, while the other one (protective transportation cover for my son’s synthesizer) measures 125cm (about 49 inches), and yet both of them are strong enough to withstand a grown man standing on top of them.

The global approach is simple – you take the sheet of single-sided copper clad FR4, cut it and solder the parts together. That sounds simple, but there are a lot of details which should be met if you want to get top results. Please read about them carefully. You might be tempted to skip some of the steps described here, but if you do so, you will most likely end up being disappointed with the results.

Continue reading “How To Build Beautiful Enclosures From FR4 — Aka PCBs”