Magnetism Makes Silly Putty Fun Again

The image above is a screen capture from a video clip where the black ooze gobbles up that rare-earth magnet. It’s actually a blob of Silly Putty which was slightly altered to add magnetic properties. [Mikeasaurus] grabbed some ferric iron oxide powder from an art supply store and donned gloves and a dust mask while massaging it into the silicone polymer. If you get the right mix of the two materials you end up with a flowing substance that performs mysteriously when exposed to a magnetic field.

Check out the video after the break to see some of the tricks that [Mikeasaurus] can do. The putty really looks like it has a life of its own. It will stretch a remarkable distance to get close to the magnets (amorphous stretch). If left in contact with one it will fully engulf it and then form an orb.

Now, is there any way to use this with electromagnetic fields to build a morphing robot?

Continue reading “Magnetism Makes Silly Putty Fun Again”

Virtual Reality With A Pico Projector

Although virtual reality was the wave of the future in the early 90’s, it hasn’t really taken off the way we would have liked. Sometimes a great idea just takes time for the technology to catch up to it (Aeolipile anyone?). Now that tiny projectors, realistic FPS games, and eye tracking systems have come down in price, this head-tracking projection system engineered by students at University of Texas at Austin could be the start of something really neat.

Although we’ve seen some cool FPS/pico projector hacks before, most of them use the “gun” as the controller. This approach offers a a different experience as one isn’t required to carry a “gun” around. It simply tracks one’s eye movement and moves the projector automatically. Check out the video after the break to see this device in action. Continue reading “Virtual Reality With A Pico Projector”

Autodesk Enters The Hobby Market

Autodesk aims to enter the hobby market with its offering of Autodesk 123d. If you’ve ever been spoiled by a nice CAD suite like Solidworks, Pro-E, or Inventor it becomes readily apparent that the free offerings don’t come anywhere close. At first Autodesk 123d seems to be entirely a Google Sketchup clone, and in some ways it is. Though, after a bit more exploring, the software offers some pretty advanced features, such as assemblies and constraints . All worries about it being windows only and closed source aside, it’s pretty cool that a big name in the CAD industry is taking a look at the hobby market, and overall it is worth testing out to see if it fits into your toolbox.
Continue reading “Autodesk Enters The Hobby Market”

$14 Swarm Robot, Kilobot, Is Extremely Cool

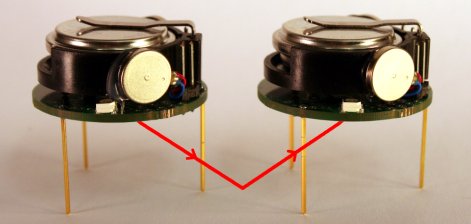
Reader, [Michael Rubenstein], sent in a project he’s been working on. Kilobot, as stated in the paper(pdf), overcomes the big problems with real world swarm robotics simulations; cost, experiment setup time, and maintenance. The robot can be communicated with wirelessly, charged in bulk, and mass programmed in under a minute. Typically, robots used for swarm research cost over a $100, so large scale experiments are left to software simulation. These, however, rarely include the real world physics, sensor error, and other modifying factors that only arise in a physical robot.  Impressively enough, the kilobot comes in far under a hundred and still has many of the features of its costlier brothers. It can sense other robots, report its status, and has full differential steer (achieved, surprisingly, through bristle locomotion). There are a few cool videos of the robot in operation on the project site that are definitely worth a look.

Displaying Graphics On An Oscilloscope

[Andrew Rossignol] was curious one day and decided that he wanted to display graphics on an oscilloscope after playing around with the X and Y inputs.

[Andrew] started out with a resistor ladder on the DAC of his AVR Butterfly. He was able to to draw a line on the oscilloscope’s screen but bandwidth limitations forced him to reconsider his approach. A friend wrote a Python script to generate C code so the ports of the Butterfly can be toggled. After getting the Butterfly to generate a voltage for every non-white pixel, [Andrew] was impressed with the results so the code was modified determine the brightness of each pixel. The setup managed 10 shades of gray and careful selection of what graphics to post on the build log assured the project a little bit of blog cred.

There are a few ways to display a picture on an oscilloscope, like plugging the Hsync and Vsync into the inputs of a scope. Except for a few music visualizations, we haven’t seen a scope display generated from a microcontroller. Great work [Andrew], but we’d like to mention there’s a grayscale Hack a Day logo from way back when.

Check out a video of [Andrew]’s oscilloscope after the break.

Continue reading “Displaying Graphics On An Oscilloscope”

Pick And Place At Home

diy_pick_and_place

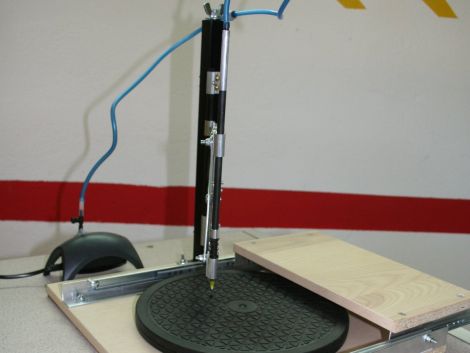
[Erv’] wrote in to share a manual pick and place he recently constructed. He builds a lot of circuits using SMD parts, and after looking at commercial pick and place systems, he decided it would be far cheaper to build his own. Using some components he had sitting around the house, along with a few store-bought pieces, he put the pick and place together for about $50, which is pretty cheap when you think about it.

The base is made from wood he had left over from another project, which has a sliding rail and a movable arm rest built into it. A rotating TV stand is used to hold workpieces, allowing PCBs to be repositioned at will while parts are being laid out. A square furniture leg is used as a support arm, holding the pick and place vacuum pen in place at the end of a small accordion hinge. As in most DIY pick and place installations, a small aquarium pump has been used to provide the suction needed to pick up SMD parts.

It’s a great build with plenty of useful features, and comes in far cheaper than any commercial system you’ll find out there.

Ubuntu Laika – An Android Phone Pen Testing Platform

laika_screenshot

Once [Ruan] over at AndroidClone heard that Android devices were capable of running a full Linux environment, he started contemplating all of the things he might be able to do with a full Linux OS in his pocket.

He decided that a portable penetration testing platform would be great to have on hand, so he got busy installing Ubuntu 10.10 on his Lenovo LePhone. Once he had it up and running, he stripped out all of the unnecessary fluff and added some common tools such as Wireshark, Nmap, and Kismet, among others. He says it easily runs side by side with Android, allowing you to switch between the Ubuntu install and your standard Android applications with ease.

While this all started out as a proof of concept, he has continued to refine the project, releasing several new versions along the way. If you are interested in giving it a try, he has installation instructions available in the AndroidClone forums.

[thanks Stephen]