On Air Light Parses Webpage Data Wirelessly Without A Computer

[Matt Richardson] built this on-air light to indicate whether a Make streaming show is currently in progress. Despite the obvious cord leaving the bottom of the base (it’s a power cord) his creation is pulling data from the Internet wirelessly. He’s using an Xbee module along with an Arduino to pull this off.

In addition to the light itself there’s a base station that we haven’t seen before. The hardware is a Digi ConnectPort Zigbee-to-Internet Gateway. That’s a mouthful but it’s just a box that acts as an Xbee node and facilitates communication between its own Ethernet port and other Xbee devices in the network. So no, you don’t need a computer but you do need an Ethernet connection somewhere for the base station. [Matt] is running an open source software package on the ConnectPort call Xbee Internet Gateway (xig). Watch the video after the break to see the configuration for this package. It’s a snap, and if you’ve never used an Xbee module before this gives you a good idea of how easy it really is.

Continue reading “On Air Light Parses Webpage Data Wirelessly Without A Computer”

.Net OS For Your ARM

Pyxis 2 is a recently released new embedded operating system. The first Pyxis OS would run on an arduino with a touch screen, and provided a nice GUI. Pyxis 2 on the other hand has departed from most of its predicator, and is now made on top of the .NET micro framework, and natively supports FEZ Cobra and ChipworkX systems. It supports 320×240, 480×272, even 800×480 (if you have the ram), LCDs.

Some of the features of the OS include alpha blended desktop icons, file dialogs, prompts, input, color selection, file box, buttons, all the standard stuff to construct your applications, support for network, USB, SD and Mp3. Since it is .NET you can also use C# visual studio to construct everything without dedicating yourself to hardware until you are ready.

Join us after the break for a short video.

Continue reading “.Net OS For Your ARM”

Arduino Sip N Puff Switch

[kayakdiver] is developing a SIP and PUFF controlled kayak, but in order to start you first need a SIP and PUFF switch. These devices allow the user to lightly sip or puff into a tube to control switches or sensors, and are sometimes mounted in joysticks for control of a computer, or wheelchair, etc, but finding the cost prohibitive the next best thing was to whip up their own.

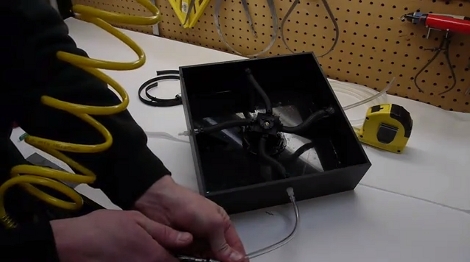
The design is clean and direct featuring off the shelf tubing and fittings, 2 pressure/vacuum switches, and an Arduino. Each one of the switches can detect pressure or vacuum, so one switch set to each is fed though a Y and up to the mouthpiece, since everything is sealed this has the advantage of only needing pressure and not airflow making it more comfortable for the user over long periods, and keeps down on humidity in the tubes.

Haptic Feedback Joystick Uses Air Muscles

[Ben Krasnow] is working on a force-feedback joystick. It centers around the concept of an air muscle which transfers pressure into linear motion. He cites another air muscle project as part of the inspiration in his build, but where he’s gone with it is one of the better uses for these blow-up components that we’ve seen.

Basically you have a bladder, in this case rubber tubing. A mesh surrounds it to reinforce the material and cause inflation to shorten the length of the package. In the image above there are four black air muscles that connect the base of a joystick with the outer frame that houses it. How and when each muscle is pressurized determines the type of motion the user will feel on the joystick. This is where his pressure controller comes into play. It uses a voltage-to-pressure transducer to feed a manifold, the combination of which not only makes each muscle addressable but allows him to dial in the force sent to the muscles. Check out the video after the break for his start-to-finish walk through.

Continue reading “Haptic Feedback Joystick Uses Air Muscles”

LEGO Pendulum Clock

Put a case around it and it would be a grandfather clock but for now it’s a pendulum clock made from LEGO pieces. The video after the break shows a great overview of the build. You can see the workings at several different angles, as well as a clip that has been sped up to show the movement of the weights over time. One weight, made from dead AA batteries, drives the clock and the other weight switches the winding motor. That motor acts to automatically wind the clock when the drive weight reaches the end of its rope.

This is a nice departure from the majority of clock projects we see as it utilizes mechanical concepts instead of electronic. Most of [Pmroskelly’s] build details are shared as comments on the Picasa album found at the link above. There are also some other videos such as the one showing how the escapement works.

Continue reading “LEGO Pendulum Clock”

Hacking Strippers To Do Your Bidding

wire_strippers

[Alex] knows his strippers.

By his estimation, he has stripped millions of wires over the years, and he has seen his fair share of wire strippers come and go. That cheap set of wire strippers you have with the graduated holes, or that adjustable stripper you squeeze as you pull the wire through? They just stress the insulation as well as the wires you are trying to strip – he says you might as well just use them in your tackle box.

His favorite style of wire stripper is the automatic kind that grip the wire, then cut and remove the insulation just by squeezing the handles. His issue with this particular tool is that it’s difficult to get a uniform length of stripped wire when working in volume.

Since [Alex] needs uniformity in his line of work, he modified a set of automatic wire strippers to include an adjustable wire stop. He determines the length of wire he needs, adds or removes some washers from his wire stop, and off he goes. It’s a very simple yet very useful hack, depending on your application. We bet it is probably one of the most accurate ways to get uniform length, this side of a fully automatic wire stripper.

How Escher’s Impossible Waterfall Was Faked

Study the image above closely. You’ll notice that physically it is an impossible object, yet this is a screenshot of full-motion video. The clip after the break shows a gentleman pouring water into the waterfall where the wheel is located. The liquid flows in a direction that appears to be uphill, then falls onto the waterwheel where it was originally poured. Ladies and Gentleman, we have the solution to the world’s energy crisis. Nope, we have a hoax and the real question is how was it done?

[David Goldman] has come up with quite the explanation. He watched the video very closely and the put together a three-dimensional diagram showing how he would build the apparatus. If you saw the movie Inception (we highly recommend you do) you will remember the infinite stair puzzle that is exposed as an optical illusion. [David’s] proposed method for debunking this hoax uses a similar build that comes in four different, precisely placed elements.

We’ve got to hand it to him. That’s a brilliant theory! Of course the first commenter on the post linked above calls this out as CGI and we’re inclined to go with that answer but that’s much less fun.

Continue reading “How Escher’s Impossible Waterfall Was Faked”