Cheap And Easy PCB Agitator From An Old CD-ROM

cdrom_pcb_agitator

Instructables user [mzsolt] enjoyed making his own PCBs, but he wanted to speed up the etching process just a bit. While some people put together elaborate bubble tanks and agitators, he wanted to keep his simple and more importantly, cheap.

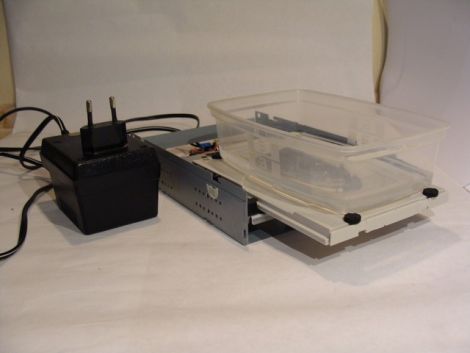
He looked around the house and discovered an ancient CD-ROM drive that was collecting dust, which he figured would make a great agitator for smaller projects. He picked up a decade counter and a handful of other cheap components, then got busy pulling the drive apart. He connected the motor and the drive’s limit switches to the decade counter, which controls the entire setup.

When powered on, the drive ejects, taking his container full of etchant with it. When the drive hits the outer limit switch, the decade counter reverses the motor until it hits the inner switch, reversing the motor once again.

As you can see in the video below, it works reasonably well. He suggests using a variable power supply to regulate the motor’s speed, but a variable pot would probably work just as well. Obviously the agitator is best suited for smaller projects, but since it was so cheap to put together, you won’t hear us complaining.

Continue reading “Cheap And Easy PCB Agitator From An Old CD-ROM”

Impressive Steampunk Keyboard

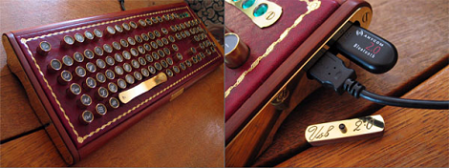
This amazing steam punk keyboard was sent in to the tip line, and while it’s not necessarily a ‘hack’ in the purest sense, the level of quality in the build is incredible.

Each key was crafted from brass tubing that was later filled with a wooden dowel and covered with the key cap label. While there’s no mention of how the key caps were made, we do especially like the abstract Windows Key label. After the PCB for the keyboard matrix was enclosed in a bit of plywood, the hand tooled leather was applied to the front. The name plaque that was hand engraved with a modified screwdriver is especially nice.

The build is based around the amazing Das Keyboard with Cherry Blue switches, one of the only keyboards currently being manufactured that comes close to the feel of the One True Keyboard. While it’s not a keyboard built from scratch, it’s still one of the best steampunk builds we’ve seen, most likely because not a single gear was glued to the project.

LED Headgear Is Marvel Of Free-formed Circuitry

Hackaday contributor [Nick Schulze] popped out an impressive set of LED headgear for a hat-themed party.

[Nick] is no stranger to working with LEDs. Previously he built a blue 8x8x8 cube something like this other 512 node full color version. He had a bunch of LEDs left over from that project and decided to put them to good use.

The first part of the build is the frame itself, made from thick fencing wire. He just started bending it around his head and got an uncomfortable head-shaped hoop to which he could solder. From there, enameled copper wire wraps its way through the system, supplying logic levels to all of the LEDs. Everything is done without a circuit board of any kind. The LED drivers themselves are attached by first using a zip tie to affix a resistor to the frame, then by soldering the TLC5916 chip to that resistor. Even the ATmega8 is included dead-bug style by soldering it to the frame which we think servers as ground. Program it with the free-floating female pin header and you’ll get the fantastic animations seen in the video after the break.

Continue reading “LED Headgear Is Marvel Of Free-formed Circuitry”

FPGA Arduino Shield Uses Kickstarter As A Preorder System

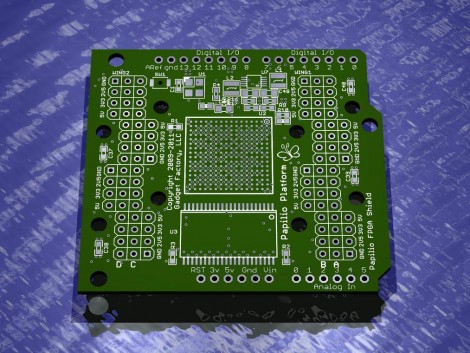
[ Jack Gassett] is working on an FPGA shield for the Arduino. At first the idea of this expansion board seemed a little silly. But [Jack] mentions that the FPGA board can be quite useful for adding higher-order electronic complexity like HDMI capabilities to an Arduino. We’re not totally sold on the idea, but he’s not making the board solely for use with an Arduino either.

The plan is to use a Xilinx Spartan 3A FPGA which comes in a ball-grid array package. And that is the reason [Jack] decided to use Kickstarter for this project. He shared some of his issues with BGA components in a home manufacturing process a while back. To get these working reliably you need to have them professionally assembled, and that requires a sizable upfront investment. But as we read through his proposal it struck us that he’s actually using Kickstarter as a preorder system. You can get a base model with just the FPGA soldered on the board for $55. Not bad considering the chip will cost you at least $20 without assembly. Each level up includes a few more components like SRAM or add-on PCBs.

We get a lot of tips pointing to Kickstarter proposals but this is one of the few that seems right on the mark for supporting open and innovative development. Great work [Jack]!

[Thanks Simon]

Don’t Buy An IPAD, Make One!

When [Liu] decided he wanted one of the new iPads, rather than fork out the cash he decided to build his own tablet Mac. His creation functions just as you would expect any tablet PC with some nice extra features such as running on Windows XP for any of you Microsoft lovers. [Lui’s] tablet apparently only cost him about $300USD, about half the price of the real thing. The two part video shows the entire construction in fast forward including a demonstration of the final working product. It looks like the tablet is built using spare tablet/laptop components and the case is constructed from sheet aluminum before being painted and labelled with apple stickers. The final product is a bit thicker than the real thing but looks great in the laptop style case [Lui] has whipped up. Kudos to the guy for saving a few bucks and making something great in the process, the video after the break is definitely worth a watch. This isn’t the first time we’ve seen this kind of thing, actually we’ve seen a few.

Continue reading “Don’t Buy An IPAD, Make One!”

Megavallometer Camera Trigger

megavallometer_camera_trigger

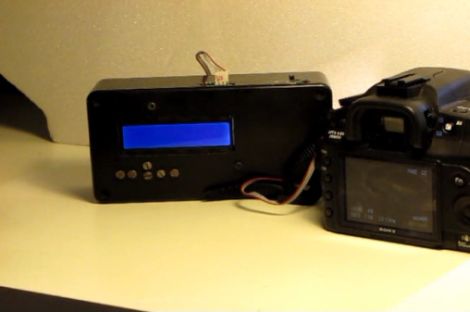
[Tobe] has an intervalometer for his camera, but he wanted a device that could trigger the shutter using several different methods, not just time. He calls his creation the Megavallometer, which can utilize any one of three distinct criteria.

He recently purchased an Arduino and a couple of shields, so he figured this would be a perfect project in which to use them. He hooked up a microphone and a photodiode to the Arduino, allowing him to use both sound and light to trigger his camera, depending on which mode he selects. Of course, the Megavallometer still incorporates the functionality of a standard intervalometer as well.

Once connected to his camera he selects one of the three trigger programs, and the Arduino handles the rest. If either the light or sound triggers are selected, the respective sensors measure the ambient levels upon selection, allowing for accurate results in any setting.

While the Megavallometer is a bit larger than other intervalometers we have seen, it looks incredibly useful and can likely be strapped to a tripod or similar if need be.

If you have a minute, be sure to check out the video on his site for a sneak peak if his Megavallometer in action.