Hardware Store Chemicals Transform Sheets Into Waterproof Tarps

For hackers in the Northern Hemisphere, the seasons of wet and cold are upon us. Staying dry is every bit as important as staying warm, so what better than a hack or two to keep us warm and dry! All you’ll need is a bed sheet, some rope, and a run to the local hardware store, and a bit of knowledge. [NightHawkInLight] has us covered with the excellent video “Recycled Bedsheets Make The Best Waterproof Tarps” as seen below the break.

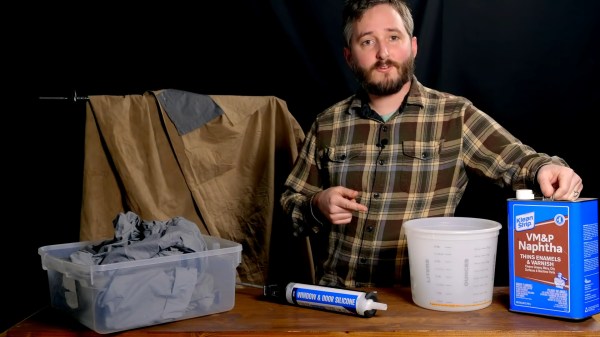
[NightHawkInLight] brings old traditional methods into the 21st century by turning away from oil, beeswax and canvas in favor of a recycled bed sheet made waterproof with silicone. The video goes into just enough detail so that you can reproduce their results without fear of working with the powerful solvent being used.

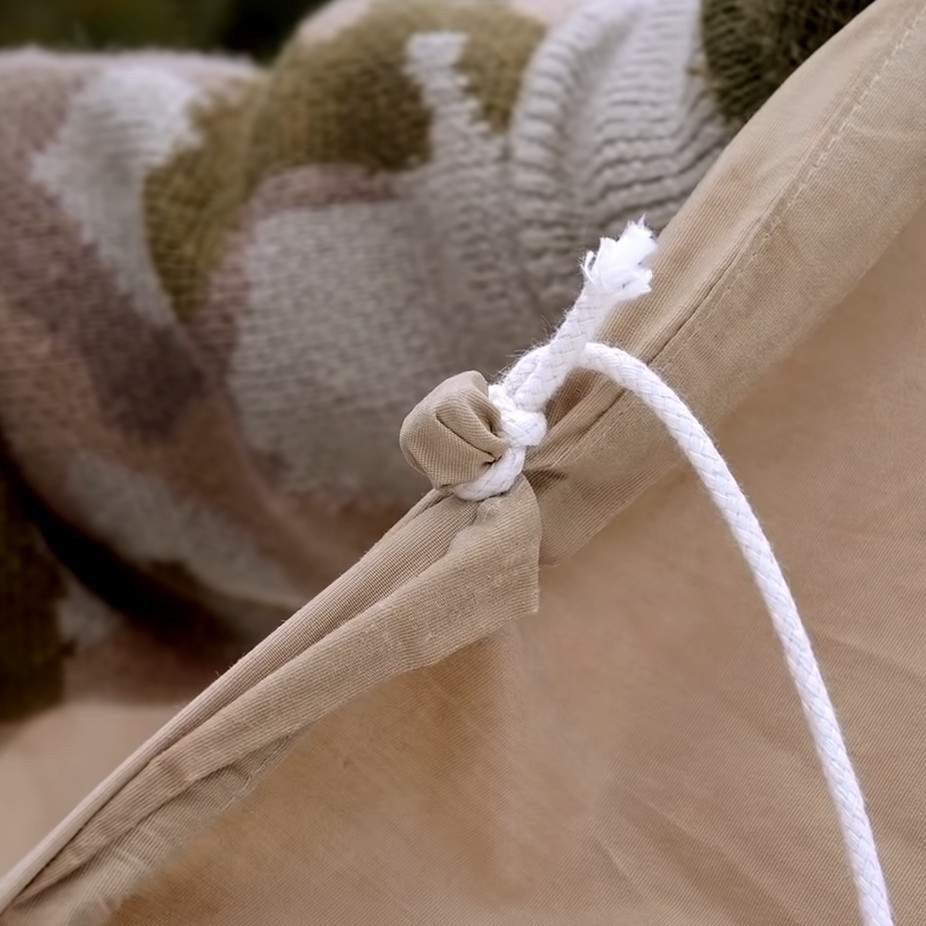
Cheap hardware store grade silicone sealant is thinned by naphtha, worked into the old bed sheet, and then hung out to dry overnight. The result? A perfectly waterproof sheet that’s just as pliable as before treatment. But how can you use it like a tarp, when there are no eyelets? If you watch the video for no other reason, check out the neat attachment trick at the end, where traditional technology is brought to the fore once again with nothing more than a rock and a slip knot.

We can imagine that the uses for such inexpensive, durable home made tarps are many. Perhaps one could put it to use when building your own Custom Cycling Camper.

Continue reading “Hardware Store Chemicals Transform Sheets Into Waterproof Tarps”

Sit Pretty On Would-Be Garbage With An Upcycled Chair

What’s the coolest thing about doing upholstery work? Aside from the fact that you end up with a new thing to sit on, sometimes the work only involves clever stapling, and no sewing is necessary. Such is the case with [wyldestyle]’s upcycled jeans chair, which started as a bare-wood swivel number from the dump. In fact, this project is almost completely made from recycled materials, except of course for those staples that hold it all together. And really, that heavy-duty stapler is likely the fanciest tool you’d need to make your own.

[wyldestyle] didn’t have any furniture foam, and we think that stuff is too expensive, anyway. So the padding treatment begins with a piece of thick Styrofoam that covers the seat screws and bolts. This is glued in place and trimmed down to match the contours of the chair’s seat and back.

Here’s where things gets tricky: the next step is wrapping over the stiff foam board with a few layers of that foam sheeting stuff that’s often used as packing material. This sheeting needs to be taut, but pull it too tight, and it will rip.

To add some loft to the chair, [wyldestyle] stretched and stapled the stuffing from an old pillow that was headed for the garbage. The final step is strategically scissoring jean scraps to fit, then stretching and stapling those to cover all the layers underneath. We like the way this chair looks, and would probably try to place pockets somewhere useful, like the back of the chair.

It’s a shame that so much denim goes to waste all over the world. There’s often a lot of life left in most of the fabric, which can be repurposed into all kinds of things, including eyeglasses frames using a wicked set of jigs.

Possibly The Most Up-Cycled, Hacked E-Bike You’ll See All Week

When it comes to bringing an idea to life it’s best to have both a sense of purpose, and an eagerness to apply whatever is on hand in order to get results. YouTube’s favorite Ukrainians [KREOSAN] are chock full of both in their journey to create this incredible DIY e-bike using an angle grinder with a friction interface to the rear wheel, and a horrifying battery pack made of cells salvaged from what the subtitles describe as “defective smartphone charging cases”.

Battery pack made from cells salvaged out of defective equipment. Sometimes, you use what you have on hand.

What’s great to see is the methodical approach taken to creating the bike. [KREOSAN] began with an experiment consisting of putting a shaft on the angle grinder and seeing whether a friction interface between that shaft and the tire could be used to move the rear wheel effectively. After tweaking the size of the shaft, a metal clamp was fashioned to attach the grinder to the bike. The first test run simply involved a long extension cord. From there, they go on to solve small problems encountered along the way and end up with a simple clutch system and speed control.

The end result appears to work very well, but the best part is the pure joy (and sometimes concern) evident in the face of the test driver as he reaches high speeds on a homemade bike with a camera taped to his chest. Video is embedded below.

Continue reading “Possibly The Most Up-Cycled, Hacked E-Bike You’ll See All Week”

Line Follower Has Lots Of Recycled Parts, But Zero Brains

Line Followers are a tried-and-true type of robot; both hardware and software need to be doing their job in harmony in order to be successful at a clearly defined physical task. But robots don’t always have microcontrollers and software, as [Mati_DIY]’s zero programming analog line follower demonstrates.

For readers used to seeing a Raspberry Pi or Arduino in almost everything, an analog robot whose “programming” exists only as a harmony between its discrete parts can be an eye-opener as well as an accessible project. A video of the robot in action is embedded below.

[Mati_DIY]’s design uses two CNY70 reflective sensors (which are essentially infrared emitter/phototransistor pairs) and an LM358 dual op-amp. Together, the sensors act as two near-sighted eyes. By using the output of each sensor to drive a motor via a transistor, the presence or absence of the black line is directly and immediately reflected by the motion of the attached motor. The more black the sensor sees, the more the motor turns. Electrically, that’s all that happens; but by attaching the right sensor to the left motor and the left sensor to the right motor, you get a robot that always tries to keep the black line centered under the sensors. Playing with the spacing of the motors and sensors further tweaks the performance.

Continue reading “Line Follower Has Lots Of Recycled Parts, But Zero Brains”

recycled delta 3d printer

Delta 3D Printer Made From Unorthodox Parts

Over here at Hackaday, we love stuff made from other (unrelated) stuff. Maybe it’s the ingenuity behind the build or the recycling of parts… or it could be both. Either way, it’s cool and a side benefit of re-using parts from the junk drawer is that it keeps the project cost down, maybe enough that the project wouldn’t even be feasible without the re-use of parts.

That brings us to the topic of this post, a Delta-style 3D Printer made from recycled parts not typically seen in such a machine. It was built by DIYer [hesamh] and is almost unrecognizable visually. The usual extruded aluminum or precision shaft frame has been replaced with 5 pieces of MDF, finger-jointed together at the seams. Attached to the 3 vertical MDF frame pieces are rail and carriage assemblies scavenged from Epson dot matrix prints saved from the scrap yard. The best part is that these rail/carriage assemblies already had stepper motors and belts installed!

The end effector is also unique among delta-style printers. This one is made from aluminum plate and provides a mount for the extruder. There is no need for a bowden tube setup when the extruder is mounted on the end effector, although the increase in mass may reduce the printer’s top speed. That’s fine by us as we’d rather have a good-looking slow print than a fast ball of spaghetti. Another scavenged stepper motor is used for the extruder. The accompanying belt pulley acts as a direct drive feed gear.

The print bed is a re-purposed flatbed scanner. The guts were removed and a heating element was placed under the glass. The bed heater is controlled separately by way of a household thermostat. An Arduino Leonardo and 4 stepper drivers replace the normally used Mega/RAMPS/Pololu combo. Overall, this is a cool build that shows what is possible with a little thought and resourcefulness. The only part used in this build that was actually made for use in a 3D Printer is the hotend!

Recycled Clock Spins Round And Round To Tell Time

pop_bottle_recycled_clock

[duckcrazy] recently shared the details on a clock he built, using recycled components to tell time.

He began his project by dismantling a handful of carefully selected pop bottles and an old clock. The bottom and midsection of the bottles were saved, and he verified that they could be easily inserted within one another. The base of the clock is made up of a CD, on which the clock’s motor components were mounted.

He constructed two open paper cylinders bearing hour and minute designations, then glued the respective clock hands inside. The cylinders and clock hands were re-mounted onto the clock’s motor, and the entire thing was enclosed within the pop bottles.

It’s a novel way to build a clock, and moving beyond the plastic bottles and paper for a moment, there’s a lot of potential for some even cooler designs based on his work. We imagine that laser-etched cylinders powered by a micro and a continuous rotation servo would be pretty sweet, though that’s just the tip of the iceberg.

Cheap And Easy PCB Agitator From An Old CD-ROM

cdrom_pcb_agitator

Instructables user [mzsolt] enjoyed making his own PCBs, but he wanted to speed up the etching process just a bit. While some people put together elaborate bubble tanks and agitators, he wanted to keep his simple and more importantly, cheap.

He looked around the house and discovered an ancient CD-ROM drive that was collecting dust, which he figured would make a great agitator for smaller projects. He picked up a decade counter and a handful of other cheap components, then got busy pulling the drive apart. He connected the motor and the drive’s limit switches to the decade counter, which controls the entire setup.

When powered on, the drive ejects, taking his container full of etchant with it. When the drive hits the outer limit switch, the decade counter reverses the motor until it hits the inner switch, reversing the motor once again.

As you can see in the video below, it works reasonably well. He suggests using a variable power supply to regulate the motor’s speed, but a variable pot would probably work just as well. Obviously the agitator is best suited for smaller projects, but since it was so cheap to put together, you won’t hear us complaining.

Continue reading “Cheap And Easy PCB Agitator From An Old CD-ROM”