Burning Man 2011: Duane Flatmo’s El Pulpo Mecanico

I had a lot of fun at Burning Man 2011, from the sculpture to the crazy art to the insane kinetic vehicles, the whole experience was something completely out of this world. With near 50,000 people out there in the Nevada desert it is impossible to see and experience everything the festival has to offer. I am positive there are several mind blowing sculptures or vehicles that I simply missed. That said, I have yet to hear a single conversation about Burning Man 2011 that does not at least mention [Duane Flatmo]’s El Pulpo Mechanico.

Continue reading “Burning Man 2011: Duane Flatmo’s El Pulpo Mecanico”

Why Wasn’t This Magnetic Cello Made In The 70’s?

[magnetovore] made himself an electronic cello. Instead of pulling a few cello samples off of an SD card, he did it the old school analog way. The finished build is really impressive and leaves us wondering why we haven’t seen anything like this before.

[magnetovore] uses a permanent magnet to play each ‘string’. A lot of details are in this post and [magnetovore]’s provisional patent (PDF warning). From what we can gather, each string is a resistive ribbon sensor connected to a voltage controlled oscillator. The output of the VCO is sent to a variable gain amplifier that is controlled by a coil of wire and the magnetic ‘bow’.

From the video (after the break), [magnetovore] already has an amazing reproduction of the cello sound. It’s a bit electronic on the lowest parts of the C string, but with a little bit of processing it could definitely pass for an acoustic instrument. We’re left wondering why we haven’t seen anything like this cello before. VCOs and VGAs were the bread and butter of the old Moogs and even the ancient ondes martenot. Ribbon controllers were being attached to electronic instruments back in the 50’s, so we’re really at a loss on why a magnetic cello is new to us. If any Hack A Day readers have seen anything like this before, leave a message in the comments.

Continue reading “Why Wasn’t This Magnetic Cello Made In The 70’s?”

Tracking Commercial Aircraft With Salvaged Electronics

ads-b_air_traffic_tracking_station

Early last year, [Edward] started work on an aircraft tracking system using components from old electronics he had sitting around the house. As you may or may not know, most modern aircraft continuously broadcast their current position over the 1090MHz band using the ADS-B protocol. [Edward] found that his old satellite receiver module was able to pick up the signals without too much trouble, and was more than happy to share how he did it.

The whole project cost him just under 5 Euros and requires the aforementioned satellite tuner as well as an ATMega48 microcontroller to decode the ADS-B messages. When the receiver is hooked up to a nice aerial and preamp he can listen in on planes within a 200km radius, but even with a simple piece of wire, he can locate aircraft up to 25 km away.

Raw ADS-B data isn’t terribly useful, so [Edward] put together a small application that plots nearby aircraft on a map for him. We imagine that it wouldn’t be too incredibly difficult to do the same sort of thing with the Google Maps API as well.

If you’re interested in putting together an aircraft tracking receiver of your own, be sure to swing by his site – he has a ton of useful information that will likely be a huge help along the way.

[Thanks, David]

Beginner Concepts: A Quartet Of Videos On Inductors

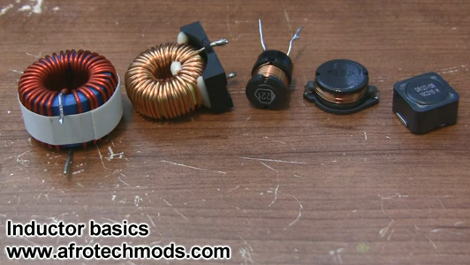
Inductors can be found in many of the devices you use every day, but if you’ve been working only with DC in your projects there’s a good chance you’ve never needed to know anything about them. Now’s your chance to pick up on the basics with this video tutorial series. [Afroman] put together four short videos that we’ve embedded after the break. Set aside fifteen minutes to watch them; you’ll be glad you did.

The first in the series starts out by explaining that an inductor is a coil of wire that serves a similar function as a capacitor with one major difference. A capacitor stores voltage, while an inductor stores current. In the second video, [Afroman] hooks up some inductors to a square-wave generator, then measures the resulting current characteristics using an oscilloscope. He shows the difference between inductor core material (air core versus ferrite core) and illustrates the properties that make inductors so useful as filters. The third video covers filtering circuits, and the fourth is the best explanation of why you need a flyback diode when driving a motor (an inductive load) that we’ve seen yet.

Continue reading “Beginner Concepts: A Quartet Of Videos On Inductors”

Retro-gaming Wall Art; It’s Playable!

Here’s a wall hanging for the reception area that let’s your customers play retro games while they wait. To give you some sense of scale, the buttons to the right (labeled Start/Jump but we would call them A and B) are arcade buttons larger than traditional arcade buttons. The screen itself is a Samsung widescreen computer monitor — we’d wager that it’s a 16″ model but we’re just guessing. It’s held in the wooden frame by a piece of angle bracket.

This is the product of a hack we looked at in June where an Arduino was used to control digitized retro LCD games. The same hardware is used, monitoring the buttons with the Arduino and using a Python script to translate them to keypresses on a computer. That means this isn’t a standalone, but needs a computer to run the game and feed the LCD monitor. Still, we love the look of it and hold out hope that this will someday migrate to FPGA control (they have not problem driving LCD screens) with selectable games.

ATtiny Hacks: DIY High-speed Photography LED Lighting Rig

ATtiny Hacks Theme Banner

diy_high_speed_photography_led_lighting

[Tom] wanted to try his hand at high-speed photography and needed some equipment to get things rolling. Not wanting to spend a ton of money on a lighting rig or trigger mechanism, he decided to build his own. In a three part series on his blog, he details the construction and testing of his high-speed setup along with the improvements and lessons learned along the way.

His adventures started out with a small off-brand Cree LED clone and an ATiny15L that was collecting dust in his workshop. He built a simple circuit that would trigger the LED to light his subject, which in [Tom’s] case was a bowl of milk. Rather than using a motion or sound trigger, he opted to mount a small piezo to the bottom bowl, firing the LED any time a droplet hits the bowl’s surface.

The pictures he took were decent, but he knew he could get better results. He purchased a new, more powerful Cree LED, and wrote a small terminal program that allows him to tweak his flash parameters using his laptop. The results he gets now are far better – in fact, he has a whole gallery of pictures you can check out.

If you want to delve into high-speed photography as well, all of the schematics and code can be found on his blog.

DIY RFID Shielded Wallet Keeps Data Thieves At Bay

diy_rf_shielded_wallet

[Serge] was in search of a new wallet, but he was concerned about ne’er do wells with RFID readers stealing his data. He could have gone out to the store and plunked down $20-$30 for a shielded walled, but where’s the fun in that? Instead, he decided to make his own.

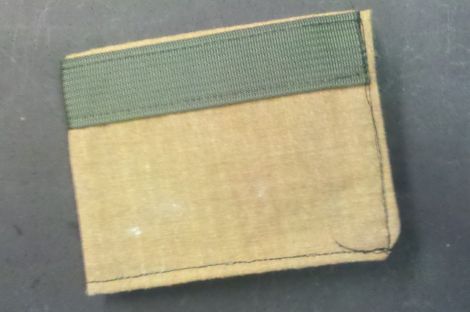
Using Kevlar-Nomex fabric, he laid out the general structure for his wallet. This ultra-strong fabric has a breaking strength of 500lbs, but blocking RF isn’t exactly its forte. To provide some electromagnetic shielding, [Serge] added a nice uniform layer of silver epoxy to the Kevlar, which carries an added bonus of strengthening the material. He fired up the sewing machine, adding a nylon strip to the exterior of the wallet for reinforcement, then he worked on forming the bill pouch and card holders.

The final result is a plain yet incredibly rugged wallet that’s sure to keep his various RFID-enabled cards safe. We really dig how unassuming the wallet is – no flash, all function. Nice job, we’ll take one!