Kitchen Hacks: Improving An Espresso Machine

The heat sensor in [Cameron]’s espresso machine doesn’t work very well. He sees some pretty crazy variations in temperature when pulling an espresso shot, and when the boiler is just sitting there the heater element will heat the water full-bore then shut off for a while. Since this is a pretty low bar from a control theory standpoint, [Cameron] decided on a PID makeover on his espresso machine.

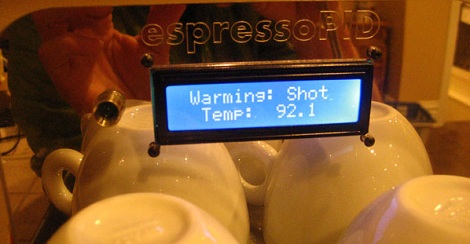
Instead of going with a commercial PID controller like we’ve seen on a few kitchen hacks, [Cameron] decided to roll his own Arduino derivative based on an ATMega328 microcontroller. The newly designed board reads the state of the ‘Steam’ button, a few relays for controlling the heater and the pump, and of course an LCD display.

[Cameron] still has to do a little tweaking to get his PID algorithm down, but already the new control board keeps a much more stable temperature than the old thermostat. The fancy new bezel and LCD display adds a lot of techy class to his espresso machine, to boot.

Star Trek Style Pneumatic Doors That Don’t Require A Stagehand

In 1966, [Gene Roddenberry] introduced fully manual doors powered by a stagehand on Star Trek. The fwoosh sound of the door was later dubbed into each show, but progress marches on, and now [Alex] created his own Star Trek-style automatic doors for his house.

The build includes a ‘control panel’, and [Alex]’s door operates in three modes: Open, and stay open; Close, and stay closed; and Automatic. The control panel itself is fairly remarkable. A small puck interacts with a magnetometer underneath [Alex]’s counter. If the puck is pointed towards ‘Open’, the door stays open. If the door is pointed towards ‘Closed’, the door stays closed. If the puck isn’t near the magnetometer, the door operates in automatic mode with the help of a few IR sensors to detect someone trying to get in or out of [Alex]’s kitchen.

For the mechanical portion of the build, [Alex] used a One meter long piston with the quietest air compressor he could find. We can’t tell from the video after the break if the compressor ever kicks in, but [Alex] says it’s about the same volume as his fridge. As a small added bonus, the new automatic door does have a fwoosh sound, just like [Gene] would have wanted.

Continue reading “Star Trek Style Pneumatic Doors That Don’t Require A Stagehand”

Adorable And Small Portable NES

The Queen of Bondo is back again, this time with an adorably small NES portable, the HandyNES.

When last saw [lovablechevy], she had just finished up her build of a Nintenduo, a build that stuffed an NES and SNES into a single box. The Nintenduo was such a clean build it would be a crime to let her talents go to waste, so [Lovablechevy] finished up one of the smallest NES portables we’ve seen.

The build is based on a top-loading NES with a 3.5″ screen. [rekarp]’s NES2 composite mod was used to get the NES and screen working together. Two LiIon batteries provide 3 hours of play time (with a low battery indicator, natch).

[lovablechevy] also included an AV out so she can connect her HandyNES to a larger CRT screen. Like our old Sega Nomad, this allows for a little two-player action – player one using the HandyNES and player two using an extra controller. Support for the Zapper was also included after modding the Zapper connection to a USB port.

Check out the video walkthrough after the break. To prove that her build isn’t a clone, [lovablechevy] also include a video of herself playing Battletoads past the point where the clones crash. Excellent work from the Queen of Bondo.

Continue reading “Adorable And Small Portable NES”

Two Ways To Convert An Electric Cooler To A Humidor

It’s not a proper humidor in the technical sense (there isn’t any specific way to moderate the humidity) but [Dzzie] came up with a couple of ways to keep his cigars cool in the summer heat.

Both versions use a Coleman electric cooler as the enclosure. This hardware uses a Peltier device to keep it cool inside. The first attempt at use a thermostat with this worked by adding an external relay to switch mains power. A thermostat dial hangs out inside the cooler to give feedback to the relay board. This worked, but it’s a really roundabout approach since the cooler operates on 12V, and this method uses a mains-to-12V adapter. If [Dzzie] decides to hit the road the relay won’t work when the cooler is powered from a 12V cigarette lighter in the car.

The second rendition fixes that issue. He moved to a 12V relay, and used a car cellphone charger to supply the 5V of regulated power his control circuitry needs to operate.

ARM Programming Primer; Getting The USART Running

We find it interesting that PIC and AVR programming is very common in hobby electronics but ARM doesn’t have nearly the same foothold. This is partly because there’s a knowledge barrier involved with making the transition (the other part is probably the lack of DIP packaged chips). But if you’ve worked with 8-bit microcontrollers you can certainly make the jump into the 32-bit realm. Here’s a great opportunity to get your feet wet. This guide will show you how to get the USART on an STM32 Discovery Board working, which makes it easy to get feedback about what’s going on in your program.

One difference you’ll notice when moving to ARM microcontrollers is that there is almost always a library bundle available from the manufacturer which includes all of the functions you need for hardware control (USART, USB, Ethernet, ADC, etc.). That’s the case here, so simply including the USART library makes it a snap to finish the rest of the program. Once you hook up your communications hardware (an FTDI cable in this case) just use the library initialization functions, followed by the send and receive commands and you’ll be pushing messages to a computer terminal in no time.

If you’re trying to use the STM32 Discovery Board with a Linux box here’s a shove in the right direction.

Pushing Chest Strap Heart Rate To A Stock Exerciser Display

This hack came out so well that [Levent] wishes he had tried it years ago. When exercising he wears a Polar heart rate monitor which sends data from a chest strap to his wristwatch. But his exercise bike also has a heart rate readout that depends on your hands touching metal contacts on the handlebars. He set out to see if he could patch the chest strap data into the exercise bike LCD display.

The first part of the hack is really simple. As we’ve seen several times before, you can buy a receiver module which grabs data from the chest strap. Now it was a matter of patching the data from this receiver into the Schwinn 213 recumbent exercise bike. [Levent] pulled out the PCB and located the small daughterboard that is responsible for the hand grip heart rate. With careful study he was able to identify the pinout. There are two data lines. One is responsible for the heart rate detected signal, the other pushes the actual heart rate data. On a hunch he hooked a signal generator up to the latter and discovered that all it takes is a square wave.

The rest is pretty straight forward. Check out the proof in his video after the break. Continue reading “Pushing Chest Strap Heart Rate To A Stock Exerciser Display”

Replacing Solder Tab Batteries

There’s a ton of devices out there that have batteries in them but most people never think about it. That’s because they use rechargeables that are sealed inside and topped off with external chargers. [Todd Harrison] has a couple of them, including a cordless shaver and a Christmas light timer. He’s had these for years and the batteries have gone south. They’re not meant to be consumer-replaceable, but that did stop him from cracking them open and swapping out the solder-tab batteries himself.

The batteries themselves won’t be all that hard to source. The shaver just takes a NiMH AA cell. But since they’re not meant to be replaced [Todd] needed to do some soldering. Here you can see he’s using a solder gun to make the connection between the new battery and one of the solder tabs. He uses the gun instead of an iron because he needs to heat the joint quickly, and must avoid heating the rest of the cell which could rupture. As a safety precaution he’s wearing gloves and a full face-shield.

Check out the video after the break to see this, as well as the coin cell replacement in the lighting controller.

Continue reading “Replacing Solder Tab Batteries”