3D Printing A Usable Airless Tire

For decades now, companies like Michelin have been teasing us with futuristic-looking automobile tires that don’t use air. Instead, they use a polymer mesh of sorts which maintains the same pressure on the travel surface that a pneumatic tire does, with much less maintenance than their pneumatic counterparts. At least, in theory. There’s a reason that these tires live in the same mythical realm that Half Life 3 and the modern affordable Volkswagen do, and [Berm Peak] decided to discover those reasons for himself.

Of course, [Berm Peak] isn’t building these for his daily driver, an electric pickup truck featured in previous videos of his. He’s putting these on his mountain bike instead, a challenging environment for a tire like this in its own right. When mountain biking at the level he does, punctures and flats can become a real nuisance on the trail, so he set about experimenting with these designs with the 3D printer to see if he could make something rivaling pneumatic technology. After a few design iterations he settled on a TPU-based version with a compliant S-shaped spacing between the tread and wheel. The tire printed in sections that are installed by joining them together on the bike rim with a separate 3D printed rim interface.

At the end of this process [Berm Peak] ends up with a surprisingly capable tire that mostly holds up to his extreme off-road testing, an impressive feat for something 3D printed in his shop. Presumably a company specializing in bicycle tires could build something even more capable, but it turns out that a different technology has already solved all of the problems that airless tires solve. Mountain bikers today almost exclusively ride on tires with sealant, so punctures and flats are essentially a solved problem. But the neon-green airless tires were still a fun project for [Berm Peak] and quite the head-turner out on the bike trails.

Continue reading “3D Printing A Usable Airless Tire”

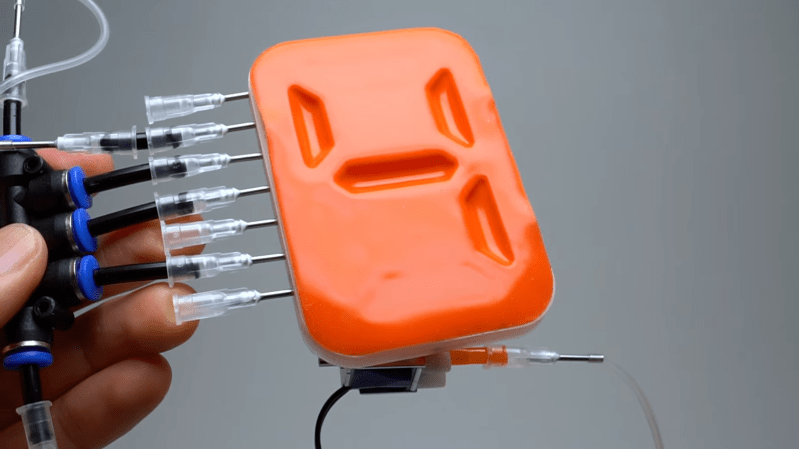
An orange silicone sheet is shown in front, with depressions in the shape of a 7-segment character "4". A man's hand is holding a pipe leading to a series of needles, which enter the block behind the silicone sheet.

A Suction-Driven Seven-Segment Display

There’s a long history of devices originally used for communication being made into computers, with relay switching circuits, vacuum tubes, and transistors being some well-known examples. In a smaller way, pneumatic tubes likewise deserve a place on the list; [soiboi soft], for example, has used pneumatic systems to build actuators, logic systems, and displays, including this latching seven-segment display.

Each segment in the display is made of a cavity behind a silicone sheet; when a vacuum is applied, the front sheet is pulled into the cavity. A vacuum-controlled switch (much like a transistor, as we’ve covered before) connects to the cavity, so that each segment can be latched open or closed. Each segment has two control lines: one to pressurize or depressurize the cavity, and one to control the switch. The overall display has four seven-segment digits, with seven common data lines and four control lines, one for each digit.

The display is built in five layers: the front display membrane, a frame to clamp this in place, the chamber bodies, the membrane which forms the switches, and the control channels. The membranes were cast in silicone using 3D-printed molds, and the other parts were 3D-printed on a glass build plate to get a sufficiently smooth, leak-free surface. As it was, the display used a truly intimidating number of fasteners to ensure airtight connections between the different layers. [soiboi soft] used the display for a clock, so it sits at the front of a 3D-printed enclosure containing an Arduino, a small vacuum pump, and solenoid valves.

This capacity for latching and switching, combined with pneumatic actuators, raises the interesting possibility of purely air-powered robots. It’s even possible to 3D-print pneumatic channels by using a custom nozzle.

Thanks to [Norbert Mezei] for the tip!

Inside A Dutch Street Organ: The Art Of Mechanical Music-Making

[James]’ Mechanical Organ of Dutch origin has been around longer than he has, but thanks to being rebuilt over the years and lovingly cared for, it delivers its unique performances just as well as it did back in the day. Even better, we’re treated to a good look at how it works.

The organ produces music by playing notes on embedded instruments, which are themselves operated by air pressure, with note arrangements read off what amounts to a very long punch card. [James] gives a great tour of this fantastic machine, so check it out in the video embedded below along with a couple of its performances.

Continue reading “Inside A Dutch Street Organ: The Art Of Mechanical Music-Making”

3D Printing Pneumatic Channels With Dual Materials For Soft Robots

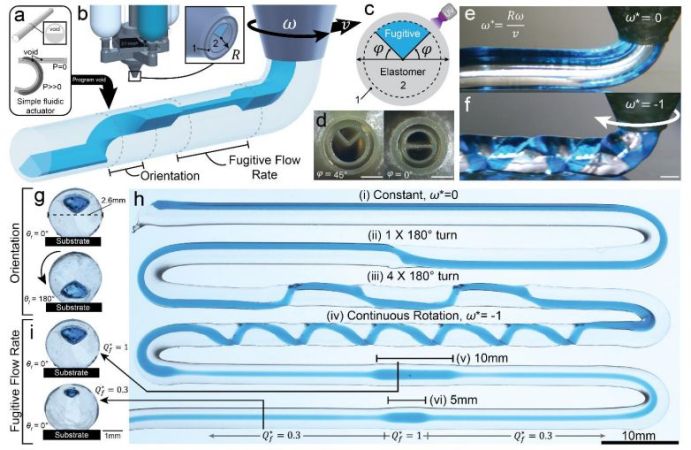
Pneumatics are a common way to add some motion to soft robotic actuators, but adding it to a robot can be somewhat of a chore. A method demonstrated by [Jackson K. Wilt] et al. (press release, preprint) involves using a 3D printing to extrude two materials: one elastomeric material and a fugitive ink that is used to create pneumatic channels which are dissolved after printing, leaving the empty channels to be filled with air.

By printing these materials with a rational, multi-material (RM-3DP) custom nozzle it’s possible to create various channel patterns, controlling the effect of compressed air on the elastomeric material. This way structures like hinges and muscles can be created, which can then be combined into more complex designs. One demonstrated design involves a human-like hand with digits that can move and grasp, for example.

In the demonstration the elastomeric material is photopolymerizable polyurethane-acrylate resin, with the fugitive ink being 30 wt% Pluronic F-127 in water. The desired pattern is determined beforehand with a simulation, followed by the printing and UV curing of the elastomeric resin.

As is typical of soft robotics implementations, the resulting robots are more about a soft touch than a lot of force, but could make for interesting artificial muscle designs due to how customizable the printing process is.

Continue reading “3D Printing Pneumatic Channels With Dual Materials For Soft Robots”

Tech In Plain Sight: Pneumatic Tubes

Today, if you can find a pneumatic tube system at all, it is likely at a bank drive-through. A conversation in the Hackaday bunker revealed something a bit surprising. Apparently, in some parts of the United States, these have totally disappeared. In other areas, they are not as prevalent as they once were, but are still hanging in there. If you haven’t seen one, the idea is simple: you put things like money or documents into a capsule, put the capsule in a tube, and push a button. Compressed air shoots the capsule to the other end of the tube, where someone can reverse the process to send you something back.

These used to be a common sight in large offices and department stores that needed to send original documents around, and you still see them in some other odd places, like hospitals or pharmacy drive-throughs, where they may move drugs or lab samples, as well as documents. In Munich, for example, a hospital has a system with 200 stations and 1,300 capsules,  also known as carriers. Another medical center in Rotterdam moves 400 carriers an hour through a 16-kilometer network of tubes. However, most systems are much smaller, but they still work on the same principle.

Continue reading “Tech In Plain Sight: Pneumatic Tubes”

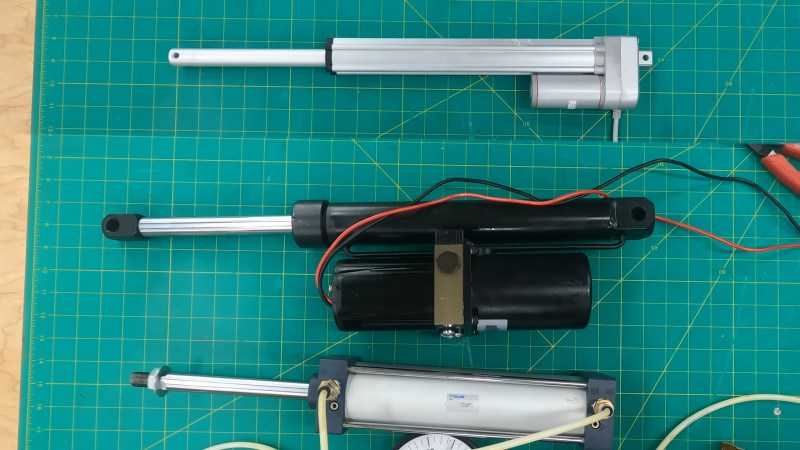
A set of three linear actuators set atop a green with yellow grid cutting mat. The electric actuator on the top of the image is silver and has a squarish tube. It is slender compared to the other two. A black, hydraulic actuator sits in the middle and is the largest of the three. A silver pneumatic actuator at the bottom of the image is the middle sized unit.

Linear Actuators 101

Linear actuators are a great help when you’re moving something along a single axis, but with so many options, how do you decide? [Jeremy Fielding] walks us through some of the high level tradeoffs of using one type of actuator over another.

There are three main types of linear actuator available to the maker: hydraulic, pneumatic, and electric. Both the hydraulic and pneumatic types move a cylinder with an attached rod through a tube using pressure applied to either side of the cylinder. [Fielding] explains how the pushing force will be greater than the pulling force on these actuators since the rod reduces the available surface area on the cylinder when pulling the rod back into the actuator.

Electric actuators typically use an electric motor to drive a screw that moves the rod in and out. Unsurprisingly, the electric actuator is quieter and more precise than its fluid-driven counterparts. Pneumatic wins out when you want something fast and without a mess if a leak happens. Hydraulics can be driven to higher pressures and are typically best when power is the primary concern which is why we see them in construction equipment.

You can DIY your own linear actuators, we’ve seen tubular stepper motors, and even a linear actuator inspired by muscles.

Continue reading “Linear Actuators 101”

Standing Desk Uses Pneumatics To Do The Job

Most standing desks on the market use electric motors or hand cranks to raise and lower the deck. However, [Matthias Wandel] found a Kloud standing desk that used an altogether different set up. He set about figuring out how it worked in the old-fashioned way—by pulling it apart.

The Kloud desk relies on pneumatics rather than electrical actuators to move up and down. Inside the desk sits a small tank that can be pressurized with a hand-cranked mechanism. A lever can then be used to release pressure from this tank into a pair of pneumatic cylinders that drive the top of the desk upwards. The two cylinders are kept moving in sync by a tensioned metal ribbon that ties the two sides together. The mechanism is not unlike a gas lift chair—holding the lever and pushing down lets the desk move back down. Once he’s explained the basic mechanism, [Matthias] gets into the good stuff—pulling apart the leg actuator mechanism to show us what’s going on inside in greater detail.

If you’ve ever thought about building your own standing desk, this might be a video worth watching. We’ve featured some other great pneumatics projects before, too. Video after the break.

Continue reading “Standing Desk Uses Pneumatics To Do The Job”