Snap Together Boombox Great For Taking Your Music On The Go

fab-boombox

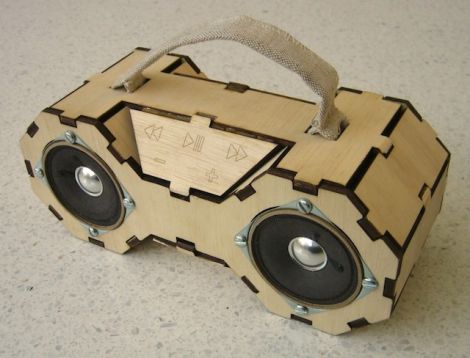
[Matt Keeter] wanted to take his music on the go, and wrote in to share a great looking boombox he built for under $100. His goal was to put something together that could be made in pretty much any hackerspace/fab lab, so his boombox was made using simple materials.

He first modeled the boombox using cardboard, later fabbing it from wood on a laser cutter. The design allows the stereo to be snapped together, though [Matt] says that some joints were glued as an extra precaution. Inside the boombox resides an custom PCB he built which incorporates an ATmega328, an MP3 decoder, and an SD card to store his music.

One feature we really like is the control scheme [Matt] built into the boombox. Each of the capacitive touch buttons are positioned on top of a copper pad, which are wired into the control board. He says that while good in theory, he had a difficult time getting the buttons to work properly, though they seem to do the job well enough.

If you’re looking for a portable music solution and have access to a laser cutter, be sure to check out [Matt’s] page for schematics and firmware.

Animated LED Buckyball

This animated LED buckyball has little to do with modeling a carbon molecule but a lot to do with adding some excitement to your party decor. [Tim] felt that the LED cube hacks had run their course, so took on the challenge of a sphere made out of pentagonal and hexagonal components instead.

As with many LED projects, finding a good diffuser is paramount. [Tim] decided to go with hot glue sticks, which do a great job of both diffusing, and piping the light from RGB LEDs. The unintended consequence of this choice is that the shape sags under the weight of 90 glue cylinders.

At the end of each glue segment you’ll find a tiny surface-mount RGB LED and controller combo. This is [Tim’s] own design and in bulk it gets the cost of each node down to about one dollar. With the help of a soccer ball as an assembly jig he finished off the construction and wrote some code to produce the eye-pleasing animations seen after the break.

Continue reading “Animated LED Buckyball”

Make Any Scrap Of Paper Sticky With 2000 Volts

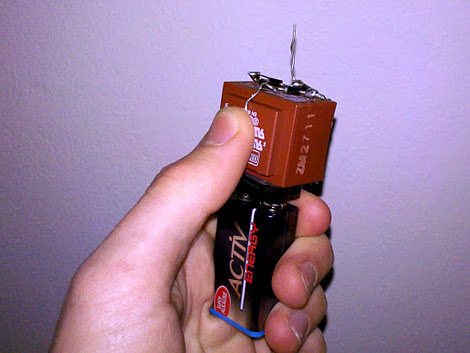
Who needs chemistry when a little bit of physics will do? Instead of brewing up a batch of weak adhesive to make his own post-it notes, [Valentin] built this handheld device to add an electrostatic charge to bits of paper. Just give them a couple of seconds to charge and they’ll stick to the wall with ease.

The charging circuit is pretty simple, involving a transformer, transistor, resistor, and four diodes for rectification. He walks us through the build process, free forming the circuit using the transformer housing as a base. Once the circuit is fully assembled, a 9 volt battery connector is added and the fragile parts are hot-glued in place. It boosts the output voltage all the way up to 2 kV, but it’s still safe because it’s at a very low current.

The concept is akin to the high-voltage bulletin board seen last month. We wonder how long the notes will stay in place without an active electrical connection to keep the charge?

Bitbuf Delivers Some Of The Best Chiptune Effects Around

Wow. And furthermore, WOW! Just looking at that clean prototype you know that a lot of work has gone into the project, but when you hear this chiptune MIDI device you’ll really be impressed. We know what you’re thinking, but really, you’ve got to hear this to appreciate the quality [Linus Akesson] achieved in this synthesizer. You can catch it after the break.

He does a great job of showing off the different waveforms that can be produced by the ATmega88 on this board. But there’s much more. It also serves as a 16 frame, 16 channel sequencer for creating and layering your own loops.

He mentions that eight oscillators are used for the waveform generation. We don’t see hardware for this on the board. Either we’re missing it, or these oscillators are being created with software? If you have an idea of how this works please clue us in by leaving a comment.

Continue reading “Bitbuf Delivers Some Of The Best Chiptune Effects Around”

Xbee Wireless Servo Control

Servo control is good, but wireless control is even better. This hack by [PyroElectro Tutorials] shows you how to do this wirelessly using two Xbee modules. There’s also a great example in the video after the break of this “hacking platform” used to control an animatronic head’s eyes. (we’ve featured the eyes here before).

In this control scheme, communication is one way only. An Xbee module is used as the transmitter, and the other as the receiver. The tutorial does a great job of explaining the parts used and gives links for purchasing the components if needed. It even goes over some very basic servo theory and gives schematics as well as assembly pictures. Transmitter and receiver firmware files are also available to download, so there’s nothing keeping you from trying it! Join us after the break to see the working example.

Continue reading “Xbee Wireless Servo Control”

MAMEing A CNC Router

[Ed] is pretty old school. He loves the functionality of old industrial shop tools that have their own dedicated systems. With huge candy-like buttons, who wouldn’t? [Ed] decided to replicate this aesthetic by building a MAME controller for his Mach3 controlled router.

[Ed] had a bunch of MAME buttons and joysticks sitting around from a forgotten project. With his vinyl plotter, it was relatively easy to make a very nice looking control panel. To connect the buttons to the Mach3 computer, a disused I-Pac was brought into the mix. The I-Pac reads the state of the buttons and sends keyboard codes over USB to the computer.

Because the very popular Mach3 CNC software responds to hotkeys, it was very simple to make the buttons do as they say. [Ed] has full control over the X, Y, and Z axes as well as the spindle speed. It seems like this would be interesting to do some ‘free form’ CNC work on [Ed]’s router.

Continue reading “MAMEing A CNC Router”

Keeping Christmas Present Hunters Guessing With QR Code Gift Tags

qr-code-gift-tags

[Thadd Brooks] is a geeky dad of the highest degree. His kids are constantly trying to figure out what mom and dad bought them for Christmas, while he continues to think up ways to stymie their progress. He certainly could have put a few prank presents under the tree, but he opted to go a different route, confusing his smartphone-wielding kids with QR codes.

Each gift under the tree bears no name tag, rather they are adorned with a single QR code sticker which [Thadd] printed out. When scanned, the code brings his children to a page on his web server stating who the gift is for.

The catch? Well, the codes bring up a random page each time, attributing the gift to every member of the family along the way. There’s no chance that any of the kids will be able to correctly identify their gifts before Christmas Eve, when [Thadd] flips a switch on the server and reveals the actual gift recipients.

It’s certainly a clever, yet frustrating, way to keep his family on their toes, and we think it’s a pretty awesome idea.

If you’d like to see some of the pages he has created to confuse his kids, just click the “Search” button on the link above.