Portal Radio Is Why Valve Needs To Build Hardware

We’ve seen Portal gun builds, a few cute turret replicas, and even a miniaturized version of GLaDOS, but [John]‘s Portal radio replica is the first physical version of this oft-forgotten Portal item.

Interestingly, the entire radio is made from scrap. The spheroid body shell is made from the foam insulation from a commercial freezer, carefully sculpted, Bondoed, and painted over the course of 300 hours. The radio guts are taken from an upcycled radio, and powered by either an internal battery or a wall wart DC adapter – perfect for carrying around a test chamber with a portal gun.

Right now, there’s an AM/FM receiver inside the radio along with an audio input so an iPod or such can be plugged in. While we would have loved to see a loop of theuptempo version Still Alive, we’re guessing [John] hasn’t found an easy way to do that with junked parts yet.

Check out [John]‘s build video after the break.

Continue reading “Portal Radio Is Why Valve Needs To Build Hardware”

DIY Battery Powered Soldering Iron

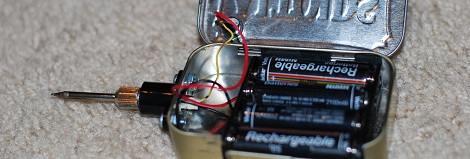
When it’s time to get started on a project and put our irons in the fire, we usually reach for a nice Weller or Hakko soldering iron. Unfortunately, that isn’t possible when we’re soldering something away from a wall outlet. Portable soldering irons usually range from slightly to completely terrible, and [Adam] thought he could do better. He put together an Instructable for a portable battery-powered soldering iron that’s extremely easy to build.

[Adam]’s project mounts a standard Radio Shack soldering iron tip in an E-10 flashlight bulb socket. Power is provided by 6 Volts of AA batteries, with a small switch added for the obvious safety concerns. Although [Adam] could have added a small project box, he chose to build his entire project around a piece of wood. This is an excellent choice in our humble opinion; wood doesn’t melt, has very low thermal conductivity, and anyone using this iron should be smart enough to turn it off if the handle starts smoking.

While this isn’t the best possible portable soldering iron (we’re partial to the disposable-lighter-fueled torches with a soldering iron attachment), it’s much better than the ColdHeat soldering iron that received consistently bad reviews.

Edit: [Adam] updated his build to be a little safer after this story was posted. We changed the original title pic to reflect this; here’s the old one.

Tiny Quadcopter Gets An Update, On The Verge Of Flying Without PC

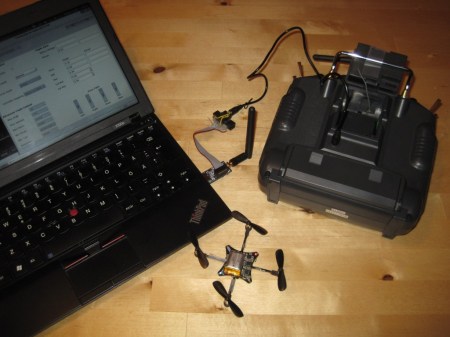
Crazyflie, the itty bitty quadcopter that uses a PCB for its frame is at the cusp of being able to fly without a PC. We were enamored with it when we first spotted it, and the Crazyflie has only gotten better. As you can see, a new PCB gives it a slightly more stylized look, but that’s not all. There have been major improvements to the design of the software, and various parts of the hardware. They’re waiting for the final prototype to arrive from the factory to test the ultimate goal, PC-less flight.  We’re not sure why this tiny quadcopter is so enthralling, but it sure has us captivated.

Be sure to check out another flight video after the break.

Continue reading “Tiny Quadcopter Gets An Update, On The Verge Of Flying Without PC”

Upgrading A Rockford Fosgate Punch 601s To An 801s With Just A Handful Of Parts

[Simon] had a Rockford Fosgate Punch 601s amplifier in his car, and while it was a great piece of equipment, he wanted a little more power behind his stereo system. It turns out that with just a handful of parts and a bit of soldering work, he was able to increase his amplifier’s output by 200 watts, putting it on par with a Punch 801s.

The main board in each amp is laid out identically, making the conversion a relatively easy process. A handful of MOSFETs need to be added, along with some resistors and capacitors. Most of the work can be done with a decent soldering iron, though you might want a hot air reflow station to handle the smaller resistors – it all depends on your skill set.

We’re really not sure how big the price difference is between the two amps, but we’re pretty certain that the conversion would be worth it. [Simon] sells conversion kits on his web site for under $60, but you may be able to find the parts for a bit less if you hunt around.

Barrel Organ Made From Lego Plays The Star Wars Theme

lego-starwars-barrel-organ

Whether or not you are a fan of the first installment of the Star Wars prequels, you have to see what [Lorenz Lnggrtnr] and [Renee Hoffmeister] have put together for the movie’s 3D debut.

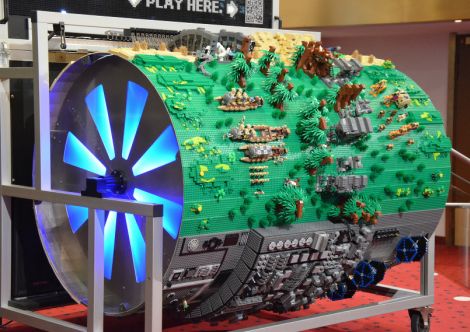
In an attempt to capture the essence of Star Wars in a new fashion, they constructed a large barrel organ from Lego bricks that plays the movie’s legendary opening theme when turned. The barrel is separated into four parts, each representing one of the series’ iconic settings in plastic block form.

Hoth, the Death Star, Tatooine, and Endor are all featured on the organ, with each environment’s structures playing specific notes from the song. As the barrel turns each Lego structure toggles a note to be played on the attached organ, via a “reading” mechanism built from metal arms and Lego tires.

It looks fantastic, and sounds pretty decent too. Be sure to stick around for a short video that shows off the barrel organ in action.

[via Wired]

Continue reading “Barrel Organ Made From Lego Plays The Star Wars Theme”

A Glorious Mechanical Seven Segment Display

If you’ve ever wondered why you’ve never seen a mechanical seven-segment display, now you know. They’re fairly complicated and most likely absurdly expensive, especially when a few light bulbs or LEDs would do the same job equally well. This didn’t stop [kiu] from completing his mechanical seven-segment clock he calls SevenBlocks, and for that we are thankful.

Each of the 28 segments in [kiu]’s clock is made of three layers of acrylic and a short section of a rack gear. Unlike every seven-segment display you’ve ever seen, tiny hobby servos provide the indication for each segment. For the electronics, An ATMega8 is used for the brains of the outfit with a 74HC595 shift register to expand the number of I/O lines. A DS1307 RTC module provides accurate timekeeping, and the dozens of servo outputs visible in the ‘guts shot’ makes you realize why you’ve never seen a mechanical seven segment display before – they’re really friggin’ complex.

If you want to build your own mechanical seven-segment clock, [kiu] put all the files up on Github. Everything is there, from the .DXF files ready to feed to a laser cutter to the schematic and board files for each of the three PCBs. A video showing this clock in action is sort of necessary, so you can check that out after the break.

Continue reading “A Glorious Mechanical Seven Segment Display”

Playing Zork On The Arduino

If you’re looking for something to do on a boring Sunday afternoon, how about dusting off your Arduino and playing a text adventure? [Louis] wrote in to tell us about his project called AZIP, an app that will let you play classic 1980s text adventures on your Arduino.

The famous Infocom text adventure games such as Zork and Hitchhiker’s Guide to the Galaxy (reputed to be better than the book, by the way) all ran on a virtual machine called a ZMachine. We’ve seen a few unsuccessful attempts to run a ZMachine on an Arduino, but these builds usually end up going with a Linux-based single board computer. As far as we’re aware, [Louis]’ build is the first time classic text adventures have been available on the Arduino.

[Louis] based his build on the popular Jzip ZMachine. The required hardware is fairly minimal – just an Arduino with an SD card. Right now the limitations of Flash and RAM on the Arduino means [Louis] needed to remove the game save and restore functions, but with a little clever coding and continued development those functions can be restored. Very cool indeed.