How A Steam Bug Once Deleted All Of Someone’s User Data

In a retrospective, [Kevin Fang] takes us back to 2015, when on the Steam for Linux issue tracker [keyvin] opened an issue to report that starting the Steam client after moving the Steam folder had just wiped all of his user data, including his backup drive mounted under /media. According to [keyvin], he moved the standard ~/.local/share/steam to a drive mounted under /media and symlinked ~/.local/share/steam to this new location on the external drive. He then tried starting Steam, which failed, before Steam crashed and tried reinstalling itself. That’s when [keyvin] realized that Steam had apparently recursively deleted everything owned by his user from the root folder.

The infamous Valve code that made Linux users sad.

In the issue thread, user [doofy] got hit by the same bug when trying to directly start the ~/.local/share/steam/steam.sh script with debugging enabled. He then was the first to point out the rm -rf in that steam.sh script, but since this particular line is in a function only called when Steam tries to remove and reinstall itself to ‘fix’ a botched start, how did this happen? Ultimately it seems to be because of the STEAMROOT variable being set to an empty string, and another unset variable triggering the reset_steam() function, leading to the demise of all the user data.

Since then Valve has presumably fixed the issue, as no further users have filed tickets, but it’s concerning that a similar issue seems to still exist on Windows. Whether or not the original Linux issue has been fixed, it shows clearly how one should always check return values and perhaps, just maybe, never do an automated rm -rf or equivalent.

Continue reading “How A Steam Bug Once Deleted All Of Someone’s User Data”

Flipped Transformer Powers Budget-Friendly Vacuum Tube Amp

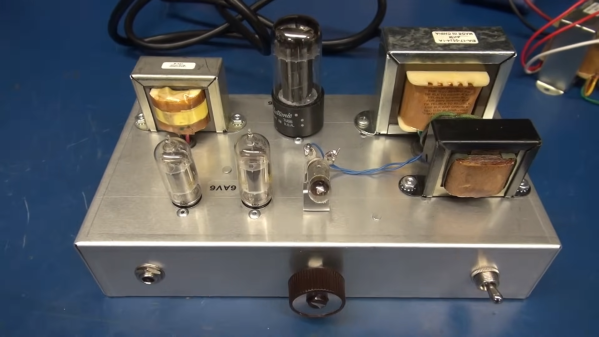
If you’ve ever wondered why something like a radio or a TV could command a hefty fraction of a family’s yearly income back in the day, a likely culprit is the collection of power transformers needed to run all those hungry, hungry tubes. Now fast-forward a half-century or more, and affordable, good-quality power transformers are still a problem, and often where modern retro projects go to die. Luckily, [Terry] at D-Lab Electronics has a few suggestions on budget-friendly transformers, and even shows off a nice three-tube audio amp using them.

The reason transformers were and still are expensive has a lot to do with materials. To build a transformer with enough oomph to run everything takes a lot of iron and copper, the latter of which is notoriously expensive these days. There’s also the problem of market demand; with most modern electronics favoring switched-mode power supplies, there’s just not a huge market for these big lunkers anymore, making for a supply and demand equation that’s not in the hobbyist’s favor.

Rather than shelling out $70 or more for something like a Hammond 269EX, [Terry]’s suggestion is to modify an isolation transformer, specifically the Triad N-68X. The transformer has a primary designed for either 120 or 230 volts, and a secondary that delivers 115 volts. Turn that around, though, and you can get 230 volts out from the typical North American mains supply — good enough for the plate supply on the little amp shown. That leaves the problem of powering the heaters for the tubes, which is usually the job of a second 6- or 12-volt winding on a power transformer. Luckily, the surplus market has a lot of little 6.3-volt transformers available on the cheap, so that shouldn’t be a problem.

We have to say that the amp [Terry] put these transformers to work in sounds pretty amazing — not a hint of hum. Good work, we say, but we hope he has a plan in case the vacuum tube shortage gets any worse.

Continue reading “Flipped Transformer Powers Budget-Friendly Vacuum Tube Amp”

Building A Giant Vacuum Tube Smart Lamp

Vacuum tubes are pretty, which is why they’re often showcased externally on exquisitely-expensive home Hi-Fi hardware. But if you just want to gaze at their beauty without making any noise, why not build this vacuum tube lamp from [Noel Törjék] instead?

[Noel] got into some creative reuse with this build, with the main body consisting of a bell jar and wooden bowls. The internal structure is then created from jar lids, wire, metal sheeting, steel rods, and galvanized wire mesh. Simple modelling techniques are used to assemble the internal parts of the “valve,” including the grid and the electrodes and so on. As for light, [Noel] employed a ZigBee LED driver that he could control over his smart home setup via a Philips Hue bridge.

The final result looks like an extra-large tube. Anyone who knows what it is will spot that it’s not a real one, but they’re also exactly the audience that will appreciate it for what it is. Everyone else will probably just think you’ve taken an interest in strange art-deco replica lighthouses. It’s not the first time we’ve seen replica valves around these parts, though, and we’re sure it won’t be the last!

Home Brew Sandblaster Is A Junk Bin Delight

Opinions vary as to what actually constitutes a “complete” shop, but one thing is for sure: the more tools, the better. That doesn’t mean running out to buy a tool every time you have a need, of course. Sometimes you can throw together what you need from scrap, as with this ad hoc sandblaster. (Video, embedded below.)

Fans of junk builds — and we mean that with the highest respect — will want to pay special attention to [GARAGEUA]’s video below. It looks like pretty much everything he uses to make this sandblaster comes from the junk pile — bits of old plumbing fixtures, a blow gun that’s seen much better days, some old nuts and bolts, and even a deceased spark plug all make an appearance. That last one is perhaps the most interesting, since with some clever dissection the spark plug’s body and its ceramic insulator were used for the nozzle of the sandblaster. And best of all, no lathe was needed for this job — everything was done with a hand drill and an angle grinder. Check out the build details in the video below; you might pick up some useful tips.

We’ve featured even junkier sandblaster builds before, but this one is a clever way to save a few bucks and flex a bit on your mechanical ingenuity. If you need a sandblaster and it’s something you’re going to use again and again, by all means go out and buy one — we won’t judge. But rolling your own is cool too.

Continue reading “Home Brew Sandblaster Is A Junk Bin Delight”

One Coder Is Porting Portal To The Nintendo 64

When Portal came out in 2007, developers Valve chose not to release the groundbreaking title on an obsolete Nintendo console long out of production. Nobody cared at the time, of course, but [James Lambert] is here to right that wrong. Yes, he’s porting Portal to the N64.

The port, or “demake,” as [James] calls it, has been under construction for some time. The project has posed some challenges: Portal was developed for PCs that were vastly more powerful than the Nintendo 64 of 1996. Thus, initial concerns were that the console wouldn’t be able to handle the physics of the game or render the recursive portal graphics.

However, hard work has paid off. [James] has chipped away, bit by bit, making improvements to his engine all the while. The latest work has the portals rendering nicely, and the companion cube works just the way you’d expect. There’s also a visible portal gun, and the engine can even render 15 recursive layers when looking through mirrored portals. Sixteen was too much.

Of course, there’s still lots to do. There’s no player model yet, and basic animations and sound are lacking. However, the core concept is there, and watching [James] flit through the not-quite-round portals is an absolute delight. Even better, it runs smoothly even on original Nintendo hardware. It’s a feat worthy of commendation.

We had no idea what [James] had in store back when we featured his work creating real-time shadows on N64 hardware. Now we know! Video after the break.

Continue reading “One Coder Is Porting Portal To The Nintendo 64″

S15351 tube transmitter

Retro And New Tech Combine In This Hybrid Ham Transmitter

We’ve said it before and we’ll say it again: the best part about holding an amateur radio license is that it lets you build and use your own transmitting equipment. Hams have been doing this for more than a century — indeed, it was once the only way to get on the air — using whatever technology was available. But the mix of technologies in this low-power transmitter for the 80-meter band is something you don’t see every day.

As ham [Helge Fykse (LA6NCA)] describes in the video below, the project began when he came into possession of a bonanza of vacuum tubes — 12A6 tetrodes, specifically. The new-old-stock tubes were perfect for an RF power amplifier, but that left the problem of what to use for an oscillator. [Helge] chose to meld the old with the new and used oscillator board that he designed. The board has an ATmega88 microcontroller and an Si5351 oscillator, along with a 3V3 regulator to let the module run on 12 volts. And for a nice retro touch, [Helge] put the board in a 3D printed case that looks like an old-fashioned quartz crystal.

There are some other nice design touches here too. A low-pass filter cleans up the harmonics of the oscillator’s 3.5-MHz square wave output before feeding it to the amplifier, in a nod to proper spectrum hygiene. The primary for the amp’s air-core output transformer is hand-wound, with 3D printed spacers to keep the winding neat and even. The tuning process shown below is interesting, and the transmitter was used to make a solid contact with another ham about 100 km away. And we really liked the look of [Helge]’s shack, stuffed as it is with gear both old and new.

We’ve personally tried the Si5351 for QRP transmitters before, but this blend of the old and new really makes us want to find some tubes and get to playing.

Continue reading “Retro And New Tech Combine In This Hybrid Ham Transmitter”

Valve Reluctantly Shows How To Mod The Steam Deck

As the narrator in this official instructional video from Valve reminds the viewer several times, the gaming company would really rather you not open up your brand new Steam Deck and start poking around. They can’t guarantee that their software will function should you start changing the hardware, and since there’s no source for replacement parts yet anyway, there’s not much you can do in the way of repairs.

That said, Valve does believe you have the right to take apart your own device, and has produced the video below as an aid to those who are willing risk damaging their new system by opening it up. Specifically, the video goes over how to replace the most likely wear items on the handheld, namely the thumb sticks and the SSD. It seems inevitable that the stock thumb sticks will wear down after a couple years of hard use, so we’re glad to see they are easily removable modules. As for the SSD, it stands to reason that users would want to swap it out for faster and higher capacity models as they become available in the coming years.

Sooner or later, these are going to need to be replaced.

Now to be clear, we appreciate Valve making this video, and would love to see other manufacturers be so forthcoming. But we have to admit that some of its messaging does seem a bit heavy handed. The narrators admonition that users who open their Steam Deck are literally taking their lives into their own hands due to the danger of potentially rupturing the system’s lithium-ion battery is a bit hyperbolic for our tastes. The constant reminders of how badly you could bungle the job just comes off as overly preachy, though to be fair, we probably aren’t the intended audience.

Outside of its obvious gaming functions, we’re excited too see what the community can do with the Steam Deck. With official reference material like this, perhaps we’ll even start seeing some hardware modifications before too long. Though we wouldn’t blame you for hitting the Mute button halfway through.

Continue reading “Valve Reluctantly Shows How To Mod The Steam Deck”