Building A 6502 In Minecraft

We’ll admit that we haven’t been following Minecraft like we used to; its been a while since we’ve seen something amazing in Minecraft, but [eloraam]’s 6502 emulator (part of her RedPower Minecraft mod) takes the cake.

The RedPower mod adds a lot of industrial technology to Minecraft. Pumps, solar panels, and pneumatic tubes to move blocks around are the staple of this mod, but with the addition of a fully emulated 6502 computer, Minecraft moves from an anachronistic medieval-themed steampunk aesthetic to a full-on machine age, mainframes everywhere style.

The heart of the 6502 portion of the RedPower mod are three craftable blocks; a CPU, a monitor, and a disk drive. All these blocks are connected together with ribbon cables and can interact with other blocks in the Minecraft universe. The CPU is an emulated 6502, with a few instructions borrowed from the 65816 and the addition of MUL and DIV. It’s possible to program this computer in assembly, but [eloraam] a Forth interpreter with the OS to make programming a little easier.

It’s been almost two years since we first saw the beginnings of a CPU made in Minecraft, but this mod takes everything to the next level. In actuality, this isn’t very different from the game [notch] is currently working on; both feature an emulated 80’s era computer that can do all your in-game bidding. We can’t imagine anything better to get us hooked on Minecraft again, and we’ve got to commend [eloraam] for some seriously awesome work.

After the break is a 23-minute tutorial on the functions of the RedPower CPU, as demonstrated by Minecraft aficionado [direwolf20].

Continue reading “Building A 6502 In Minecraft”

Rain Activated Light Show In An Umbrella

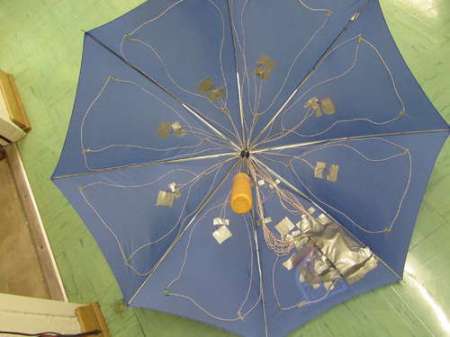
In a decision we completely agree with, these industrious young women decided that playing in the rain would only be more fun if it included an interactive light show. They wanted the rain itself to cause LEDs in their umbrella to light up. To achieve this, they put piezo sensors on each of the 8 panels of the umbrella. When that panel gets hit, its LEDs light up. You can see in the video after the break that it was quite effective.

Their next step should be to somehow increase the resolution to be similar to this one, while maintaining interactivity with the rain. How would you sense rain drops with more definition though?

[via Adafruit]

DeLorean Hovercraft

[Matthew Riese] got frustrated waiting for the future to arrive so he could have his flying car. He decided to take things into his own hands and construct the closest thing he could. This turned out to be a hovercraft. Not only that, but he thought that the most fitting shape for this thing would be a DeLorean.  We can’t say that we disagree with him. Unfortunately, there isn’t a whole lot of information on his build. There is this cool video on his kickstarter page (don’t worry, he got funded back in 2010). To make up for the fact that the build information is sparse, we’ve found you some plans to make your own hovercraft. Just add whatever shape body you want, though we have some suggestions.

[via Makezine]

Making Real-life Portals With A Kinect

[radicade] wanted to know what real life portals would look like; not something out of a game, but actual blue and orange portals on his living room wall. Short of building a portal gun, the only option available to [radicade] was simulating a pair of portals with a Kinect and a projector.

One of the more interesting properties of portals is the ability to see through to the other side – you can look through the blue portal and see the world from the orange portal’s vantage point. [radicade] simulated the perspective of a portal using the head-tracking capabilities of a Kinect.

The Kinect grabs the depth map of a room, and calculates what peering through a portal would look like. This virtual scene is projected onto a wall behind the Kinect, creating the illusion of real-life orange and blue portals.

We’ve seen this kind of pseudo-3D, head tracking display before (1, 2), so it’s no surprise the 3D illusion of portals would carry over to a projected 3D display. You can check out [radicade]’s portal demo video after the break.

Continue reading “Making Real-life Portals With A Kinect”

DIY Spring And Plate Reverb

If you’re running your own recording studio, you’re going to need a lot of gear that seems excessively esoteric to the non-musically inclined. A rack full of synth gear looks just like any other cabinet of technology you would find in a server room. Electronic music is, for the most part, very utilitarian looking, but there are a few pieces that add a very nice aesthetic touch to any studio. [Peter] made two great looking pieces of hardware – both reverbs – that significantly add to the decor of his studio. As a bonus, they also sound really good.

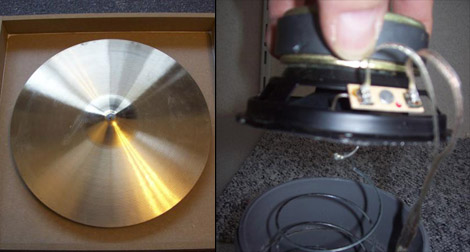
[Peter]’s spring reverb (Dutch, Google translate) works just the same as any other spring reverb; a speaker puts some music into a slightly stretched spring, and this sound is picked up by another transducer at the opposite end. For this build, [Peter] used a Slinky and a piece of PVC pipe left over from a bathroom remodel. Adding a few jacks, pots, and a preamp, [Peter] had a very nice and extremely large spring reverb.

The plate reverb (translation) is also a staple of pro recording studios around the globe. This reverb is somewhat similar to a spring reverb, except the spring is replaced with a tuned metal plate. [Peter] used a cymbal from a drum set for this piece of kit. Two speakers are attached to the back of the cymbal, one feeds a sound into the cymbal, the other speaker picks up those sounds and sends it to the mixing board.

There’s a lot of really cool musical DIY projects over on [Peter]’s site, along with a few audio demos for each of his DIY projects. We’ve included his reverb demos after the break, feel free to give those a listen.

Thanks go to [geekabit] for sending this one in.

Continue reading “DIY Spring And Plate Reverb”

Geeks Living Off The Grid Are Hard On Batteries

Many of you will remember [Mikey Sklar] from the multitude of times he’s been on hackaday. What you may not have noticed is that he is an ubergeek, living off the grid.

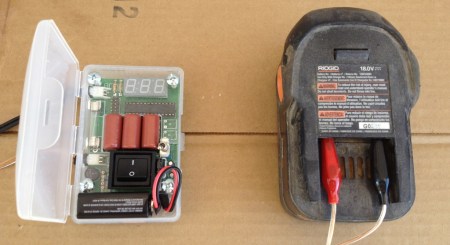
He has Solar PV battery bank, three electric vehicles, a shipping container loaded with battery powered tools and a small army of iRobot Roomba’s for cleaning. Getting the maximum lifetime out of a battery by removing sulfation is essential to keep expenses down.

Keeping expenses down is nearly a full time job when trying to live the homestead lifestyle. Our current culture makes it extremely difficult to survive completely on self made/grown things and bartering. They seem to be doing pretty well though. One way he can reduce his costs while still getting to enjoy some modern gadgets is to get longer life out of his batteries.  He does this by using a capacitive battery charger and desolfator that he designed and affectionately calls “Da Pimp”. He also brings in a little bit of income by selling kits!

 A capacitive charger behaves like a constant current power supply dynamically adjusting the voltage to get over the batteries internal resistance. Plus there is a pulse from the AC/DC conversion. This allows for old batteries to last longer and for dumpster dived to be used as replacements. Capacitive chargers are small, silent and super efficent (up to 60% more so than cheap transformer based chargers).

Of course, [Mikey] is a supporter of sharing information so you can also go to his site and download the schematics,bill of materials, gerber files, and files for the housing,  to build one yourself.

Building A Color Sensor Using Luminosity

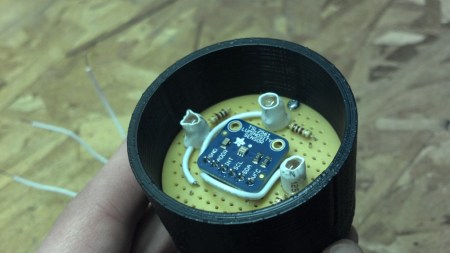
[Richard Osgood] is back again with an interesting project. This time he has constructed a color sensor. His initial design was to use three LEDs and a photoresistor. He would shine a red, then green, then blue LED on a surface and record the reflected light with the photoresistor allowing him to determine how much reflected light there was of each color. Unfortunately, he found it to be completely unreliable. An attempt at using a light frequency sensor didn’t work either. What did finally work, was a luminosity sensor shown above.

Finally, his prototype worked. Unfortunately only the red LED gives readings that he considers to be adequate with the blue and green being “not all quite right”.  With this type of circuit, he could build a clone of the magic chameleon lamp.