Melting Beer Cans And Building Engines

What do you do if you’ve got a fully equipped machine shop and you’re tired of taking old beer cans to the recycler? If you’re like [Brock], you’ll probably end up melting those cans down to build an engine.

After gathering 50 pounds of beer cans and melting them down into ingots of various sizes, [Brock] and company had a lot of aluminum and nothing to build. Eventually, someone got the idea to build an internal combustion engine out of these beer can ingots.

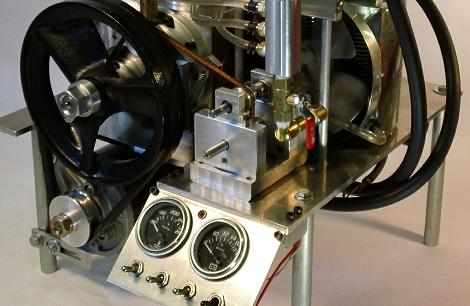
So far, the beer can engine crew has built two engines from these beer can ingots. The four-stroke engine started off as a 5-inch aluminum cube, bored and milled into something resembling an engine block. When [Brock] and the beer can engine team completed their four-stroke masterpiece, they had a water-cooled engine displacing 150cc with a single 2″ bore piston. The two-stroke engine is a much simpler affair with a 1 inch bore displacing 19cc.

Even though there’s no information at all covering the pottery kiln foundry used to melt the beer cans into ingots, it’s an amazing piece of work building and engine from the ground up.

You can check out a few videos of both engines after the break.

Continue reading “Melting Beer Cans And Building Engines”

Better Driving With A Bullduino

Despite what you may have heard from the kids hanging out in the parking lot of Taco Bell, there’s a lot to be said about driving conservatively. Not peeling out after ever red light and stop sign does wonders for the life of your engine, and not slamming on the brakes 50 feet away from an intersection will keep your brake pads going a long time. [aromaoftacoma] wanted a dashboard gauge telling him how good of a driver he is, so when he got a bullduino he knew what he had to do.

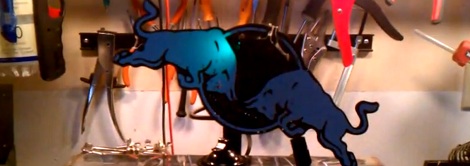
[aromaoftacoma]’s project for the Redbull creation contest uses the very cool Arduino shield/Redbull logo known as a bullduino with an accelerometer to track how conservatively he’s driving. Quick stops and starts are murder on an automobile – it’s the same reason your grandmother has had the same car for 20 years – so [aromaoftacoma] made a wonderful display using red and blue LEDs behind each charging bull.

Because simply blinking a LED in response to data pulled from an accelerometer is a little boring, [aromaoftacoma] added a servo to change the orientation of the charging bulls. When he’s driving well, the blue bull is tilted up, and when he stops short the red bull becomes the focus of attention. Not a bad build at all.

You can check out [aromaoftacoma]’s build video after the break.

Continue reading “Better Driving With A Bullduino”

Don’t Bring Your 3d Printer To MakerFaire

This could easily be called “the year of the 3d printer”. They are in the news, in every hackerspace, and at every event. This last one is the one I’m going to focus on here. All the coverage we’ve seen as well as our personal experience shows that MakerFaires are filled with 3d printers. At MakerFaire K. C., there were so many that I lost count. I didn’t even bother taking pictures or stopping to look after a while. Many were makerbots, though a few repraps were present too.

If you want to be noticed at MakerFaire, DON’T BRING A 3D PRINTER AS YOUR SOLE DISPLAY.

Continue reading “Don’t Bring Your 3d Printer To MakerFaire”

Playing Video On An 8-bit Microcontroller

The LCD displays for Nokia phones have seen a ton of use as easily interfaced displays for Arduino or other microcontroller projects. Usually, these LCDs are only used for displaying a few lines of text, or if someone is feeling really fancy, a small graph. Shame, then that we don’t see more complicated and computationally difficult tasks like playing video very often. [Vinod] sent us his way of playing video on these small color screens, surprisingly using only an ATMega32 microprocessor.

The build started off by saving uncompressed image data on an SD card using code from a previous project. [Vinod] was able to write a slideshow program to go through the SD card one file at a time and displaying each image. From there, it was simply a matter of using a Python script to convert frames of an .AVI video file to an uncompressed image and display them at 15 frames/second.

Turning these videos into talkies was a bit of a problem, but after taking an uncompressed .WAV file and sending that to a PWM pin on the ATMega, [Vinod] managed to play sound alongside his video.

The result is the ability to play a video with sound at 15 frames a second and a 132 x 65 resolution. You can check out the demo video after the break.

Continue reading “Playing Video On An 8-bit Microcontroller”

MakerFaire K.C. First Impressions

I arrived at the Kansas City MakerFaire bright eyed and bushy tailed, excited to meet up with like minded people and see awesome projects. I was not disappointed in that respect. The building itself is quite beautiful with giant main rooms and decorated 40 foot tall ceilings. If you haven’t ever seen the Union Station in Kansas City, I suggest you check it out. It is really quite fantastic on its own.

The event seemed rather well organized. There were talks on different subjects as well as clearly outlined areas for each event. The place was absolutely packed, but walking around still managed to be tolerable. Volunteers in bright red shirts were wandering around offering assistance to anyone looking lost or confused. I didn’t run into a single person complaining about the event. I’ve been to a ton of large events and there are usually a few people who were upset. I didn’t find any here.

The booths covered subjects from all over the place. There was knitting, model rocketry, robotics, lego construction, random hacks, cast making, and of course, 3d printing.  I’ll be posting projects separately, as there were only a selected few that I think our readers would enjoy.

There were only 3 things I found frustrating.

1. Some of the coolest stuff I found, we have already covered.

2. I didn’t have time or ability to get as much detail on any one project as I would have liked. I’m used to seeing full write-ups with schematics and pictures. I only had a couple minutes with anyone. There were constant distractions as well as an amazing amount of noise (tesla coils especially!). I walked away felling almost like there was no point in doing interviews, but I guess this is how “on location” stuff works.

3. My footage is shaky. I apologize in advance. I didn’t end up bringing a rig with me to stabilize the camera and I spent the whole time wishing I had. I know how frustrating shaky footage is. I’m truly truly sorry. I will flog myself appropriately at my soonest opportunity.

after the break is a small gallery of random pics from the event with pretty much no accompanying info. Actual posts will be coming soon with details.

Continue reading “MakerFaire K.C. First Impressions”

[Sprite_tm] Connects An LCD To A Tiny Linux Board

One of [Sprite_tm]’s colleagues recently challenged him to connect a small LCD touch screen to a Raspberry Pi. Sadly, [Sprite_tm] has yet to take delivery of a Raspberry Pi, but he did manage to connect an LCD to a Linux board without video capabilities.

Because [Sprite_tm]’s display has a 16-bit parallel interface, and 16 GPIO pins are hard to come by on the Carambola Linux board, a few shift registers had to be brought into the build to make the LCD work. These shift registers are connected to the Carambola board via an SPI interface; a very simple way to connect all the LCD pins to the Linux board.

Of course, there’s no way for Linux to speak to the LCD without a kernel driver; [Sprite_tm] wrote a framebuffer driver so the LCD can be used as a console, an X session, or used by any other program that can write to a framebuffer device.

Like all good driver authors, [Sprite_tm] is giving away the patch to enable SPI-ified LCD panels on the Carambola along with the shift register schematic. With any luck we’ll also see the Raspi drivers when [Sprite_tm] takes delivery of his Raspberry Pi.

Logging Temperatures With An Etch-a-Sketch

What do you do if you’re given a gigantic ancient printer? If you’re [IronJungle], you throw that printer on your workbench and salvage all the parts you can. After coming across a few stepper motors in an old Oki printer, [IronJungle] decided to automate an Etch-a-Sketch with the help of a PIC microcontroller and H-bridge chip to log the ambient temperature on an Etch-a-Sketch display.

After [IronJungle] was finished figuring out his stepper motor circuit, the only thing left to do was to add a thermometer. For this task, he chose a very cool one-wire digital thermometer that carries power and data over the same wire.

In the video after the break, you can check out [IronJungle] playing with his new Etch-a-Sketch temperature logger with a shot glass of hot water and a cold can of holy water. There’s no scale or graph lines drawn on this Etch-a-Sketch temperature logger, but [IronJungle] has a few more things planned for this rig. We can’t wait to see those plans come to fruition.

Continue reading “Logging Temperatures With An Etch-a-Sketch”