Glass PCB LED Clock

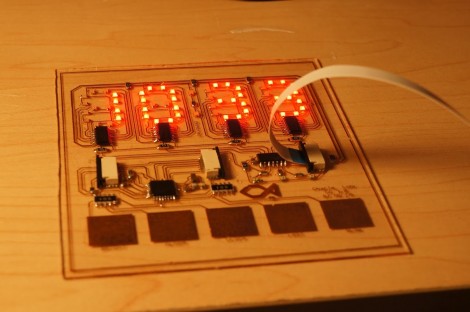
This clock looks fantastic because of the glass PCB used for the build. This banner image allows you to see all the traces and components, but when it is lifted off of the desk surface the LEDs which make up the 7-segment digits appear to be floating.

The concept isn’t new, but it’s a much larger format than we’ve seen before. When we first looked at [CNLohr’s] glass PCB fabrication he was using microscope slides. This uses a much larger pane of glass but it seems the fabrication still uses copper foil glued to the glass, then toner transfer etched like normal.

Here he’s testing out some 74LV164 chips as constant current drivers. One of the commenters on the Reddit thread is skeptical about using the chip in this way and so are we. But as the video after the break shows, it seems to work (at least for now). [CNLohr] also mentions that the AVR soldered on the display is burnt out which doesn’t help his case. Still, we love the look and can’t wait to see where he goes from here!

Continue reading “Glass PCB LED Clock”

Firing Rocket Engines In The Wrong Direction — This Is Only A Test

LVL1 has a new rocketeering group. This rocket engine testing platform is the first project to come out of the fledgling club. The purpose of the tool is to gather empirical data from model rocket engines. Having reliable numbers on thrust over time will allow the team to get their designs right before the physical build even starts.

The rig uses a pine base, with a PVC frame, threaded bolts, and a PVC cuff for mounting the engine in place. It is set to fire up in the air, directing the thrust down onto a scale. The flex sensor in the scale is monitored by an Arduino, and should be able to hold up to the 5000 pounds grams of thrust max which this type of engines can put out. The data is pushed via USB to a laptop computer where it is stored in a spreadsheet.

Calibration would be an issue here. But as long as they’re always using the same strain sensor the numbers will be accurate enough relative to each other.

How To Earn Your Hackaday Skill Badge

Since Adafruit released a few dozen hacker skill badges, we’ve been waiting for this tip to come in. [phillip torrone] over at Adafruit posted a requirement sheet put together by a school teacher-blogger friend aimed at high school students wanting to earn their Hackaday skill badge.

The requirement list is heavily influenced by the requirements needed to earn a merit badge in the Boy and Girl scouts – first, do a little research and be able to describe the type of build we usually feature. Then, describe the project to your teacher and directly relate your project to other builds featured on Hackaday. Solid advice, we have to say.

There’s a few solid tips that really help us out; putting up a blog post for your project really helps us out, as does hosting your code on a Git. Videos are always good, and even though I’m partial to Vimeo (these videos just come out looking more professional for some reason), a lot of our commentors prefer YouTube.

About the commentors: the requirement sheet specifically mentions ignoring the flame bait comments, something we’d have to agree with. The comments have gotten better, but the best way for you (yes, all of you) to help is just hit the report button and don’t feed the trolls.

If your post doesn’t make Hackaday, don’t feel bad. Before I started working here, I built a Mellotron and submitted it to the tip line. It didn’t get featured, but I just rolled with the punches. Now I’m waiting for a Raspberry Pi to come in so I can update that build and give it the rollout it deserves. If your build gets skipped, just re-submit a week or so later. We’re a fickle bunch and sometimes projects waste away in the tip line, especially if it’s similar to a recently posted build.

Improve Your Vision With Computer Generated Glasses

[Vitor Pamplona] sent in a project presented at this years SIGGRAPH. It’s a piece of hardware that corrects vision without the need for lenses. Yep. software-defined eyeglasses now exist, even if the project is a bit bulky for daily wear.

[Vitor] et al came up with two versions of hardware for this project. The first is a dual stack of high-resolution LCD displays, while the second revision is an LCD with a lenticular overlay. With this hardware, the team can change the focal plane of an entire image, or just subsets of an image allowing for customized vision correction for anyone with nearsightedness, farsightedness, astigmatism, presbyopia, and even cataracts.

With plenty of head-mounted augmented reality platforms coming down the pipe such as Google’s Project Glass and a few retina displays, we could see this type of software-defined vision correction being very useful for the 75% of adults who use some form of vision correction. It may just be a small step towards the creation of a real-life VISOR, but we glasses-wearing folk will take what we can get.

You can check out the .PDF of the paper here, or watch the video after the break.

Continue reading “Improve Your Vision With Computer Generated Glasses”

Need A Quadcopter Transmitter? Use A PS2 Controller!

After [Pyrofer] built a quadcopter, he purchased a cheap 6-channel transmitter made in China. Unfortunately, that transmitter was terrible so he took an old PS2 controller and built his own.

For his build, [Pyrofer] broke out the analog sticks and wired them to an AVR housed in the handle of the controller. The AVR sent commands to a 2.4 GHz radio transmitter powered by a small LiPo battery. With the addition of a few tact switches behind the shoulder buttons of the controller, [Pyrofer] has four axes of control with a few buttons for changing modes on his quadcopter.

This build really doesn’t hold a candle to some of the awesome DIY RC transmitters we’ve seen, but we’ve got to give [Pyrofer] credit for coming up with a very simple and easy build. Just about everyone has a PS2 or XBox controller lying around, and with a few extra hardware bits it’s easy to bodge up a decent remote control.

[Pyrofer] used a project called Funkenschlag to generate PPM signals, so if you feel the need to replicate this project send it in when you’re done.

Dealing With The Horrors Of PDFs By Binding Your Own Books

Looking at a few PDFs of data sheets, journal articles, or even complete books can be a pain. Not only do you have to deal with the torment of a PDF reader (we’re looking at you, Adobe), but a purely electronic document misses the beautiful tactile interface available in dead tree format. [samimy] put together an amazingly professional video showing us how to turn our convenient yet unwieldy PDFs into paperback books, perfect for a very accessible off-line reference.

[samimy]’s build is basically a few pieces of wood and C clamps designed to compress the printed PDF together. After drilling a few holes along the spine, he stitches the pages together with very strong thread and applies a little glue to the spine. After removing the pages from the press, [samimy] applied a piece of tape to the spine and had a very nice looking paperback book.

While [samimy] is using his binding jig for data sheets, we see no reason why a more prodigious tome couldn’t be created with his rig. A few pages of marbled paper and a leather cover would result in a beautiful and functional work of art that will be around long after you’re gone.

Rocket Telemetry From UAV Hardware

When we posted our call for rocketry hacks and builds, we expected to see a few altitude sensors and maybe a GPS module or two. Apparently, we forgot similar hardware is very popular in the remote-controlled aircraft world, and can be successfully added to a rocket as [Kevin] and his ArduPilot equipped J motor rocket showed us

The ArduPilot is a small Arduino comparable board designed for UAVs, quadcopters, and other whirligigs not powered by rocket motors. To get real-time telemetry from his rocket, [Kevin] attached a GPS receiver and an XBee transmitter. When launched on an H165 motor, [Kevin] was able to keep a radio lock on his rocket, allowing him to pull down data in real-time.

There are a few drawbacks to using the ArduPilot to collect flight data; the ArduPilot only reports ground speed, a somewhat useless feature if the vehicle is going straight up. Also, there is no way for [Kevin] to record data to an SD card; the ground team must be able to receive the XBee, lest bits of data go missing. For most rockets the radio issue shouldn’t be a problem. [Kevin] launched the same hardware on a J motor and was able to receive data from 3600 AGL.