Controlling A Quadcopter With A Homebrew Remote

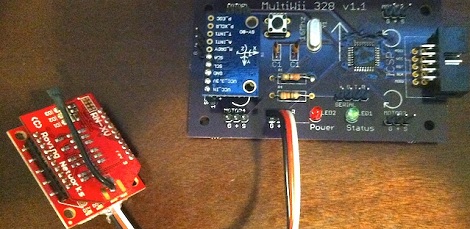
When [Matt] started building his multirotor helicopter, he was far too involved with building his craft than worrying about small details like how to actually control his helicopter. Everything worked out in the end, though, thanks to his homebrew RC setup built out of a USB joystick and a few XBees.

After a few initial revisions and a lot of chatting on a multirotor IRC room, [Matt] stumbled across the idea of using pulse-position modulation for his radio control setup.

After a few more revisions, [Matt] settled on using an Arduino Pro Mini for his flight computer, paired with a WiFly module. By putting his multicopter into Ad-hoc mode, he can connect to the copter with his laptop via WiFi and send commands without the need for a second XBee.

Now, whenever [Matt] wants to fly his multicopter, he plugs the WiFly module into his MultiWii board, connects his laptop to the copter, and runs a small Python script. It may not be easier than buying a nice Futaba transmitter, but [Matt] can easily expand his setup as the capabilities of his copter fleet grows.

Video of [Matt]’s copter in flight after the break.

Continue reading “Controlling A Quadcopter With A Homebrew Remote”

Network Time Clock For A Home Media Center

[Derek] wanted a clock for his media center. A simple wish, but he had a few requirements: he didn’t need an alarm, wanted it to automatically set its time after a power outage, needed a big display, and also wanted it to look good. After shopping around [Derek] couldn’t find a clock that would fit his requirements so he decided to build one.

[Derek]’s project is called the SNTP clock. As you might expect, it gets its name from the protocol used to automatically synchronize the clock in your computer with other network time servers. The clock itself is built around an ATMega168 gathering time data from the Internet with the help of a Lantronics XPort. One inch seven segment LEDs serve as the display for the clock, and everything, from the time offset from UTC, the brightness of the display, and whether the clock displays 12 or 24-hour time is controlled by an infrared Apple remote.

A bare PCB or bundle of wires would look out of place in [Derek]’s media shelf, so he used a metal picture frame and smoked acrylic to dress up his clock. Now he’s got a beautiful and elegant clock that fits right in to his media servers and receiver.

Cloning A Water-based Light Wall Project

A few weeks ago, we featured this water-based LED graffiti art installation that allows anyone to paint in light using only a bottle of water. When one of [Chris]’ friends saw the video of this build, he immediately asked him how it worked. One thing led to another, and now [Chris] and a few other members at the BUILDS hackerspace at Boston University are building their own water LED installation.

The basic premise of this build is allowing water to serve as a conductor between the anode and cathode of a LED. Without spraying or painting water on the circuit [Chris] whipped up, there is an infinite resistance between the two pins of the LED and current cannot flow. After applying water to the anode and cathode pads, a small amount of current is conducted through the water and the LED lights up.

Right now, [Chris] is working on a test board with different sizes of pads and spacing to get the best water graffiti LED effect for his future build. The plan is to build a single one-meter panel out of one hundred 10 cm x 10 cm boards connected together with jumpers.

All of [Chris]’ work is up on GitHub, and even though [Chris] hasn’t begun designing the production boards, it’s more than enough to get you started if you’d like your own water LED painting panel.

No Secret Knocks Required At [Steve’s] House – Your Subway Pass Will Do

rfid-door-lock

[Steve] is often host to all sorts of guests, and he was looking for an easy way to let his friends come and go as they please. After discovering that his front door came equipped with an electronic strike, he decided that an RFID reader would be a great means of controlling who was let in, and when.

Giving all your friends RFID cards and actually expecting that they carry them is a bit of a stretch, but lucky for [Steve] he lives near Boston, so the MBTA has him covered. Just about everyone in town has an RFID subway pass, which pretty much guarantees that [Steve’s] cohorts will be carrying one when they swing by.

He crafted a stylish set of wooden boxes to contain both the RFID reader and the Arduino that controls the system, matching them to the Victorian styling of his home. A single button can control the setup, allowing him to add and remove cards from access lists without much fuss. For more granular control however, [Steve] can always tweak settings from the Arduino serial console.

The card system is both stylish and useful – a combination that’s hard to beat.

Control Raspi GPIO Pins In The Browser

Now instead of wrangling Python or PHP to do your bidding, [Eric] came up with a way to control the GPIO pins on his Raspberry Pi in a browser.

[Eric] calls his project WebIOPi, and it’s the perfect tool if you’d just like to blink a LED or control a relay over the internet. Simply by pointing his browser to the IP of his Raspi, [Eric] can turn GPIO pins on and off, directly from his desktop browser.

All the code for WebIOPi is available on [Eric]’s Google code page. The UI of [Eric]’s project is fully customizable, so it’s entirely possible to control your garage door from a smart phone simply by loading up a web page hosted on your Raspi and pressing a button.

Right now WebIOPi is only able to turn GPIO pins on and off. That will change as [Eric] implements UART, SPI, and I2C in his project, making it possible to do a lot of cool stuff without having to write much – if any – code.

One Dimensional PONG Is A Great Use For LED Strips

[Jason] has had a five meter addressable RGB LED strip lying around for a while, and only recently came up with a good idea of what to use it for. He came up with One Dimensional PONG, and it looks like it’s a blast to play. Instead of moving a paddle up and down, [Jason]’s 1D PONG game requires the players to stomp on a switch to send the ball back to the other player.

The LED strip [Jason] used has an SPI interface, but needed to be PWM clocked to a microcontroller to operate. After whipping up an Arduino library for his LED strip, [Jason] built an ATMega328-based controller board and a pair of seven segment display boards to keep track of the score. There’s a technical overview in another one of [Jason]’s videos.

[Jason] will be taking his 1D PONG game to the Brighton Mini Maker Faire on September 8th. We’re sure his game will be very popular there, so if you see him, tell him Hackaday sent you.

Continue reading “One Dimensional PONG Is A Great Use For LED Strips”

Turning A DS Into A Game Boy Advance

The venerable Game Boy is dead – and has been for a long time – after being replaced by the DS, DSi, DSi XL, and the 3DS. That doesn’t mean there’s nothing of value to the old Game Boy catalog; Pokemon Red/Blue is still as much fun as it was 15 years ago, and the game play of Advance Wars is still superb.

[Maarten] over at Bureau voor Gamers decided to put a modern twist on our old friend by taking a first-gen DS and converting it to a proper single screen Game Boy (Dutch, Google translation).

The donor machine was a broken first gen DS with a broken top screen. [Maarten] removed the top screen, did a tiny bit of Bondoing, moved the speaker, and gave his new toy a bright orange paint job.

Now [Maarten] has a modern version of the best portable system ever created, packed full of more powerful hardware and a much more capacious battery. Sure, it’s not a build that requires rewiring everything, but it’s still an awesome build for GBA aficionados.