Token Authentication For Gmail Using A EZ430 Chronos Watch

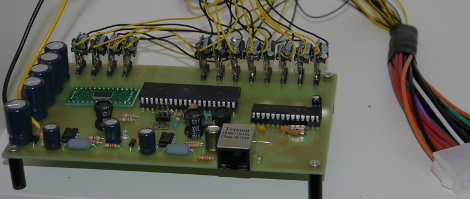
Two-factor authentication allows you to use your chosen password, as well as a one-time password to help keep your services secure. The one-time passwords traditionally come from a dedicated piece of hardware, but there are also solutions for smart phones. [Patrick Schaumont] shows how a TI eZ430 Chronos Watch can be used to generate authentication tokens. After walking through the process he uses it to beef up his gmail login.

This method of token authentication is often called Time-based One Time Passwords (TOTP). It’s part of the Open Authentication (OATH) initiative, which seeks to sort out the password-hell that is modern computing. A portable device generates a password by applying an algorithm and a private encryption key to an accuarte time-stamp. On the server side of things a public key is used to verify the one-time password entered based on the server’s own time-stamp. In this case the portable device is the Chronos watch and the server is Google’s own TOTP service.

You can do this with other simple microcontrollers, we’ve even seen an Arduino implementation. But the wrist-watch form factor seen here is by far the most convenient — as long as you always remember to wear the watch.

[Thanks Oxide]

Homebrew FPGAs

Homebrew CPUs made out of logic chips are nothing new, but a homebrew FPGA is another matter entirely. [Joshua] sent in a project he whipped up where he made a single logic cell FPGA.

Despite how complicated and intimidating they are in practice, FPGAs are really very simple. They’re made of thousands of logic blocks capable of transmuting into AND, OR, NAND, and XOR logic gates. These logic blocks are all tied together, and with a somewhat complex hardware design language are capable of becoming a CPU, a micocontroller, or even a video card. Basically, programming a microcontroller tells a chip what to do, while programming an FPGA tells the chip what to be.

To build his single logic block FPGA, [Joshua] used a four-bit multiplexer to hard wire a truth table out of a 74HC174 D-type flip-flop. A bit of Arduino code changes the state of the pins connected to the multiplexer allows for any combination of TRUE and FALSE to be calculated for AND, NAND or XOR logic functions.

Yes, it’s only a single logic block for an FPGA, and if this build were expanded to even a few hundred cells it would be gargantuan. Still, there’s no better way to learn the ins and outs of abstract hardware, so we’ll gladly tip our hat to [Joshua] and his homebrew FPGA.

Makerbot, Occupy Thingiverse, And The Reality Of Selling Open Hardware

Yesterday, Makerbot Industries introduced the Replicator 2, a very good-looking 3D printer that will is probably the closest thing we’ll see to a proper ‘consumer’ 3D printer for a year or so. There’s only one problem. The new Replicator 2 is rumored to be closed source. If that’s not enough, [Bre Pettis], co-founder and CEO of Makerbot Industries will be speaking at the Open Source Hardware Association conference next week with the suitably titled talk, “Challenges of Open Source Consumer Products.”

Of course, the Replicator 2 being closed source is hearesay, and we can’t blame them for closing up parts their product; they have investors to worry about and people are blatantly copying their work. There was another change in Makerbot’s operation at the press conference yesterday: Makerbot now owns everything you’ve put up on Thingiverse.

This news comes from [Josef Prusa], creator of what is probably the most widely used 3D printer in the world.

[Prusa] begins his rant with the history of the RepRap. The project began with a team of core developers headed by [Adrian Bowyer], and supported by [Zach Smith], [Adam Mayer], and [Bre Pettis]. [Boyer] gave the guys a bit of money to start Makerbot, and it’s something the guys at Makerbot have never been ashamed of. Makerbot went on to create Thingiverse, became the darlings of the Open Hardware movement, and acquired $10 million from investors.

All things change, of course, and Makerbot is no exception. Along with the (again, rumored) closed-source Replicator 2, [Prusa] pointed out the Terms of Use for Thingiverse say that Thingiverse – and thus Makerbot Industries – owns everything submitted by Thingiverse users. [Prusa] started an Occupy Thingiverse movement in response to this discovery.

Honestly, we hope [Josef Prusa] is wrong on this one. We hope the specific clauses in Thingiverse’s Terms of Use granting itself a license to do whatever it wants with uploaded Things is just a bunch of legal mumbo jumbo added in by lawyers to protect Thingiverse from being sued by crazy people. Still, if rumors are true, it may be a portent of things to come.

In any event, [Prusa] will be taking his Thingiverse things down. He plans on posting his stuff on GitHub, probably the most Open Source-friendly community in existence. You can do the same with this GitHub template for 3D printed objects.

So, learned reader of Hackaday, what do you make of this? Is Makerbot right to close up their projects? Are we finally becoming disillusioned with Open Hardware? What say you?

Another Eerily Similar High Power LED Driver Hack

[Maximilian Güntner] dropped us a comment in last week’s globe writeup linking to his own project, which involves a similar high power LED driver mod. This looks like the exact same mod we came up with, and [Güntner] even used the mod to connect a bunch of high power LEDs to a PCA9685 LED driver [pdf]. It’s the same exact concept as Disco Planet!

It should come as no surprise that people have actually been modding high power led drivers in this way for some time. They are a few bucks per handful and take an enormous input voltage range. In [Güntner]’s case he grabbed a bunch of these from Dealextreme.  Actually there are two others on the site, and all three contain comments (dating back a year) with helpful tips on various ways to modify the little PCB.

Our Ebay sourced boards are different though. The boards [Güntner] purchased employ the PowTech PT4115 [pdf] which uses fewer parts and has an easy to follow data sheet. Take, for instance, the pin graciously labeled “DIM” with a little PWM signal next to it. The nerve! The Ebay drivers use the MCP34063 [pdf] which has a much more cryptic data sheet (burned two weeks and several notebook pages to figure out the circuit). Ultimately the two are so similar it makes no difference.

So, if you want to mod some LED drivers on your own, check out the how-to video after the jump. Thanks [mguentner]!

Continue reading “Another Eerily Similar High Power LED Driver Hack”

Reading Bare NAND Flash Chips With A Microcontroller

NAND flash, the same memory chips found in everything from USB thumb drives to very expensive solid state disk drives, are increasingly common. As they (partially) serve as the storage for cellphones, Wiis, routers and just about every piece of consumer electronic devices, you’re probably surrounded by dozens of NAND chips at any one time.

[Sprite_tm], hacker extraordinaire, put up a build a few years ago where he was able to read the contents of NAND Flash chips using a PC parallel port. It’s getting rather hard to find a parallel port on a PC anymore, so he updated his build to read Flash chips off of a USB port.

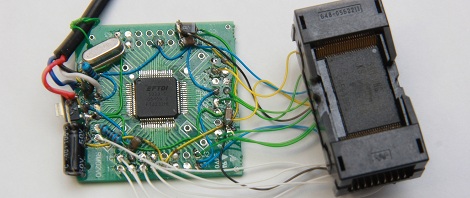
There are two main components of [Sprite_tm]’s build. First, to read the Flash chip, he needed a way to break out the pins on the very tiny TSOP48 package. [Sprite] found a neat little socket for these chips on eBay for about 10 Euros.

Communicating with the Flash chip via USB was a little harder. [Sprite] knew he needed USB 2.0, but not many microcontrollers have that implemented. Luckily, the FTDI FT2232H has USB 2.0, along with the very nice feature of being able to read data and address pins directly from the Flash chip. After a bit of soldering, [Sprite_tm] was left with the device seen above.

[Sprite_tm] found a nice library to bitbang the pins on the FTDI chip and request one page of memory from the Flash chip at a time. The device works as advertised, but it’s still a bit slow at 250 kBps. [Sprite] figures he can increase the speed of reading a Flash chip by requesting multiple pages at a time, but it’s still orders of magnitude faster than the old parallel port solution.

There’s a good bit of software [Sprite] posted to help him (and possibly others) read bare NAND flash chips via USB. This means if you have a broken USB Flash drive or SD card, it’s possible to desolder the chip and read it with your own controller. Interpreting the blocks of data recovered from a Flash drive as a file system is another story, but it’s still a fairly remarkable build.

Introducing The Makerbot Replicator 2

A few short hours ago at press conference, Makerbot announced the release of their Replicator 2 3D printer.

The original Makerbot Replicator was released earlier this year at CES and regaled by the press as a quantum leap in home manufacturing (a quanta is actually very small, guys) with and option for dual extruders and a rather large build volume. The Replicator 2 takes the same formula and adds a powder coated steel frame, larger build volume (11.2″ x 6.0″ x 6.1″ or 28.5 x 15.3 x 15.5 cm) and a resolution so fine as to approach the realm of uber expensive 3D printers (100 microns or 0.004 inches).

Base price is $2200 USD for the single extruder model with no Makercare service plan. A dual-extruder Replicator 2X is slated to be released after the beginning of next year. This model will also handle ABS filament, although we can’t find anything that says the single-extruder Replicator 2 is only able to use PLA.

Even though the new Replicator 2 is rumored to be closed source, we’d really struggle to come up with a better 3D printer for a high school shop class, college CS and/or engineering department, or even a hackerspace.

Home Automation Hack Controls Lights Based On Head Count

This home automation hardware turns on and off the lights based on room occupancy. The hack is an extension of an earlier version that was only a proof of concept. [RPisces] took the idea and made it into reality by mounting the sensor hardware in a doorway.

He prototyped the device using the MSP430 launchpad. It monitors a pair of IR distance sensors which record a change when something passes between them and the opposite side of the hallway. This is a good sensor choice as it only requires hardware on one side of the passageway. Because two of them are used, it’s quite simple to figure out if a person is entering or leaving the room based on which is tripped first.

In this case [RPisces] drives a relay to switch a lamp on and off. But it could be used for just about anything. We’d enjoy seeing it trigger an audio system like the one [Quinn’s] installing in every room.