Introducing The Makerbot Replicator 2

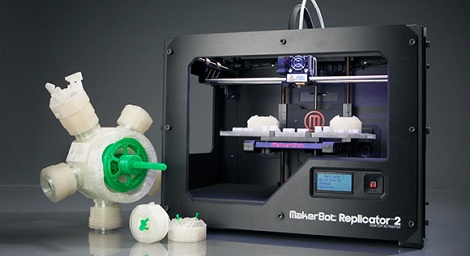
A few short hours ago at press conference, Makerbot announced the release of their Replicator 2 3D printer.

The original Makerbot Replicator was released earlier this year at CES and regaled by the press as a quantum leap in home manufacturing (a quanta is actually very small, guys) with and option for dual extruders and a rather large build volume. The Replicator 2 takes the same formula and adds a powder coated steel frame, larger build volume (11.2″ x 6.0″ x 6.1″ or 28.5 x 15.3 x 15.5 cm) and a resolution so fine as to approach the realm of uber expensive 3D printers (100 microns or 0.004 inches).

Base price is $2200 USD for the single extruder model with no Makercare service plan. A dual-extruder Replicator 2X is slated to be released after the beginning of next year. This model will also handle ABS filament, although we can’t find anything that says the single-extruder Replicator 2 is only able to use PLA.

Even though the new Replicator 2 is rumored to be closed source, we’d really struggle to come up with a better 3D printer for a high school shop class, college CS and/or engineering department, or even a hackerspace.

Home Automation Hack Controls Lights Based On Head Count

This home automation hardware turns on and off the lights based on room occupancy. The hack is an extension of an earlier version that was only a proof of concept. [RPisces] took the idea and made it into reality by mounting the sensor hardware in a doorway.

He prototyped the device using the MSP430 launchpad. It monitors a pair of IR distance sensors which record a change when something passes between them and the opposite side of the hallway. This is a good sensor choice as it only requires hardware on one side of the passageway. Because two of them are used, it’s quite simple to figure out if a person is entering or leaving the room based on which is tripped first.

In this case [RPisces] drives a relay to switch a lamp on and off. But it could be used for just about anything. We’d enjoy seeing it trigger an audio system like the one [Quinn’s] installing in every room.

17-stage Great Ball Contraption Must Use All The LEGO Pieces

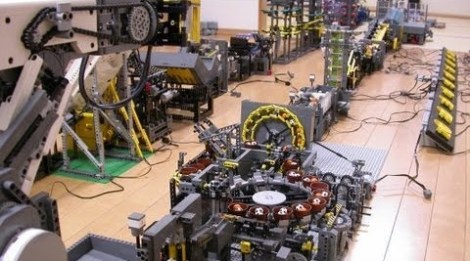
Looking at this 17-stage Great Ball Contraption makes us think that [Skiyuky] should be working in industrial automation. The build, which has been assembled from an untold volume of LEGO parts, moves a reservoir of round plastic balls around a circuit. Each module exhibits a different mechanical way of handling the parts. It’s certainly not the first GBC we’ve seen, but the previous offering combined stages from many different makers. [Skiyuky] built this one all himself over the last two years.

The video after the break starts off at the main depository of tiny soccer and basketballs. To help illustrate how long it takes to move around the entire circuit [Skiyuky] adds a red and blue ball which are both easy to spot. From there it’s a Willy Wonky type of ride through all manner of contraptions. We’re struck by accuracy and efficiency with which all of the stages operate.

Continue reading “17-stage Great Ball Contraption Must Use All The LEGO Pieces”

DIY Flux Comes Straight From The Tree

[Tom] needed more solder flux and instead of buying it he thought he’d try making his own. The thing is, he didn’t have any rosin on hand. But knowing its source let him acquire it for free. He took a sample of tree sap and turned it into his own solder flux.

We’ve seen a few different DIY flux recipes this year. The most recent guide suggests sourcing rosin from the hardware store because of the quality, or if that fails you’ll find some at the music store. [Tom] was lucky enough to find a large dollop leaking from a pine tree in his neighborhood. He let it sit overnight in a container along with some isopropyl alcohol. In the morning the sap had fully dissolved, so he ran it through a coffee filter to get rid of any debris. He keeps it in a small jar, applying it to his projects using cotton swabs. You can see his short soldering demo after the break.

Continue reading “DIY Flux Comes Straight From The Tree”

Qube Robots Use Well-designed Laser-cut Acrylic

These robot cubes, called BOXZ, use an interesting interlocking part design to mount and protect the parts within. But to really make them pop you need to color and apply your own papercraft skins.

The actual hardware is quite simple. They’ve used an Arduino, along with motor driver and Bluetooth shields, to control a set of geared DC motors. There’s a battery pack which holds four AA cells and a pair of servo motors which seem to be there to act as arms. This base can then be adorned with sensors to add functionality (line following, wall following, obstacle avoidance, etc.).

Despite the simple appearance of the cube, the chassis is the most complicated part. It uses sixteen pieces of acrylic, but they may also be hand cut from cardboard by printing out templates and gluing them onto the material. The parts are designed with interlocking tabs which we often see used on laser-cut wooden box parts.

We’ve embedded the video presentation of BOXZ after the break.

Continue reading “Qube Robots Use Well-designed Laser-cut Acrylic”

This Hack Can Refill Your Stratasys 3D Printer

[Dan] has his own Stratasys Dimension SST 768 3D printer. It’s a professional grade machine which does an amazing job. But when it comes time to replace the cartridge he has to pay the piper to the tune of $260. He can buy ABS filament for about $50 per kilogram, so he set out to refill his own P400 cartridges.

Respooling the cartridge must be quite easy because he doesn’t describe the process at all. But the physical act of refilling it doesn’t mean you can keep using it. The cartridge and the printer both store usage information that prevents this type of DIY refill; there’s an EEPROM in the cartridge and a log file on the printer’s hard drive. [Dan] pulled the hard drive out and used a Live CD to make an image. He loaded the image in a virtual machine, made some changes to enable SSH and zap the log file at each boot, then loaded the image back onto the printer’s drive. A script that he wrote is able to backup and rewrite the EEPROM chip, which basically rolls back the ‘odometer’ on how much filament has been used.

[Image Source]

Regarding The Development Files That Accompany TI’s Microcontroller Offerings

We received a tip from [Fabien] that Texas Instruments had posted a set of IDEs for the Stellaris Launchpad on their download page. At first we skipped right over the link, but then decided to take a look and see if things had changed any since the MSP430 Launchpad had been released. As we expected, there’s really no help on this page if you’re looking to develop for the hardware without using one of these IDEs.

Why would we want to forego the preconfigured development environments TI supplies? For one thing, they offer only trial licenses. When you go to download one of the packages you have to wade through a eyebrow-raising non-export agreement. When we made it that far, the ~500 MB Sourcery package we downloaded was quite slow. And we don’t see any option for installing any of these on a Linux machine. No matter what OS you choose, we think you should be able to develop for any architecture using the same development environment — be it Eclipse, GNU Emacs, Notepad, or whatever . We don’t want to download a huge package just to try out a new chip.

We know you can develop for Stellaris ARM chips using a vanilla cross compiler like arm-none-eabi (we use Sourcery CodeBench Lite — formerly CodeSourcery G++ lite). We hope that TI is planning on adding a barebones package that supplies a simple Makefile, Linker Script, and base libraries for the hardware. But we won’t hold our breath. After all, it is an industry standard to leave out Linux support.