PyMCU Test Project Looks Like A Minecraft Mob

pymcu-controlled-blockhead

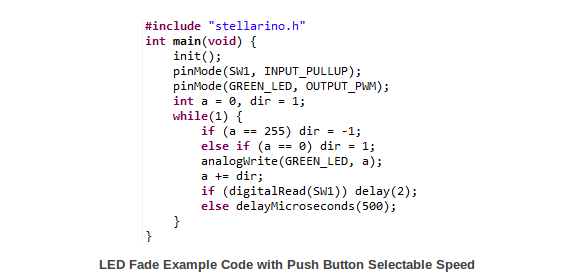
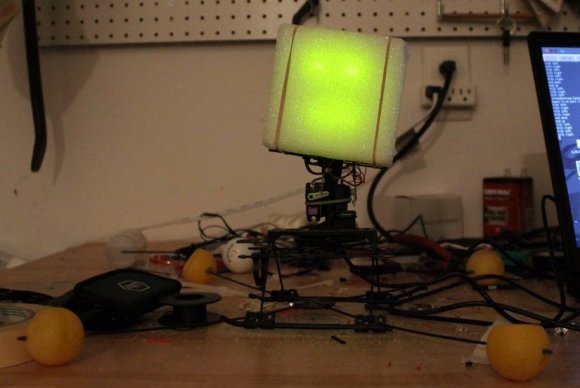
Hackaday’s own [Jeremy Cook] has been testing out the pyMCU board and managed to put together an animated block head that looks like it could be a foe in Minecraft. That’s thanks mostly to the block of foam he’s using as a diffuser. The face of the project is a set of LEDs. These, along with the servo motors that move the neck are controlled using Python code which you can glance at after the break (there’s a video demo there too).

We first saw pyMCU early in the year. The PIC 16F1939 offers plenty of IO and acts as a USB connected bridge between your hardware and your Python scripts. Speaking of hardware, the test platform used to be an RC helicopter. [Jeremy] scrapped most of it, but kept the servo motors responsible for the pitch of the rotors. The board makes these connections easy, and the concept makes controlling them even easier. In fact, there’s only about 17 lines of code for the functions that control the servos. The rest is a simple UI built with Tkinter.

Continue reading “PyMCU Test Project Looks Like A Minecraft Mob”

Modifying An EEG Headset For Lucid Dreaming

moddedmindwave4

[Michael], [Tom], and a few other people on the Lucid Scribe Database project have been using off-the-shelf EEG equipment to invoke lucid dreaming. Yes, that’s where you take control of your dreams and become a god. This requires wearing an EEG setup while you sleep, and these products aren’t very comfortable sleeping wear. [Tom] decided to take apart a NeuroSky MindWave and turn it into something comfortable to wear all night.

The folks at the Lucid Scribe Database log their dreams with consumer-level EEG equipment, usually something made by NeuroSky. The NeuroSky MindWave is the smallest and cheapest EEG headset available, but it’s still a hard plastic device not conducive to sleeping.

[Tom] removed all the guts and electronic goodies out of his MindWave and attached them to an elastic headband. The MindWave has two sensors – a forehead and ear lobe sensor. For the forehead sensor, [Tom] simply soldered a piece of wire to a penny and attached it to the elastic. The ear lobe sensor in the stock MindWave is a simple clip that was kept in the stock configuration for [Tom]’s mod.

Now that [Tom] has a much more comfortable EEG setup, he can get on with improving his lucid dreaming skills and even try communicating via Morse from inside a dream.

Custom MOTD For The Raspberry Pi

motd

With so many uses for a Raspberry Pi in a headless configuration – especially with the impending release of the Raspi Model A – we’re surprised it has taken so long for someone to send in a way to create a custom message of the day that is displayed whenever you SSH into everyone’s favorite Linux board.

A MOTD is used by servers to display messages to new users, or simply system information for server admins. It’s a simple text file stored in /etc/motd, but with some proper beardly Unix wizardry it’s possible to display uptime, free memory, and even the weather wherever the Raspi is located.

[yanewby] over on the Raspberry Pi forums created a nice little MOTD that grabs weather data from the Internet and displays it alongside an ASCII rendering of the Raspberry Pi logo. Of course like everything in Unix, this MOTD can be modified to do just about anything, from checking your Twitter to sending a text message to your phone.

Two Computer Vision Builds From Cornell

land

[Bruce Land], professor at Cornell, is a frequent submitter to our tip line. Usually he sends in a few links every semester from undergraduate electronics courses. Now the fall semester is finally over and it’s time to move on to the more ambitious master’s projects.

First up is a head-mounted eye tracker, [Anil Ram Viswanathan] and [Zelan Xiao] put together a lightweight and low-cost eye tracking project that will record where the user is looking.

The eye tracker hardware is made of two cameras mounted on a helmet. The first camera faces forward, looking at the same thing the user is. The second camera is directed towards the user’s eye. A series of algorithms detect the iris of the user’s eye and overlays the expected gaze position on the output of the first camera. Here’s the design report. PDF, natch.

Next up is a face tracking project implemented on an FPGA. This project started out as a software implementation of a face tracking algorithm in MATLAB. [Thu-Thao Nguyen] translated this MATLAB code to Verilog and eventually got her hardware running on an FPGA dev board. Another design report.

Having a face detection and tracking system running on an FPGA is extremely interesting; the FPGA makes face tracking a very low power and hopefully lower-cost solution, allowing it to be used in portable and consumer devices.

You can check out the videos for these projects after the break.

Continue reading “Two Computer Vision Builds From Cornell”

Which Way Do Non-polarized Film Capacitors Go? There Is An Answer.

orienting-non-polarized-film-caps

If you, like us, thought that capacitor orientation only matters for polarized varieties like electrolytic capacitors you should read through this article. [Bruce Trump] looks at why some film capacitors have a stripe printed on one end and why their orientation can matter.

He has an image rolled into his post showing both axial and dipped capacitors with a black stripe printed on one end of the package. This is an indicator of what is going on inside of the component. The end with the line has a conductive foil layer which acts as a shield. But it seems that this shield will do its job better if you do a better job of designing for the capacitor.

The diagram above shows two op-amp circuits, both using a non-polarized capacitor that will affect the circuit if it receives external interference. [Bruce] discusses various aspects of this phenomenon, mentioning that although these careful layouts can be tested in your designs to prove which has more benefits, simulated applications (using SPICE) will perform exactly the same.

Comprehensive Home PCB Fabrication Tutorial

home-pcb-fabrication

From what we’ve seen we’d say [Jianyi Liu] is really good at etching PCBs at home. Now you can learn from his experience. He just published a mammoth guide to fabricating your own PCBs at home. That link goes to his index page which leads to all eight parts of the guide.

He starts off by mentioning that fab house boards are rather inexpensive these days. This will save you a lot of trouble (like acquiring the equipment and raw materials needed to get up and running) but you can’t beat the turnaround time of doing it yourself.

After discussing the particulars about trace width, copper thickness, and a few design considerations he lays out his board and prints the artwork to a sheet of transparency film. A pre-sensitized board is cut to size before a trip through an exposure rig with the film taped onto it. The image above shows him rinsing the board after applying the developer chemical. From here he uses cupric chloride he mixed himself to etch the board. [Jianyi] recommends populating the components before cutting the panel apart — a task which he accomplishes with a hack saw.

Stellarino Brings Wiring-style Coding To The Stellaris Launchpad

wiring-for-stellaris-launchpad

[Sultan Qasim] wrote in to tell us about the work he’s been doing on the Stellarino library. It’s goal is to break down the coding barriers present for those looking to move from Arduino to ARM. This is accomplished by facilitating Wiring-stlye code for the Stellaris Launchpad ARM development board.

Right off the bat [Sultan] mentions that the interface is Wiring-like, but is not compatible with it. This means you can’t just plop your existing sketches into a C file and get them to work with the addition of a simple include file. But what it does do is provide access to the functions to which seasoned Arduino users have grown accustomed. You can see some examples above, including analogWrite(), digitalRead(), and a simple delay function.

We had a quick look at the library. It uses StellarisWare components which are stored in the ROM of the chip (these are all preceded by ‘ROM_’). The one thing missing is the UARTstudio library which apparently carries a license incompatible with GPL.