$20 Vacuum Pen Build On Of The Best We’ve Seen

20-dollar-vacuum-pen-build

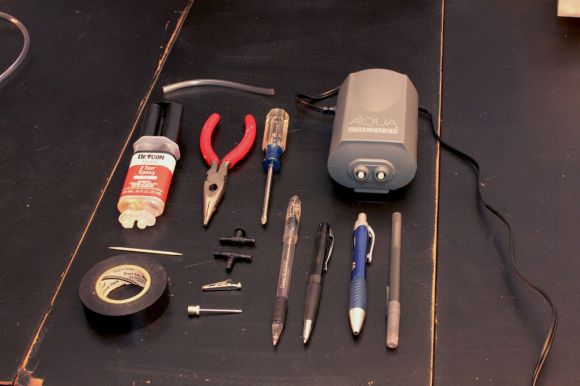
Everything you need to build a vacuum tweezers is laid out in this image. The parts should run you about $20 and when you’re done you’ll have the perfect tool for placing very small surface mount parts for reflow soldering.

This project uses the same concept as other fish pump tweezers projects but builds upon them with some interesting additions. The first step in the conversion process is to tear down the aquarium pump to reverse its flow. There are several steps but all-in-all it’s not very difficult. With the source of vacuum established [Technically Artistic] begins work on the business end of the tool. This is where the array of different pens see some action. The large blue one is the outer assembly, with the others combining to help connect it to the plastic tubing. The business end is made from a needle adapter for an air compressor, with an alligator clip cleverly modified to serve as a valve to release the parts from the tip.

Iron Man Faux Stained Glass Saves $4k

ironman-faux-stained-glass

Check out how the light hits this piece of artwork. It’s a very convincing piece of stained glass… except it’s fake. [Sdtacoma] figured out a way to mimic stained glass using a single pane. The inspiration for the project came after seeing a real stained glass panel featuring Iron Man which was available on Etsy for $4500.

Due to popular demand [Sdtacoma] posted an album of the technique he used. Starting with some art found online he made it black and white, blew it up to size (this thing’s about five feet tall) and used posterizer to print it out using multiple sheets of paper.

The frame and pane were found at a recycled building goods store. After cleaning it up he used the paper template to lay out the dividing lines between different colored sections using Liquid Lead. The product had dimension to it (kind of like puffy paint for fabrics) which looks like the lead tracks between panes of stained glass. Once dry the color was added using an eye dropper to apply glass paint.

New IOIO Is Faster, Cheaper

board-nobg

For the last few years, [Ytai] has been working on the IOIO, a device that connects your Android devices to the other homebrew peripherals. There’s a new version of this really cool board out now that includes a few much-needed features like USB-OTG and a lower component cost that is passed on in savings to you.

A few months ago, our own [Mike Szczys] caught a glimpse of this new IOIO board. It’s the same size as the previous revision, but with USB-OTG, the new IOIO can be a master when connected to a phone, or a slave when connected to a PC.

In addition to USB-OTG, [Ytai] improved the power regulation circuit, and even went so far as to refuse royalties to the board to get the costs down. It’s currently available at Sparkfun for $40.

[Ytai] says he’s working on a few software upgrades to the IOIO, including making capacitive sensing a possibility and including support for stepper motors and controllers. There’s also support for the Raspberry Pi coming up, but we’re just glad [Ytai] managed to put a yo-yo graphic on the bottom silkscreen. Finally, and hopefully, everyone will know how to pronounce IOIO.

Build A Bioprinter From Very Old Inkjet Cartridges

This column of messages was printed with Escherichia coli. That’s the bacteria better known as E. coli which can cause so many problems if it makes its way into our food. But the relative size and the fact that this strain was engineered to glow in the dark makes it a perfect candidate for Bio Printing. We find it even more interesting that it was printed using hacked inkjet and computer parts.

There are legitimate uses for this type of technology. But this project is aimed more at getting the word out about the method and how easy it can be. For us, it’s the close look at modern inkjet print heads that was the most interesting. It turns out that common cartridges have an overly high-resolution for this to work well. In order to get so many dots in such a small area the nozzle openings end up being too small for most biological material to fit through. There is also an issue with a filter built into the silicone technology inside.

The solution was to use the InkShield to drive cartridges from very old printers. This lets the team command the cartridge with an Arduino, making it dead simple to tweak the way the material is deposited. They mounted the cartridge holder (using decades-old technology in the form of HP Deskjet 500 cartridges) on the sled of an optical drive and went from there.

Take a glance at the printer in action in the clip after the break.

Continue reading “Build A Bioprinter From Very Old Inkjet Cartridges”

Sunrise Alarm Clock Mounted Above The Bed

sunrise-alarm-from-led-strips

This sunrise alarm clock was made in a bit different form factor than we normally see. Instead of a box next to the bed it’s a bar above the headboard which slowly illuminates every morning. This was [Holly’s] first electronics project. She spent pretty much all summer working on it and accumulated a skill set that included designing for and operating the laser cutter and assembling and programming the electronics.

She didn’t start from square one. The hardware and programming were greatly simplified by the availability of RGB LED strips and the Monochron clock which drives them. [Holly] altered the code to bring up a blueish hue over a 35-minute time period. Since this will be used to wake her at 5:30am she was also obliged to include some backup sounds just in case. But after the project was finished and mounted she forgot to turn them on and was pleasantly surprised that the lights woke her up on time. The mounting bracket seen above uses t-slot rail with laser cut brackets to hold the half-cylinder shade for the sconce. The final product looks fantastic!


Hackaday Links: January 24th, 2013

Raspberry Pi’s answer to the iMac

links-rpi-imac

If you always wanted a sweet looking all-in-one computer like an iMac, but without OSX this one’s for you. [Michael Davis] glued everything you need for a Raspberry Pi computer to the back of an LCD monitor.

Dancing Japanese robot shows high creepiness factor

links-dancing-robot

You’ve just got to see this one to believe it. Someone choreographed some seriously lifelike dance moves for this robot. [Thanks – via Dr. GIY’s blog]

Helper script to install MSPGCC

links-mspgcc-install-script

The repositories available to Ubuntu are nice, but if you want to get the newest version of the GCC toolchain for MSP430 microcontrollers you’re going to need to do the compilation yourself. [Jose] is trying to make the process a bit easier with this helper script which download and installs MSPGCC Uniarch.

Easy reset for WRT-54G routers

links-ddwrt-reset-button

The whole point of the router reset button being hard to press is so you don’t hit it by accident. But the difficulty of getting to it drove [Noah] crazy so he added his own easy to reach replacement.

Camera stabilization tips

links-camera-stabilizers

This is a public service to amateur videographers. You don’t need expensive equipment to make a video without nausea inducing shakes. Try out these simple camera stabilization tips. You can use a tripod as a counterweight, or a piece of 2×4 to give the point-and-shoot a dual grip.

Building Your Own Model A Raspberry Pi

A

When the Model A Raspberry Pi is released in the coming weeks or months, you’ll have the opportunity to buy an even cheaper ARM Linux computer that will draw 1/3rd the power of the classic Model B. Some people just can’t wait a month to get their hands on it, so [Blair] decided to make his own.

The Model A Raspberry Pi is nearly the same as the Model B; the only things missing are an Ethernet port, a single USB port, and the associated chips required to drive these ports. In a brave bit of desoldering, [Blair] removed the Ethernet/USB controller with a butane torch.

In part two of [Blair]’s adventures, he removed the Ethernet connector and replaced the two-high USB ports with a single port, greatly decreasing the height of the Raspberry Pi.

As of right now, this is just about the only way to get your hands on the lower power, more compact Raspberry Pi. We can’t wait, though, for the eventual tutorial of how to turn a Model A into a Model B. That’ll be an awesome demonstration of god-like soldering skills.