Scratch-built Desk Adjusts So You May Sit Or Stand

custom-height-adjustable-battlestation

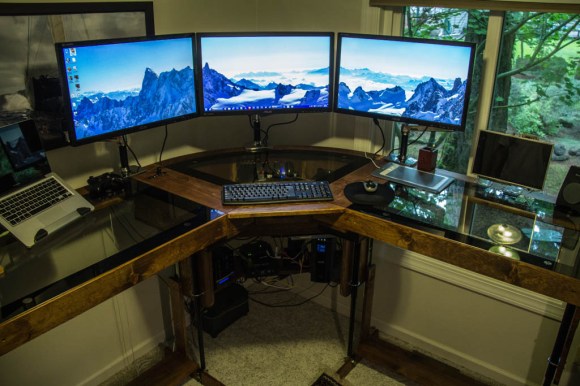
Knowing that this desk was built from scratch is pretty impressive. But the motorized legs that raise and lower the desk to any height really puts the project over the top.

Surprisingly this started off as a computer case project. [Loren] upgraded his hardware and couldn’t find a case that would organize it the way he liked. His desk at the time had a glass top and he figured, why not build a new base for the glass which would double as a computer case? From there the project took off as his notebook sketches blossomed into computer renderings which matured into the wooden frame seen above.

Much like the machined computer desk from last December this uses motorized legs to adjust the height of the desk. These cost about $50 each, and he used four of them. If you consider the cost of purchasing a desk this size (which would not have been motorized) he’s still not breaking the bank. This battlestation is now fully functional, but he does plan to add automated control of the legs at some point. We think that means that each has an individual adjustment control which he wants to tie into one controller to rule them all.

33 Node Beowulf Cluster Built With Raspberry Pi

Not only did [Josh Kiepert] build a 33 Node Beowulf Cluster, but he made sure it looks impressive even if you don’t know what it is. That’s thanks to the power distribution PCBs he designed and etched. In addition to injecting power through each of the RPi GPIO headers they host an RGB LED which is illuminated in blue in the images above.

Quite some time ago we saw a 64-node RPi cluster. That one used LEGO pieces as a rack system to hold all of the boards. But [Josh] used stand-offs to create the columns of hardware which are suspended between top and bottom plates made out of acrylic. The only thing that’s unique about each board is the SD card and that’s why each has a label on it that identifies the node. These have been flashed with almost identical images; the host name and IP address are the only thing that changes from one to the next. They’ve been put in order physically so that you can quickly find your way through the rack. But functionally this doesn’t matter… put the card in any RPi and it will automatically identify itself on the network no matter where it’s located in the rack.

Don’t miss the demo video where [Josh] explains the entire setup.

Continue reading “33 Node Beowulf Cluster Built With Raspberry Pi”

Meet The 2013 LayerOne Conference Badge

badge_2013-1838

The LayerOne security conference is fast approaching and [charliex] is doing his best to put the finishing touches on this year’s conference badge.

Around the perimeter of the badge is 48 LEDs driven by two LED drivers. This allows for some crazy hardware hacking to create anything from a TV-B-GONE to a bulbdial clock. There’s also a few extra switches and sensors that can be hacked to do some interesting things, but where this badge really shines is the addition of an OLED display, allowing it to transform into an XMEGA Xprotolab, a small oscilloscope, spectrum analyzer, and frequency generator. Yes, this badge can be hacked, but it’s also a tool for hacking.

There’s an impressive amount of work that went into this badge, a feat even more impressive given the fact that the LayerOne conference is this weekend and the PCBs for these badges won’t arrive until tomorrow. We’ll be the first to say we’re masters of procrastination, but [charliex] really cut it close here.

Scooterputer, The All-in-one Scooter Computer

ScootDisplay-2

We’ve seen a fair share of carputer builds involving a Raspberry Pi in the last few months, but even the power of a Raspi can’t compete with the awesomeness of this Arduino-powered scooterputer.

Like all awesome projects, this build is the product of a massive case of feature creep. Initially, [Kurt] only wanted a voltage monitor for his battery. With an  Arduino Duemilanove, a voltage divider, and an evening of coding, [Kurt] whipped up a simple device with three LEDs to indicate the status of the batter: either low, good, or charging.

The project was complete until he ran across an awesome OLED screen. Using a touch screen display for just battery monitoring is a bit overkill, so [Kurt] made a trip over to Sparkfun and got his hands on a temperature sensor, real-time clock, accelerometer, GPS sensor, and even a cellular shield.

The resulting scooterputer is a masterpiece of in-vehicle displays: there’s a digital speedometer and GPS unit, and the cellular shield works as a tracking device and a way to download real-time maps of the scooter’s current location with itouchmap.

While the majority of the electronics are hidden under the hood of the scooter, the display of course needed to be out in the weather. To do this, [Kurt] found a nice enclosure with a rubber boot that perfectly fit the OLED display. The display is connected to the Arduino with a cat5 cable, and everything should hold up pretty well as long as [Kurt] doesn’t drive through a hurricane.

You can check out a video of the scooterputuer below.

Continue reading “Scooterputer, The All-in-one Scooter Computer”

Electric Motorcycle Hits The Racing Circuit

electric-motorcycle-hits-the-race-track

Check out that beefy electric motor hanging out where the swing arm connects to the body of this motorcycle. It’s the muscle that makes this recently completed electric motorcycle ready to race.

[Jackson Edwards] has been hard at work building this from the ground up. His goal was to make it competitive with production line motorcycles and his most recent test runs are pointing to success. The film shows off a couple of problems with the rear suspension. This actually led to him dumping the bike on a turn. He was unharmed but the control panel on the handlebars was unfortunately trashed. A bit of work fixed the handling and he was able to ride with confidence. We’re struck by how quiet the thing is as it tears past the camera at the very beginning of the video.

Sure, we’ve seen other electric motorcycles before. Those were all conversions from gas. Designing from the ground up really opened up a lot of choices not possible with a retrofit. Make sure to dig through all the posts on his blog to get the full picture.

Continue reading “Electric Motorcycle Hits The Racing Circuit”

Automated Cat Feeder And Large Plastic Screws

We’ve seen automated food dispensers for pets, but none that go so far as to build large plastic screws for dispensing kibble.

This isn’t [Mathieu]’s first automatic cat feeder; an earlier version used a wheel to dispense cat food in excessively large version. To improve upon his first build, [Mathiu] decided to use an Archimedean screw to dispense food in 5 gram increments. There was a problem, though: a proper industrial screw cost about $1500 and the ‘consumer’ versions of what he wanted were trash. He though about casting one in epoxy but didn’t want to poison his cat with strange chemicals. He ended up using PolyMorph for his screw, a plastic that melts at 60º C and is also used in medical devices.

The electronics of the build are an Arduino, a  DS1307 real-time clock, LCD display, and a relay board powering an electric screwdriver motor. From the video demo below, we’re going to say [Mathieu] put together a pretty nice automated cat feeder.

Continue reading “Automated Cat Feeder And Large Plastic Screws”

Trimethyl Borate Lantern Built From Garbage

scratch-build-lantern

This lantern was built from recyclable goods. It’s a bit dangerous when used like the image above, but [The Green Gentleman] does give you a few other options in his build instructions which make for much safer operation.

The lantern enclosure is made from old cans and a glass jar. He screwed a couple of boards together at a right angle to act as a jig for cutting the glass. The V-shape created by the boards holds the jar on its side, giving his glass cutting tool something to rest upon. He then turns the jar to score it around the top, and then bottom. He alternated pouring boiling and chilled water on the score mark to shock the glass into breaking along the line.

This makes up the clear part of the enclosure which is later mated with metal top and bottom pieces. From there he adds either an LED, an alcohol lamp, or the Trimethyl Borate lamp seen above. The first two are relatively safe, but the latter burns at around 1500 degrees F. We have reservations about using a plain old glass jar as the enclosure for something burning this hot. It really should be heat resistant glass.