RedBull Creation Update: Fantastic Videos From The Welder Company!

As I’ve been wandering around today, I saw a couple people filming all day. They were crawling on their bellies, climbing things, and doing interviews. It isn’t that surprising till I found out they’re from Lincoln Electric, the company that supplied the plasma cutter and the welders.

Continue reading “RedBull Creation Update: Fantastic Videos From The Welder Company!”

HackIt: Sony Invites You To Hack Its SmartWatch Firmware

sony-smartwatch-hacking

This is Sony’s smart watch, which has been around for a while now. It’s designed for use with your Android phone, and has always included an SDK that allows app developers to interact with it. But now Sony is taking it one big step further. They’ve published everything you need to know to hack your own firmware for the SmartWatch.

The navigation scheme for that articles includes five menu items at the bottom which you’ll want to dig through. The most interesting to us was the one labeled “SmartWatch hacker guide”. It lays bare the hardware used in the watch and how it’s peripheral component connect to each other. This starts with the STM32 (ARM) microcontroller that drives the watch. It goes on to document how the screen is addressed (SPI1) including the pin to turn it on and off. The same goes for the Bluetooth, accelerometer, buzzer, and touch sensors.

Firmware is updated via USB using Device Firmware Upgrade (DFU) mode. We don’t don’t see any way to connect an on-chip debugger. We searched to see if there is a JTAG port on the circuit board and it sounds like getting the watch apart without breaking it is pretty tough.

Now that you don’t need to stick to what Sony had planned for the device, what do you want to do with your strapless wristwatch?

[Thanks Brian]

Machining Beer Can Solder Stencils

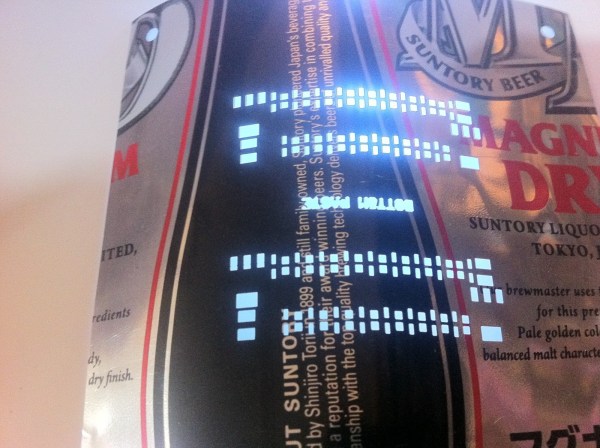
This is a solder paste stencil machined from a beer can. [Simon Ludborzs] spent quite a bit of time dialing in his process to get to this point. Note the nice crisp edges of the openings. That’s a big change from his first attempt.

When looking for a way to make his own stencils he considered two options: plastic and aluminum. He produced both (more about the plastic stencil and his reflow process is discussed in this post). Plastic is a bit easier to work with since it lays flat. But it proves to be too thick. After applying paste with a squeegee there’s way too much solder on the pads. Aluminum beverage can walls are much thinner, depositing less paste.

We’ve seen soda cans used in the past, but they were produced through an etching process. [Simon] cut these holes using a CNC mill. This required a bit of futzing to figure out the right settings. For instance, he used Altium to produce CAM files from his circuit design. But the program is set up to mill the outside of traces, resulting in openings that are too large. He fixed this by setting the pasted expansion rule in the program to a negative value. The other advantage to using a mill is that he can cut precision tooling holes to ensure proper alignment. You can see them in the upper corners of this image.

Hackaday At The Redbull Creation Challenge: The Teams Begin To Build

After a long day sitting around airports watching one flight after another get cancelled due to the storm in New York, I finally made it. Unfortunately I missed the entire first day, but luckily RedBull put out a recap of Day1. They also have a live feed if you want to check in.

I got a chance to run around this morning and check everything out. The 6 teams are already in the heat of competition, rushing to get their musical instrument built before the time runs out.

I apologize ahead of time for the noise. I don’t have a better microphone for this environment. I’ll do my best to try to pull them into a quieter area if I’m going to talk to them in the future. Also I can now see that the footage is over exposed. I’ll fix that, though you can see the gallery of pictures turned out well.

Continue reading “Hackaday At The Redbull Creation Challenge: The Teams Begin To Build”

Guitarduino Show And Tell

guitarduino-show-and-tell

[Igor Stolarsky] plays in a band called 3’s & Sevens. We’d say he is the Guitarist but since he’s playing this hacked axe we probably should call him the band’s Guitarduinist. Scroll down and listen to the quick demo clip of what he can do with the hardware add-ons, then check out his video explanation of the hardware.

There are several added inputs attached to the guitar itself. The most obvious is the set of colored buttons which are a shield riding on the Arduino board itself. This attaches to his computer via a USB cable where it is controlling his MaxMSP patches. They’re out of the way and act as something of a sample looper which he can then play along with. But look at the guitar body under his strumming hand and you’ll also see a few grey patches. These, along with one long strip on the back of the neck, are pressure sensors which he actuates while playing. The result is a level of seamless integration we don’t remember seeing before. Now he just needs to move the prototype to a wireless system and he’ll be set.

If you don’t have the skills to shred like [Igor] perhaps an automatic chording device will give you a leg up.

Continue reading “Guitarduino Show And Tell”

The Making Of A Katana Hand Guard

tiger

Even though the handmade portion of Hackaday is still in its infancy, we expected to put up a post on traditional japanese sword making by now. What [Kelvin] sent in to the tip line far surpases the artistry of forging a katana by hand. It’s a tsuba, the hand guard for a katana, and over the course of two videos (one and two), you can see this masterpiece of traditional metalworking techniques take shape.

Tsubas usually come in a matched set, one for the katana, or long sword, and another for the wakizashi, a slightly shorter sword. [Ford Hallam] was asked to construct the tsuba for a katana that had been lost to the sands of time. Fortunately, a black and white photograph of the original as well as the matching wakizashi tsuba were available for reference, making the design of this tsuba an exercise in replication.

The piece of metal this tsuba was constructed from is made out of a slightly modified traditional alloy of 75% copper and 25% silver. After the blank was cast, many, many hours of scraping, filing and hammering began before the design was laid out.

The craftsmanship in this tsuba is, quite simply, insane. There are about 100 different pieces of metal inlaid into the tsuba to emulate the tiger’s stripes, and hundreds of hours of work in hand carving every leaf and every bit of fur.

Even more, no power tools were used in the creation of this hand guard; everything was crafted using the same methods, tools, and materials as the original tsuba. A masterful piece of craftsmanship, indeed.

Continue reading “The Making Of A Katana Hand Guard”