NES: Nixie Entertainment System

nixieNES

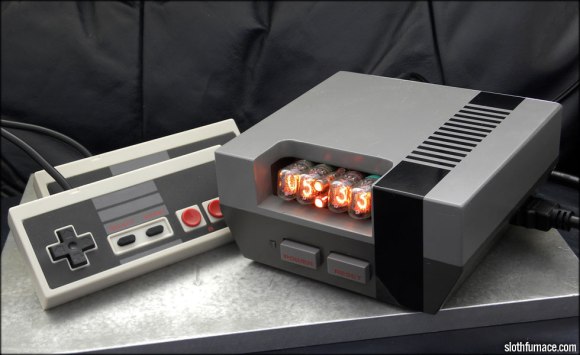
[Bradley W. Lewis] is no stranger to Nixie clock builds, and he felt his latest commission was missing something. Instead of merely mounting the Nixie clock into a case resembling an NES console, he goes full tilt and makes it into an NES console emulator. After some work on the milling machine, a wooden box has room to squeeze in a few new components. [Bradley] originally planned to mount only an Arduino with an ArduNIX shield to handle the Nixie clock, but the emulator demands some space saving. Flipping the Arduino on its side freed up plenty of room and the shield still easily connects to the adjacent Nixie tube board.

A Raspberry Pi serves as the console emulator and was mounted close to the side of the case to allow access to its HDMI port. The other ports from both the Arduino and RasPi stick out of the back, including an extension to the Pi’s RCA video out and buttons to set both the hour and minutes of the clock. The two surplus NES buttons on the front of the case control power to the RasPi and provide a reset function for the Nixie clock.

If that isn’t enough Nixie to satisfy you, check out the WiFi Nixie counter.

3D Printering: Key Patents

Here’s a little tip about tech blogs, and journalism in general: absolutely everything you read is one hundred percent true, except in the cases where you – the reader – know anything about the story being discussed. Those stores on Wired and CNet where a device using an ARM Cortex-M3 is described as having, “the same CPU as a modern-day smart phone?” Totally legit, unless you know that running Android on such a chip is a virtual impossibility.

Such is the case with ‘key 3D printing patents set to expire in 2014’ – a phrase bandied about tech blogs with the fervency of news the seventh seal has been broken. If you believe everything you read on the Internet, we’re looking at a world of 3D printed lollipops, unicorns, and rainbows in just a few short months. Following the logic of journalistic veracity above, this obviously isn’t the case. What does the expiration of these patents actually mean, then?

Continue reading “3D Printering: Key Patents”

Game Of Light

gameoflight

Hyperrealistic graphics may be the standard for gaming, but Game of Light (Warning: Loud video volume) is a welcomed detour into vivid, low-res delight. Built for a course at the University of Oslo by [Abdimaalik], [Martin], [Andre], [Eivind], and [Stian], Game of Light has a handful game options, some of which allow up to four players. The build uses eight DE-DP14211 LED dot matrix boards, each with 32×16 bi-color LEDs and a built-in HT1632C display controller to handle the multiplexing. They are mounted together to form the 64×64 resolution display.

The box was custom-made out of what we suspect is acrylic, and uses some 3D printed pieces to offset the top from the bottom and to hold components in place. SNES controllers send data to the Arduino, which also runs the games and feeds the display controllers. Buried in the mix are two fans to keep the components cool. Everything is open source, so race to Github for source code and the games.

For another LED matrix project with a lot of gaming potential, check out [Brad’s] PS2 mouse interface that lets him interactively draw in real-time.

Continue reading “Game Of Light”

123D Circuits: Autodesk’s Free Design Tool

Arduino fanatics rejoice: Autodesk and Circuits.io have jointly released a new electronics design tool with some unique features: 123D Circuits. Anyone familiar with Autodesk knows they have a bit of a habit of taking over the world, but you can relax knowing this is a (pretty much) free product that’s filed under their Free 3D tools—though we’re not quite sure what is “3D” about a circuits layout program.

123D is web-based software, and using it requires account creation on the circuits.io website. Anything you design sits on the cloud: you can collaborate with others and even embed your circuit (with functioning simulation) straight into a webpage. Unfortunately, your work is public and therefore accessible by anyone unless you fork over $12 or $25 monthly: the former only gives you 5 private circuits. Dollar signs pop up again when you hit “finish circuit;” they offer to sell you PCBs in multiples of three.

Some features of the free account, however, may tempt the Arduino veteran away from a go-to program like Fritzing. Plopping in a virtual Arduino lets you edit its code on the fly in another window, which you can then simulate. If you’re new to circuit design or want some guidance for using 123D Circuits, they have provided an extensive list of applicable Instructables. Check out their promotional video below.

Continue reading “123D Circuits: Autodesk’s Free Design Tool”

Completely Analog Electronic Music Box

For the Ottawa Mini-Maker Faire this year, [Steven Dufresne] created an electronic take on the classic mechanical music box.

A typical music box uses a sequence of bumps on a rotating drum to pluck the tuned teeth (called lamellae) of a metal comb. Steven ditched the drum and comb and replaced them with a strip of paper and a single 555 timer.  The timer is configured as an astable oscillator with a fixed capacitor and charging resistor.  The discharge resistor is selected via a series of 13 shaped wires that drag along the strip of paper.  When a wire drags over a hole, it is connected to a copper pad below that is soldered to a specific resistor.  This completes the circuit and generates a tone specific to the resistor selected.

While the electrical aspects of the project are fairly simple (not even requiring a circuit board), the mechanical parts are much more sophisticated.  Steven had problems getting the dragging wires to make good contact and keeping the paper roll pulled tight.  He outlines all of these challenges and how he solved them in his very thorough video summary (embedded after the break).  With all of his incremental improvements to the design, the finished music box stood up to a whole 14 hours of abuse at the Faire.

Continue reading “Completely Analog Electronic Music Box”

Rubicon Gives The Makerbot Digitizer A Run For Its Money

rubicon

Look out MakerBot, there’s a new 3D scanner on the block and it’s about 10% of the cost of the Digitizer. Enter the Rubicon 3D Scanner which just hit Indiegogo, a device much closer to being worth its price $199.

Just like the pricey Makerbot Digitizer it’s a very simple design made up of a webcam, two laser lines, and a stepper motor controlled turn table. Still very easy to make yourself, but at $199, it’s not a bad price for an all-in-one kit, especially compared to the Digitizer. The newcomer claims a much faster scan time (3 minutes versus 12), and the same stepper rotation (800 steps or 0.45 degrees per step). There are no details about making the design open source, but after some digging in the RepRap forums we found some discussion on that topic from designer [Robert].

It scans objects up to 160mm in diameter and 250mm tall, however it has the ability to scan marginally larger objects if the camera is moved farther back. The funding for the Indiegogo campaign will go towards a custom arduino-esq PCB with a motor driver built in – personally we would be interested in just getting the PCB and 3D printing the rest of the scanner ourselves!

More information is found in the video after the break. Continue reading “Rubicon Gives The Makerbot Digitizer A Run For Its Money”