Aquaponic System Uses Arduino For Consistent Performance

Smart Aquaponics

Food is just one of those things that we need to survive. Plants can grow on their own without human intervention but the quantity and quality of the crop will vary from year to year. Even elaborate farms can have good and bad years due to variables such as weather, disease, bugs, pollution and soil condition.

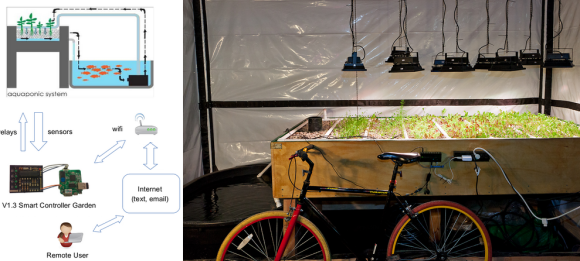
There is a system called Aquaponics that attempts to control those variables. Aquaponics combines aquaculture (raising aquatic animals) with hydroponics (growing plants in water). The Aquaponic system tries to emulate what happens in nature without the variation; water-based animals eat plants and excrete waste and that waste is used as food for plants.

[Kijani Grows] has built an Aquaponic setup and added a smart controller that is made out a bunch of stuff you would not normally associate with a garden. Their are several sensors in the system that measure water flow, tank level, water quality and dissolved oxygen. An Arduino monitors these sensors and reports the information back to a $20 router running OpenWRT. All of the recorded data is also stored for review later. Software on the router determines what needs to be adjusted in the enclosed ecosystem. The router communicates this information back to the Arduino which in turn controls the water pumps, heaters, fish feeder and lighting. And as if that wasn’t enough, the control system can be set up to send out messages via email, SMS or social media.

Hacking A Bee Hive

tumblr_inline_na763mgS0N1rnwm9n

[Marc] created a self-contained monitoring platform that enabled him to record the temperature and humidity of his bee hives.’

The health of colony can be determined based on a few factors. One is temperature which is an early indicator of whether or not the bees are about to swarm. Once temperature spikes are noticed, the bee wrangler can take the necessary steps to reduce the chance of losing the hive to a neighbor. Another indicator of bee health is humidity. If the area is too damp, it can damage the hive.

With that in mind, [Marc] developed a system to alert him via SMS or email if the sensor readings go beyond a certain range. In addition, he monitored the weight of the hive to see how much honey is inside. Frequency of the buzz was also recorded, and so was the activity of the entrance. He used an Arduino Duo and a DHT22 temperature/humidity sensor. A solar panel powered the bee monitoring system.

There were some challenges that needed to be overcome. Initially the Arduino wasn’t sending out data, but that was fixed with a simple debugging session. From there, he was able to broadcast the information creating graphs with the data. Battery levels, temperature, and humidity were all recorded. With the bee hive hacked and monitored, [Marc] was able to make progress on his system making great use of an Arduino.

THP Entry: A 6502 SBC Robot (On Multiple Boards)

SBC

Robots have always been a wonderful tool for learning electronics, but if you compare the robot kits from today against the robot kits from the 80s and early 90s, there’s a marked difference. There are fairly powerful microcontrollers in the new ones, and you program them in languages, and not straight machine code. Given this community’s propensity to say, ‘you could have just used a 555,’ this is obviously a problem.

[Carbon]’s entry for The Hackaday Prize is a great retro callback to the Heathkit HERO and robotic arms you can now find tucked away on a shelf in the electronics lab of every major educational institution. It’s a 65C02 single board computer, designed with robotics in mind.

The 6502 board is just what you would expect; a CPU, RAM, ROM, CPLD glue, and a serial port. The second board down on the stack is rather interesting – it’s a dual channel servo board made entirely out of discrete logic. The final board in the stack is an 8-channel ADC meant for a Pololu reflective sensor, making this 6502 in a Boe-bot chassis a proper line-following robot, coded in 6502 assembly.

[Carbon]’s video of his bot below.


SpaceWrencherThe project featured in this post is an entry in The Hackaday Prize. Build something awesome and win a trip to space or hundreds of other prizes.

Continue reading “THP Entry: A 6502 SBC Robot (On Multiple Boards)”

An FPGA Based 6502 Computer

A diagram of the CHOCHI Board

It’s no secret that people love the 6502 processor. This historic processor powered some of our favorite devices, including the Apple II, the Commodore 64, and the NES. If you want to play with the 6502, but don’t want to bother with obtaining legacy chips, the CHOCHI board is for you.

While many people have built modern homebrew 6502 computers, the CHOCHI will be much easier for those looking to play with the architecture. It’s based on a Xilinx XC3S50 FPGA which comes preconfigured as a 6502 processor.

After powering on the board, you can load a variety of provided binaries onto it. This collection includes a BASIC interpreter and a Forth interpreter. Of course, you’re free to write your own applications in 6502 assembly, or compile C code for the device using the cc65 compiler.

If you get bored with the 6502 core, you can always grab Xilinx’s ISE WebPACK for free and use the board as a generic FPGA development tool. It comes with 128K of SRAM and 31 I/O pins. Not bad for a $30 board.

Makerspace Tours: HexLab In Tarzana, California

This time around, we dive into the world of 3D printing and laser cutting at a local community-driven space near Van Nuys, California. We were invited to visit HexLab Makerspace by [Jonathan] and [Mike] who own and run the company. They showed us the large selection of resources that they have made available to the public. This includes a variety of 3D printers, laser cutters, industrial sewing machines, 3D scanners, computer workstations, wood working tools, manual metal lathes, heaps of testing equipment, a leather embossing/hot stamping machine, and even a plastic injecting machine. And yes, they have a ventilator too.

With all this equipment, HexLab has the ability to prototype practically anything that floats into the mind of someone walking in the door. Specialties include paper craft, costume tailoring, laser etching wood products, manufacturing acrylic glass objects, and much more.

What makes this place different from a lot of other makerspaces is the history of the company. Originally, they started as a Research and Design firm about 14 years ago and have recently opened up the doors to the outside community. Because they began as a business that was previously similar to a hackerspace, they had already acquired the necessary tools for the space. The change makes the tools accessible to entrepreneurs, artists, designers, and musicians alike. This has bred a fantastic teaching environment where the community helps each other through the learning process.

In the future, HexLab plans to continue hosting classes and has even hinted at an up-coming mobile project that is certain to spark a local and portable maker movement. Eventually, they would like to help develop a sustainable model that can be given out to other makerspaces in an effort to assist in the creation of additional places like this. In the meantime though, we look forward to seeing how the community grows through them, and what types of amazing products with be produced out of their space.

Melting Chocolate – FOR SCIENCE!

The Ultimate Fondu Melting Pot

[Patrick Herd] was in Sweden recently and decided to help out a team of high school students in the International Young Physicist Tournament — The challenge? Chocolate Hysteresis.

Chocolate what? When chocolate melts, it doesn’t actually re-solidify at it’s melting point — in fact, it’s quite below that. The challenge here is figuring out a scientific way of measuring the time (and temperature) it takes to return to a solid state. This in itself is kind of tricky considering you have to accurately measure the temperature and be able to empirically tell if its solid or liquid.

The first scientific apparatus they came up with was the Chocolate Rig V1 – a very simple peltier heated and cooled calorimeter. They used an Arduino to control the temperature and a motor shield to power the peltier plate. It kind of worked but they discovered it was difficult to assess the physical state of the chocolate. This is when [Patrick] started doing some research and discovered rotary viscometry.

Continue reading “Melting Chocolate – FOR SCIENCE!”

Table-Top MAME Cabinet Dubbed “The Water Cooler”

Table-Top MAME Cabinet Dubbed "The Water Cooler"

[Greg] wanted to build a MAME cabinet. Not one of those monsters that take up a bunch of floor space, mind you: this one would be table-top size. He admits he could have made his game system out of new, currently available, off the shelf parts, but part of the design goal was to reuse old hardware that was kicking around. It was important to [Greg] to keep unnecessary waste out of the landfill.

An old PC motherboard was pulled out of an old desktop. It’s not fast enough for use as an everyday computer but it will be totally sufficient for a MAME machine. The project’s screen is an old 13 inch Gateway CRT computer monitor. Notice that it is turned 90 degrees so that it is taller than it is wide. This screen orientation lends itself better to certain types of games. The monitor’s plastic casing was removed before some measurements were taken. SketchUp was used to plan a basic idea of the cabinet.

Table-Top MAME Cabinet Dubbed "The Water Cooler"

The controls consist of a joystick and 4 buttons. During past projects, [Greg] has had experience with the least-expensive arcade controls available on eBay. Well, you get what you pay for. This time around he ponied up the extra cash for some high quality controls and is satisfied with the purchase. These buttons were wired straight into a PS/2 keyboard so the computer does not know the difference between the keyboard keys or recently added controls… another great re-use of old obsolete hardware.

The cabinet is made from MDF, glued and screwed together. The limited wood working tools available wasn’t a show stopper for this dedicated builder. For example, the square hole for the joystick was made by removing most of the material with a spade drill bit before using a chisel to clean up the edges. Doing it this way was a little tedious, but you have to do what you have to do sometimes. Once the entire cabinet was finished, several coats of paint were added in a yellow and blue water-theme. Black rubber molding finishes off the edges of the cabinet nicely.