Retrotechtacular: Restoring A 19th Century Automaton

eyes

Made sometime in the 1790s or 1800s London, the Maillardet Automaton has a long and storied history. It was exhibited around England for several decades, brought over the Atlantic by [P.T. Barnum], nearly destroyed in a fire, and donated to the Franklin Institute in Philadelphia in the 1920s. From there, this amazingly complex amalgam of cogs, cams, and linkages eventually became the inspiration for the book – and movie – Hugo. Time hasn’t exactly been kind to this marvel of the clockmaker’s art; it has been repaired four times before receiving a complete overhaul in 2007 by [Andrew Baron].

[Fran], one of Hackaday’s sources for awesome projects, recently visited the Franklin Institute and posted a series of videos on the reverse engineering of the Maillardet Automaton. Being nearly destroyed and repaired so many times didn’t make this an easy job; it’s extremely possible no one alive has ever seen the eyes of the Automaton move as originally designed.

Even though the Maillardet Automaton has one of the largest series of cams of any mechanical draftsman, that doesn’t mean it’s simply an enlargement of an earlier machine. The automaton’s pen is like no other writing device on Earth, with a stylus acting as a valve to dispense ink whenever the tip touches paper. The eyes have linkages to follow the pen as it traces a drawing. In 1800, this automaton would have been a singularity in the uncanny valley, and watching it put pen to paper is still a little creepy today.

Below you’ll find a video from [Fran] demonstrating all seven drawings the Maillardet Automaton can reproduce. You can also find a whole bunch of pics of the mechanisms along with the 2007 repair report on [Andrew Baron]’s site.

Retrotechtacular is a weekly column featuring hacks, technology, and kitsch from ages of yore. Help keep it fresh by sending in your ideas for future installments.

Continue reading “Retrotechtacular: Restoring A 19th Century Automaton”

Introducing: Hackaday Projects

Today Hackaday is launching a new site that furthers our goal of being a Virtual Hackerspace. Now you can host your own hacks and builds in a place truly worthy of what we’re all about. We present to you: Hackaday Projects.

What’s so great about it? It has a dark theme, just like the blog! Actually, the awesome of the new site is a combination of what’s already available and what we have planned. First and foremost, the site has been built from the ground up with open data in mind. This means you own what you create on Hackaday Projects. You can export your work, delete it, and use a public API to extend the usefulness of the data. Secondly, we have a range of different tools which are extremely easy and quick to use, but allow rich styling and presentation when you need it. Want to see what we mean? Go check out the NFC Voting Rig that was at The Gathering.

Where do we go from here? A huge part of that is up to you. We need Hackaday readers to get in there and tell us what works, what doesn’t work, and what needs to be added. Are you up to the task? Request your alpha testing invite now and guide Hackaday Projects to be the hosting site the Hackaday community has always dreamed about!

Low Budget Omnidirectional Treadmill

Omni-treadmill

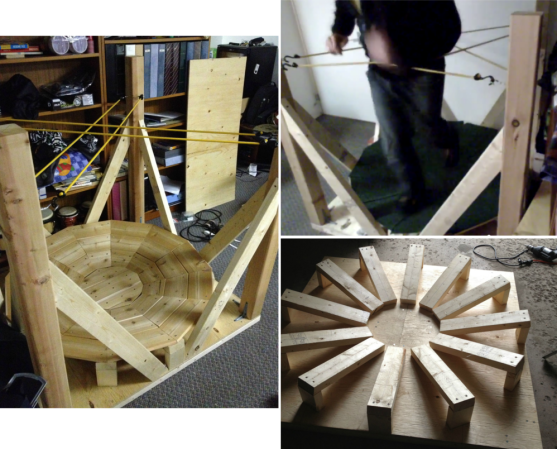
Moving around in space is one of the major hurdles in virtual reality. A holodeck wouldn’t be much fun if you kept walking into walls.  [Gamnaught] is working on a simple solution to this complex problem with his budget omnidirectional treadmill. Omnidirectional treadmills have been around in various forms for a number of years. The idea behind them simple: allow a person walk in any direction without actually changing their position. This is a bit different from the unidirectional treadmill models found at the local gym. Some very complex solutions have been used to create omnidirectional treadmills, including multiple motors and computer control systems as can be found in the US Army omnidirectional treadmill.  [Gamnaught] kept it simple. He built a circular 2×4 platform 13-15 degree bowl. The bowl is covered with carpet, and the user wears furniture sliders on their shoes. The low friction of the sliders allows the user to walk, run, and even walk backwards on the platform. Bungie cords provide resistance so the user doesn’t walk off the platform.

The early results look promising. [Gamnaught] says the balance felt a bit weird at times and took some getting used to. Anyone who has spent time with the Oculus Rift or other VR systems will tell you – many aspects of virtual reality take some getting used to. The treadmill is still open loop, however [Gamnaught] hopes to add motion tracking with a Sixense STEM system. We think a OpenCV based system would work as well. We’ve also seen carpet sliders sold as a children’s toy to be strapped over regular sneakers. Going the toy route would avoid needing a dedicated pair of footwear for the treadmill. More build information can be found on [Gamnaught’s] Reddit thread on the topic.

Continue reading “Low Budget Omnidirectional Treadmill”

STM32 Nucleo, The Mbed-Enabled, Arduino-Compatable Board

The STM32 line of microcontrollers – usually seen in the form of an ST Discovery dev board – are amazingly powerful and very popular micros seen in projects with some very hefty processing and memory requirements. Now, ST has released a great way to try out the STM32 line with the Nucleo board.

There are two really great features about these new Nucleo boards. First, they’re mbed compatable, making them a great way to get started in the ARM development world. Secondly, they have Arduino pin headers right on the board, giving you access to all your shields right out of the box.

Right now, there are four varieties of the Nucleo board based on the STM32F030, -F103, -F152, and -F401 microcontrollers. The STM32F401 is the high-powered variant, An ARM Cortex-M4 microcontroller running at 84 MHz, 512kB of Flash, and enough I/O for just about any project.

If you’d like to get your hands on one of the STM32 Nucleo boards, you can order a voucher to pick one up at Embedded World in Germany next week. Otherwise, you’re stuck ordering from Mouser or Farnell. Bonus: the high-end F401-based board is only $10 USD.

HTPC For Lunch

xbmcLunchbox

If you’re hungry for a portable HTPC (Home Theatre PC) solution, maybe packing everything into a stylish mini lunch box is the way to go. [tomhung] wanted a quick and easy way to drag his media around while he’s away from home, but in an intentionally portable, self-contained enclosure, and the Star Wars lunch box provided plenty of space for the necessary guts.

Inside, he’s stacked the RasPi and a USB hub on top of one another. Each is mounted to its own platform made out of plastic DVD covers, and kept separate by standoffs carved from what appear to be the casings of inexpensive plastic pens. The stack also includes a 250GB 2.5″ HD, which [tomhung] simply attached with velcro for easy removal. The cables underwent minor surgery to keep the rat’s nest under control, and although the interior may still cause cable management enthusiasts to cringe, the exterior of the box cleans up well for its evening out. [tomhung] fit a simple 6-port keystone wall plate to the face of the lunch box to provide simple connections for all the important plugs.

Stellated Snowdecahedra

snoe deca

It’s been a pretty crazy winter here in Canada and the northern States, but at least one maker is having fun with it! He’s been making Snowdecahedras!

According to him, snow sculpting is an ancient art that was originally first discovered over 16,000 years ago outside of the caves of Lascaux, France. Despite whether this claim is true or just tongue in cheek, he’s crafted some amazing nonconvex regular polyhedra—or, stellated snowdecahedras—with a few fancy tools.

He’s created five steel molds for the sculpture by shearing 50 triangles out of steel sheet at his local hackerspace. After taping the cones together, he then welded them into place, creating a rather intricate five-piece mold. He’s welded nuts onto the outside of the pieces in order to tie the mold shut when it is filled with snow.

Plop it upside down, untie your ropes or other fastening device, and carefully remove each face, one at a time.  Et voila, a beautiful spiky star for all to enjoy.

The project is part of the New American Public Art initiative.

Ketchup Bottle… Flexible Hose?

ketchup pipe

Need a corrugated flexible hose for your CNC machine? You could buy one… or you could make your own using tape and ketchup bottles!

One of our tipsters stumbled upon a very interesting hack on a Russian 3D Modeling website that sells 3D models ready to be CNC machined. They have a few articles on CNC machines, and this is one of them. An ingenious way of making your own flexible hose — in this case, used as a vacuum return on the CNC machine.

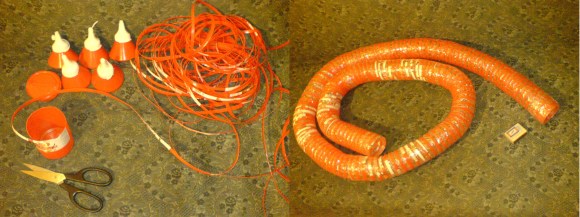
It’s pretty simple, although we would expect the labor involved quickly outweighs the cost of some cheap hose — but this is recycling so hey! You start by finding a source of cylindrical plastic containers, like ketchup bottles. You then cut a never-ending ribbon from said bottles, and then using a cylindrical template (like a can of spray paint), wrap packing tape, sticky side out, around the template. Now wrap your ribbon around the template, slightly spaced, and then cover the outside in tape as well. A one liter bottle of ketchup will make approximately a half meter of corrugated hosing. It’s not hard to continue doing this by sliding the hose off the can, and wrapping more ribbon and tape in place.

Now that’s a hack.

[Thanks Michael!]