Electric Go-Cart Has Arduino Brains

arduino powered go cart

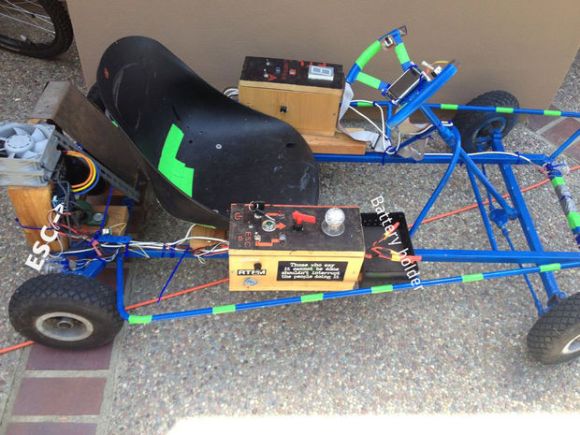
Oh how times have changed. Back in the 30’s the VW Beetle was designed to be cheap, simple and easy for the typical owner to maintain themselves. Nowadays, every aspect of modern cars are controlled by some sort of computer. At least our go-carts are spared from this non-tinkerable electronic nightmare…. well, that’s not completely true anymore. History is repeating itself as [InverseCube] has built an electronic go-cart fully controlled by an Arduino. Did I forget to mention that [InverseCube] is only 15 years old?

The project starts of with an old gas-powered go-cart frame. Once the gas engine was removed and the frame cleaned up and painted, a Hobbywing Xerun 150A brushless electronic speed controller (ESC) and a Savox BSM5065 450Kv motor were mounted in the frame which are responsible for moving the ‘cart down the road. A quantity of three 5-cell lithium polymer batteries wired in parallel provide about 20 volts to the motor which results in a top speed around 30mph. Zipping around at a moderate 15mph will yield about 30 minutes of driving before needing to be recharged. There is a potentiometer mounted to the steering wheel for controlling the go-cart’s speed. The value of the potentiometer is read by an Arduino which in turn sends the appropriate PWM signal to the ESC.

Continue reading “Electric Go-Cart Has Arduino Brains”

Control This Pedestrian Walk Signal Online!

Capture

[Jon Bennett] is an electrical engineer who specializes in embedded systems software. He was the first employee of Pebble Technology and the lead developer of the inPulse Smart Watch. He has studied at the University of Waterloo during which he completed several interesting internships, including working on Bluetooth and WiFi embedded software for the iPhone (Apple, 2007). Now, he has hooked up this pedestrian walk signal — picked up at an electronics surplus store — to the internet.

The web-enable project utilizes a Spark Core Wifi Module, which is an Arduino-like micro-controller with more power, to wirelessly connect to the device. With the click of a button, the hand signal can be flashed. The walking illuminated man can be triggered with another press. Messages can be sent scrolling across the LED’s flashing by in sets of two simply by hitting enter.

All the source code has been posted on Github in case anyone wants to create their own.

Capture

[Jon]’s previous work can be found in a few of our featured articles from a couple of years ago. There’s the Thrift Shop Wifi Router Robot he made that could be controlled through the internet. He also built this interactive bubble music visualizer, and this programmable RC car that can be driven by a computer.

What will he think of next??

Hackaday logo with the words "4-Minutes to Entry"

4-Minutes To Entry

If you think it’s too much work to write about your projects you’re simply wrong, and I’m going to prove it to you.

The first of this set of videos walks though the steps for submitting an official entry… I did it in under 4 minutes.  The second clip covers the extra details you need to post to meet the requirements for the first cutoff on August 20th.

This is the bare minimum needed for your project to be reviewed by the judging panel. But here’s the thing: get your basics down early, then refine as you go along. The Hackaday Prize celebrates the journey of developing interested connected devices. From now until November you should be working on the build and adding to infor to your project post as you go.

Did we mention your odds of winning this thing are really good?

Ask Hackaday: Graphene Capacitors On Kickstarter

Last week, we heard of an interesting Kickstarter that puts a capacitor and charging circuit in the same space as a AA battery. This is usually a very simple endeavour, but this capacitor has the same energy density as an alkaline cell. The chemistry inside this capacitor was initially attributed to lithium ion, and a few people in the comments section were wondering how this was possible. The math just didn’t seem to add up.

The guy behind this Kickstarter, [Shawn West], recently spilled the beans on these… interesting capacitors. Apparently, they’re not lithium ion capacitors at all, but graphene capacitors. Graphene capacitors you can buy. On Kickstarter. Graphene capacitors, also known as the thing that will change everything from smartphones to electric vehicles, and everything in between. I will admit I am skeptical of this Kickstarter.

Apparently, these graphene supercaps are in part designed and manufactured by [Shawn] himself. He fabricates the graphene by putting graphite powder in a ball mill for a day, adding a bit of water and surfactant, then running the ball mill for another few days. The graphene then floats to the top where it is skimmed off and applied to a nonconductive film.

There’s absolutely nothing that flies in the face of the laws of physics when it comes to graphene capacitors – we’ve seen a few researchers at UCLA figure out how to make a graphene supercap. The general consensus when it comes to graphene supercaps is something along the lines of, ‘yeah, it’ll be awesome, in 10 years or so.’ I don’t think anyone thought the first graphene capacitors would be available through Kickstarter, though.

I’m a little torn on this one. On one hand, graphene supercaps, now. On the other hand, graphene supercaps on Kickstarter. I’m not calling this a scam, but if [Shawn]’s caps are legit, you would think huge companies and governments would be breaking down his door to sign licensing agreements.

Post your thoughts below.

Pwning Timberman With Electronically Simulated Touchscreen Presses

arduino-plays-timerman

What do you do if you suck at a smartphone game? Buy some in-game upgrades to pretend like you’re good? Screw that! [Valentin] did what any self-respecting hacker would: developed an automated system to play for him.

Granted, when you see the demo video embedded below you’ll realize there isn’t much strategy involved in this game. But that setup to simulate the touchscreen presses is pretty neat. We’re used to seeing mechanical touchscreen hacks but this one is electronic, using a couple of pads of copper foil tape and some relays to make it happen. Here’s the one caveat: you still need to be touching something with your hand. This just uses the relays to switch the connection between the pads and your body.

We’ve looked around for this before. Does anyone have a cheap, simple, and effective hack to fully automate presses on a modern touchscreen? Can we use a potato or something? Tell us below, but send it in to the tips line too!

Continue reading “Pwning Timberman With Electronically Simulated Touchscreen Presses”

Hats With Sunblock Reminders Are Easy To Make

light_sunscreen-reminder-hat-00

Just about anyone can build this UV index sensing wearable that detects heat rays from the sun and reminds the user to put on sunscreen. There is no soldering required, which makes this a nice beginners projects for those unfamiliar with hooking up electronic sensors.

All that is needed is a FLORA main board, one UV index sensor, a piezo Buzzer, a 500mAh lipoly battery, 2-ply conductive thread, a couple of household tools, and your favorite summer’s hat.

Once the materials have been rounded up, the rest of the process is relatively simple. Threading the FLORA in and place and connecting the Piezo only takes a few minutes. Then the UV sensor is added allowing the hat to start collecting data. A little bit of coding later, and the whole system is ready to be worn out in the sun.

light_sunscreen-reminder-hat-08

What’s great about this project is that the hat can be programmed to play a song when it is time to apply more sunscreen. Everyone from beach bums, to sun-bathing beauties, to music festival attendees will be able to find this hat useful. And, it is cheap and easy to make.

The video on the Adafruit tutorial page shows how simple it is to rig up the system.

Continue reading “Hats With Sunblock Reminders Are Easy To Make”

Using Surface Mount Devices On A Breadboard

[Czar] was working on a project with the Raspberry Pi using the MCP3008 analog to digital converter. The surface mount SOIC version of this chip was slightly cheaper, and there’s always a way to make that work (Portuguese, Google Translation). How [Czar] did it is fairly impressive, as it’s a bit more flexible for breadboard designs than a through-hole version, and done correctly, is an extremely sturdy hack.

A few new leads needed to be soldered onto the SOIC package, and for this [Czar] chose jumper wires. This makes each pin easy to plug into a solderless breadboard, and since [Czar] was extremely clever, all the wires for power, ground, analog, and SPI are color coded.

Simply soldering a few jumper wires onto a chip won’t last for very long. To solve this problem, [Czar] potted the entire chip and its connections with hot glue. Probably not the best solution, and a heavy-duty epoxy would have been better, but the current build is more than enough to stand up to the relatively minor abuse it will receive on the workbench.