Disabling Tap To Pay Debit Cards

XRAY of Debit Card

Some people aren’t too crazy about the rush of RFID enabled credit & debit cards, and the problem is, you don’t really have a choice what card you get if the bank sends you a new one! Well if you really don’t like this on your card for whatever reason, it’s pretty easy to disable.

[James Williamson] recently got a new debit card with RFID technology — the problem is it was messing with his access card at work, the readers would beep twice, and sometimes not work. He decided to disable it because of this and that he didn’t really use the tap to pay feature, nor was he completely convinced it was as secure as the bank said.

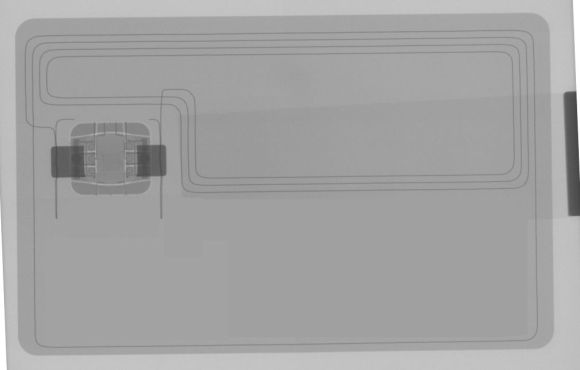
Since these RFID chips use antennas made of copper wire, he could have just started slicing his card with a knife to break the antenna — but, since he has access to a CT scanner, he thought he’d scan it to figure out where everything was.

Simply make a small notch in the edge of your card, or snip off one of the corners. This breaks the antenna and prevents power to the chip when held near a reader — though if you don’t have access to a CT scanner you might want to double-check next time you buy something!

Now there is another side to this — maybe you actually like the whole tap to pay thing, well, if you wanted to you could get a supplemental card, dissolve it in acetone, and then install the RFID chip into a finger ring for Jedi-like purchasing powers!

Converting Cigarette Butts Into Batteries

Trillions of cigarettes are smoked every year, leaving behind discarded filters containing non-biodegradable materials that can be recycled into carbon-based products for electrochemical components. This was discovered by a team of South Korean scientists who presented their unique energy storage solution in IOP Publishing’s journal of Nanotechnology.

The materials inside the cigarette filters offered up better performance than commercially bought carbon, graphene and carbon nanotubes at the time. They hoped to coat electrodes of supercapacitors with the material to be inserted into computers, handheld devices, and electric vehicles. A simple one-step burning process called pyrolysis reduced the filters down into a carbon-based byproduct with tiny pores. The leftover porous substance ensured higher power densities for supercapacitors. This was then tested out to see how well the material absorbed electrolyte ions and discharged them. It did better than expected and stored higher amounts of electrical energy than other commercially available options.

The full paper is linked at the bottom of their article but it’s behind a paywall. If you have a subscription and the time to look it over, please let us know if you think there’s potential for this unorthodox material source or if they’re just blowing smoke.

[Thanks for the tip Ryoku!]

PID balancing a ball on a plate

Stewart Platform Ball Bearing Balancer

For their Mechanical Engineering senior design project at San Jose State University, [Tyler Kroymann] and [Robert Dee] designed and built a racing motion simulator. Which is slightly out of the budget of most hackers, so before they went full-scale, a more affordable Arduino powered Stewart platform proof of concept was built. Stewart platforms typically use six electric or hydraulic linear actuators to provide motion in six degrees of freedom (6 DOF), surge (X), sway (Y), heave (Z), pitch, roll, and yaw. With a simple software translation matrix, to account for the angular displacement of the servo arm, you can transform the needed linear motions into PWM signals for standard hobby servos.

The 6 DOF platform, with the addition of a resistive touch screen, also doubled as a side project for their mechatronic control systems class. However, in this configuration the platform was constrained to just pitch and roll. The Arduino reads the resistive touch screen and registers the ball bearing’s location. Then a PID compares this to the target location generating an error vector. The error vector is used to find an inverse kinematic solution which causes the actuators to move the ball towards the target location. This whole process is repeated 50 times a second. The target location can be a pre-programmed or controlled using the analog stick on a Wii nunchuck.

Watch the ball bearing seek the target location after the break.

Thanks to [Toby] for sending in this tip.

Continue reading “Stewart Platform Ball Bearing Balancer”

Introducing Hat A Day! Not To Be Confused With The Real HaD Of Course…

Hat a Day

With the release of the Raspberry Pi B+ model comes a whole slew of extra GPIO connectors, a whopping 40 of them in fact — Almost double the original B model! A HAT stands for Hardware Attached on Top, and Adafruit is celebrating by trying to create a new hat, every day.

A HAT is a rectangular board measuring 65x56mm with mounting holes for the Raspberry Pi B+ and a 40 pin GPIO header. That doesn’t sound too special by itself, but two of the header pins are reserved for a special auto-configuration system that allows your Pi to have automatic GPIO and driver setup! Now we’re talking!

So far Adafruit has made a handful of prototype HATs including the Perma-proto HAT, a GPS HAT, a TFT HAT, an Arcade HAT and even a Servo HAT. But they’re looking for more! We think they’ve slipped up on the one a day record though…

We’re excited to see more integrated projects with the B+ since it’s so much more friendly for add-on hardware than the original — What kind of hardware would you like to see in HAT form? Do you like the idea of HATs?

The Hackaday Prize: Unofficial Statistics

Hackaday Prize entries over time. You people really know how to procrastinate. Click to embiggen.

What is the Hackaday crew doing this weekend? Judging Hackaday Prize entries, of course! We need to pare down the hundreds of entries we received to 50 primo entries for the quarterfinals round. We’re going to be slammed the entire weekend, so don’t expect any news on who’s in and who’s out of the competition until Monday.

Each of us has about 15 hours of video to go through (multiply the number of entries by two minutes. It’s a lot), and of course we need to read each entry and rate them. We’re literally looking at more than a man-month of work here, and yes, we’ve all read the book.

Until then, here’s some totally unofficial statistics, courtesy of [Greg Kennedy] and his web scraping skills. The graph above shows the number of Hackday Prize entries over time, from the first announcement of the contest to the cutoff time. You people really, really like to procrastinate. The day with the most entries was August 20th, the deadline to get your project in. The day with the most validated entries (i.e. meeting the requirements of a video and four project logs) was August 19th. Needless to say, it’s been a busy week on Hackaday.io.

As a side note, the rules for THP say you must upload a video to qualify for the quarterfinals. This video may be uploaded to YouTube or Youku. Only one project uploaded a video to Youku. Now you know what to do next time to get some free publicity.

It’s highly unlikely we’re going to publish this many official stats, especially now that [Greg] has it pretty much covered. We’ll get the list of all the quarterfinalists out on Monday. Until then you can entertain yourself by watching nearly 15 hours of Hackaday Prize entry videos, all embedded below.

Continue reading “The Hackaday Prize: Unofficial Statistics”

Thumbnail that say The Hacklet

Hacklet #12 – Last Minute Hackaday Prize Submissions

12

If hackers and engineers are notorious for anything, it’s for procrastinating. Many of us wait until the absolute last-minute to get things done. The Hackaday Prize has proved to be no exception to that. Anyone watching the newest projects could see the entries fly in the last few days. Let’s take a quick look at a few.

handuino

[Cyrus Tabrizi] submitted Handuino just a few short hours before the deadline. Handuino is an Arduino based human interface device. You can use it to control anything from R/C cars to 3D printers, to robots to Drones. Input is through the joystick, switches, and buttons, and output through the on-board 2.2″ LCD. Projects can interface to the Handuino via a USB port, or an XBEE radio. Nice Work [Cyrus].

bionicYoSelf

[txyz.info] wants to make us more human than human with Bionic Yourself, an implantable device to make you a bionic superhero. [txyz] plans to use sensors such as an electromagnetic field sensor, accelerometers, and Electromyography (EMG) muscle activity detectors. The idea is to not only sense the implanted wearer, but the world around them. The wearer can then use an embedded Bluetooth radio to send commands. The entire system runs on the Arduino platform, so updating your firmware will be easy. Not everyone has a charging port, so [txyz] has included wireless battery charging in the system.

HAD-alarm-clock[Laurens Weyn] wants to wake us all up with Overtime: the internet connected alarm clock. Overtime is a Raspberry PI powered clock with a tower of 7 segment displays. The prototype displays were sourced from an old exchange rate sign. Overtime does all the normal clock things, such as display the time, and date. It even allows you to set and clear alarms. The display is incredible – there are enough pixels there to play Tetris. Overtime is currently running on an Arduino Mega, but [Laurens] plans to move to a Raspberry PI and hook into the internet for information such as Google calender events.

We’re going to cut things a bit short this week. Your work is done (for now) but for the Hackaday staff, the work is just beginning. We’re already on task, reviewing the entries, and picking which submissions will move on to the next round. Good luck to everyone who entered.

As always, See you in next week’s Hacklet. Same hack time, same hack channel, bringing you the best of Hackaday.io!

Plan B: An Open Source Powder Based 3D Printer

Open Source Powder Based 3D Printer

3D printers come in all shapes and sizes. Most widely known is the FDM (fused deposition modeling) style, which was the easiest to adapt to a consumer grade machine. We’re still waiting for widespread availability of some of the more advanced 3D printing technologies — so you can guess how excited we were when [Yvo de Haas] dropped us a line on his open-source powder based 3D printer!

Powder based 3D printing is one of the most economic and easy to use technologies in the commercial industry because of one wonderful thing — no support material required! They work by laying down fine layers of powder which can then be bonded together either by laser sintering, or by using a binding agent applied by something similar to an inkjet head. Because of this, the surrounding powder acts as a support for any complex geometry you might need — you can quite literally print anything on this style of machine.

[Yvo] has just finished his own version of this style of 3D printer, called the Plan B. Mechanically similar to a regular 3D printer, his is capable of laying down fine powders, and then binding them together using a hacked HP inkjet cartridge. Check it out after the break.

Continue reading “Plan B: An Open Source Powder Based 3D Printer”