TI Launches “Connected LaunchPad”

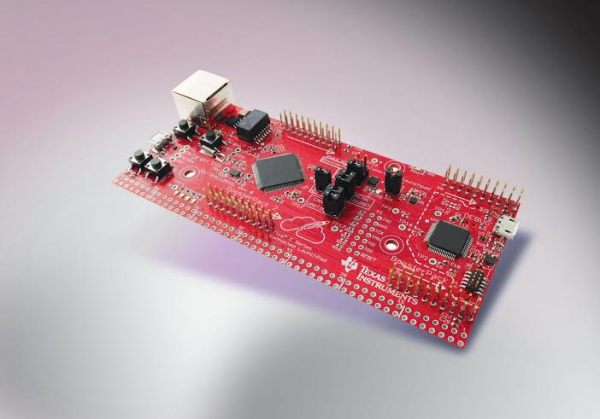
TI’s LaunchPad boards have a history of being both low cost and fully featured. There’s a board for each of TI’s major processor lines, and all of them support the same “BoosterPack” interface for additional functionality. Today, TI has announced a new LaunchPad based on their new Tiva C ARM processors, which is designed for connectivity.

The Tiva C Series Connected LaunchPad is based on the TM4C129x processor family. These provide an ethernet MAC and PHY on chip, so the only external parts required are magnetics and a jack. This makes the Connected LaunchPad an easy way to hop onto ethernet and build designs that require internet connections.

This development board is focused on the “Internet of Things,” which it seems like every silicon manufacturer is focusing on nowadays. However, the real news here is a low cost board with tons of connectivity, including ethernet, two CANs, 8 UARTs, 10 I2Cs, and 4 QSPIs. This is enough IO to allow for two BoosterPack connectors that are fully independent.

Connected Launchpad Details

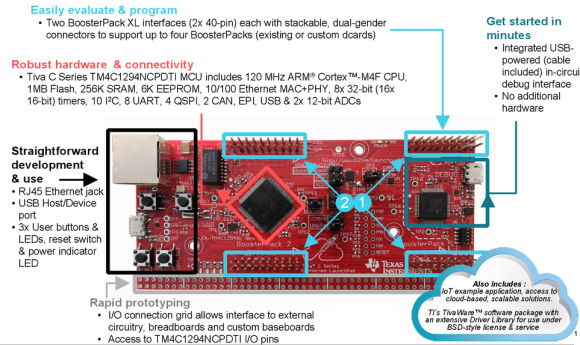
For the launch, TI has partnered with Exosite to provide easy access to the LaunchPad from the internet. A pre-loaded demo application will allow you to toggle LEDs, read button states, and measure temperature over the internet using Exosite. Unlike some past LaunchPads, this one is designed for easy breadboarding, with all MCU pins broken out to a breadboard compatible header.

Finally, the price is very right. The board will be release at $19.99 USD. This is less than half the price of other ethernet-ready development boards out there. This makes it an attractive solution for hackers who want to put a device on a wired network, or need a gateway between various devices and a network. 

The Flaming Yinlips

furan-yinlips

No, that’s not a Playstation Vita up there, it’s a “Yinlips YDPG18A” portable game system. [Ian] found that his Yinlips was lacking in the flash memory department, so he fired up his soldering iron. The Yinlips is based on an Allwinner Sunxi series processor, and uses a standard TSOP48 footprint flash. There is some standardization in flash pin out and packages, so [Ian] picked up the largest pin compatible chips he could find – a pair of 256 gigabit (32 gigabyte) chips from Micron. Desoldering the existing flash proved to be a bit of an adventure as the flash was glued down. [Ian] also didn’t have his hot air gun handy, making things even more interesting. Careful work with a razor blade broke the glue bond.

It turns out that the soldering was the easy part. All flash chips have geometry, die count, page size, block count, sector size, etc. The geometry is similar to the geometry in a hard drive. In fact, just like in modern hard drives, a system will read some basic information before accessing the full storage array. In the case of NAND flash, the processor can access the first page of memory, and query the flash for its part number. Once the part number is known, the geometry can be determined via a lookup table. [Ian] checked the NAND table on github, so he knew going in that his flash chips were not supported. Due to the complexities of booting Allwinner processors into Linux or Android, the table and the NAND driver that uses it exist in several places. The bootloader’s axf file, U-Boot, and several flash application binaries sent from the PC based LiveSuit flash app all required modification. Most of these files were packed into a single flash image. [Ian] used imgrepacker to unpack the image, then opened the hex files. The fact that he knew what the original flash parameter tables looked like was key. He searched for an existing Micron flash table entry, and replaced the parameters with those of his new chips.

With all the files modified, [Ian] re-packed his flash image and sent it over. The Yinlips rewarded his hard work by continually resetting in a bootloop. [Ian] wasn’t going to give up though. He wired into the boot console, and discovered that a CRC check failure on one of his modified files was causing the reset. He then disassembled binary issuing the reset. Changing the return value of the CRC to always pass fixed the issue. [Ian’s] now has a collagen infused Yinlips with 58GB of internal storage. Pretty good for a device that only started with 2GB.

Make A Plastic Bender Using Stuff You Already Have

bendingStation

The team over at [2PrintBeta] found they needed some unique plastic profiles for their 3D printer the Printupy. Unable to find a supplier with what they needed, they decided to try building their own inexpensive bending station, using stuff they already had.

Not too concerned with the longevity of the system (or perhaps the flammability?) they’ve taken a wooden board and routed a straight groove through the center of it. Using a power supply and some Nichrome wire — it’s done.

They admit it’s really not the most durable and that it requires constant supervision in case of flames — but it cost next to nothing to make, and actually works quite well! What we like about the following video is they also show us the design process, the laser cutting, and bending to create the final product.

Continue reading “Make A Plastic Bender Using Stuff You Already Have”

Here’s The Dirt On Printing With Pollution

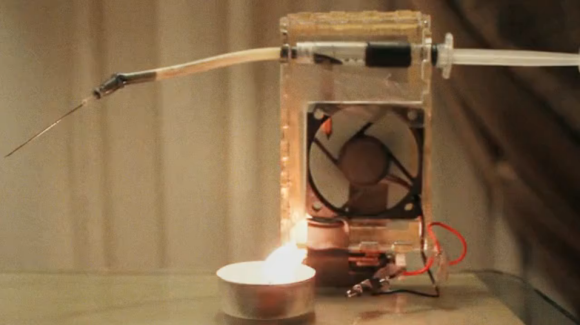
[Anirudh] and his friends were sitting around reminiscing about India. In particular, they recalled riding around in auto-rickshaws in stifling heat, watching their skin turn black from the exhaust. They started thinking about all of the soot and pollution in crowded cities the world over and wondered whether the stuff could be re-purposed for something like printer ink. That’s how they came up with their soot/pollution printer.

They created a soot-catching pump which they demonstrate with a burning candle. The pump mixes the soot particles with rubbing alcohol and an oil substrate and sends the ink to an HP C6602 inkjet cartridge. They used [Nicolas C Lewis]’s print head driver shield for Arduino to interface with the cartridge, turning it into a 96dpi printing head that uses only five pins.

[Anirudh] and his friends plan to design a carbon separator using charged plates to capture the soot particles from pollution sources and filter out dust. Be sure to check out their demonstration video after the jump.

Update: In response to [Hirudinea]’s comment about mining the carbon from cars, [Anirudh] is now looking for collaborators (tinkerers, filmmakers, DIY enthusiasts) to move forward with the idea of re-purposing carbon. Email him at anirudhs@mit.edu.


Continue reading “Here’s The Dirt On Printing With Pollution”

From Wireless Soundbar To Portable Boombox

toshiba-mini-soundbar-online

[Frank] had wanted a portable Bluetooth boombox for a while, but when he did some price comparisons he found that they are pretty expensive. He decided to take matters into his own hands and modify two products he already had — into what he wanted.

The guts of his Frankenstein-boombox come from a Toshiba 3D Soundbar — a great product, but not as durable or portable as he needed. He then took an old mini guitar amp and started hacking the two together.

The soundbar features 4 speakers and a sub woofer — plus the amp and wireless capabilities of course — so [Frank] opted to just use the case of the guitar amp with the soundbar’s innards. He took some measurements and then built up a wooden support for the speakers inside the amp. He’s also sealed off the tweeters sound cavity from the main SUB to keep the sound nice and clear.  Continue reading “From Wireless Soundbar To Portable Boombox”

Hackaday Scouts For Hacks At SXSW

It seems like everyone is going to South by Southwest this year. We even heard about it on The Today Show this week. But we still have hope that there’s awesomeness to be found. A few of our crew will be there this year and they’re on the lookout for something special. The festival starts on Friday and runs more than a week to the following Sunday but our guys will be on the ground Sunday, March 9th through Tuesday the 11th.

Sure, we’ll take a gander at the interactive hardware areas, but preliminary research tells us these may be watered down to the lowest common denominator. What we really want to see is if a Burning-Man-like culture is beginning to coalesce around SXSW. Are you carrying around your own hacked hardware at this year’s event? Do you roll up in a custom party-mobile and spend the week trying to keep the 24-hour tailgate alive with your fold out pig roaster and awning-based entertainment system? We’d like to check that out.

[Eren], [Alek], and [Ivan] are handling coverage of the event. They’ve been killing themselves making Hackaday Projects an awesome place to share and interact. What they wanted was a bit of down time, but handing out T-shirts and Stickers in exchange for a look at your hacks doesn’t get in the way of that. Connect with them on Twitter using the hash tag #HaD_SXSW. They’ll be using it to tweet their activities but of course it works both ways. Your best bet of just crashing into these guys is to check out [Alek’s] talk on StageTwo.

[Background Image Source]

Bench Power Supply Constant Current EZ-SET

constant_current_mod3

Here is a nice hack you may find very useful if you have a cheaper bench power supply that supports constant current limit protection (CC mode) and the only way to set or check your max current limit is to disconnect your circuit, short the power supply outputs and then check or set your limit. Yes, what a pain! [Ian Johnson] was enduring this pain with a couple of Circuit Specialist bench power supplies and decided to do something about it. After finding a download of the circuit diagram for his CSI3003X-5 supply he was able to reverse engineer a hack that lets you press a new button and dial-in the max current setting. Your first guess is that he simply added a momentary button to short the power supply outputs, but you would be wrong. [Ian’s] solution does not require you to remove the load, plus the load can continue running while you set your current limit. He does this by switching the current display readout from using 0–3 volts off an output shunt resistor to using the 0-3 volts output from a digital potentiometer which is normally used to set the power supplies’ constant current limit anyway. So simple it’s baffling why the designers didn’t include this feature.

Granted this is a simple modification anybody can implement, however [Ian] still wasn’t happy. A comment by [Gerry Sweeney] set him on the path to eliminate the tedious multi-button pressing by implementing a 555 momentary signal to switch the circuit from current load readout to current set readout. This 2nd mod means you just start pressing your up-down CC set buttons and it momentarily switches over the display to read your chosen max current and a few moments later the display switches back to reading actual load current. Brilliant! Just like the expensive big boy toys.

[Ian] doesn’t stop with a simple one-off hack job either. He designed up a proper PCB with cabling and connectors, making an easy to install kit that’s almost a plug-in conversion kit for Circuit Specialist bench power supplies (CSI3003X-5, CSI3005X5, CSI3003X3, CSI3005XIII). It is not a 100% plug-in kit because you do have to solder 3 wires to existing circuit points for signal and ground, but the video covering that task seemed trivial.

This hack could very well work with many other power supplies on the market being Circuit Specialist is just rebadging these units. For now, only the models listed after the break are known to work with this hack. If you find others please list in the comments.

After the break we will link to all three progressive mod videos incase you want to learn how to mod your own power supply or you could just order a prebuilt kit from [Ian].

Continue reading “Bench Power Supply Constant Current EZ-SET”