3 Hours Until Collabatorium

This is your 90-minute warning. This week’s Collabatorium begins in just 1.5 hours and you’re invited. To join in just click the “Request to join this project” found on the left sidebar of the Hacker Channel page.

Once you’ve joined you can open up the Group Messaging for that project, one of the many awesome collaboration features on Hackaday.io. Starting at 1700 UTC we’ll launch the Collabatorium to celebrate, discuss, encourage, and find partners for 2015 Hackaday Prize Entries. This edition of the live event is hosted by [Sophi Kravitz] and [Jasmine Brackett].

vote-shortWhile we have your attention, here’s another reminder to head on over and Vote in Astronaut or Not. Each week we draw a random hacker number for a $1000 giveaway, but only if you have voted!. The next drawing is TODAY so get at least one vote in right away to qualify.

The 2015 Hackaday Prize is sponsored by:

Insane 33 Port USB Charger

Like it or not, Hackers gonna hack. And when your hackerspace has someone who looks like Doc Brown from Back to the Future, the builds can get a bit weird, like this Hack42 FestivalCharger.

The Hack42 hackerspace in Arnhem, The Netherlands had collected a large number of TP-Link 5V USB chargers – but all of them had the North American NEMA plug (flat, 2 pin) which wouldn’t fit the Schuko sockets prevalent in The Netherlands. [Simon “MacSimski” Claessen] decided to whip out his giant soldering iron and use it to solder two long pieces of welding filler metal rods to 33 of the chargers, effectively wiring them up in parallel. He did apply his obvious skill and experience to good use. For one, the diameter of the filler metal rods he used were just about the right size to fit in the Shucko Schuko socket. And the gap between the two turned out to be the right distance too, thus creating a sort of Schucko Schuko plug. All that was needed to power up all the chargers was to connect a socket extension to the FestivalCharger. The unit was built to allow crowds of festival-goers to charge their phones and battery-powered gadgets simultaneously. To make sure the visitors didn’t get electrocuted, he used a piece of PVC pipe to cover up the exposed pins and keep it all safe.

Thanks to Hack42 member [Dennis van Zuijlekom] for sending in this tip.

Legit Hack Creates TEA Laser Power By Mr. Wimshurst

It’s a bit scary what you can make with stuff found in the average household, provided you know what you’re doing. How about a TEA laser? Don’t have a high-voltage power supply to run it? Do what [Steven] of rimstar.org did, and power it with a homemade Wimshurst machine.

TEA lasers give off ultraviolet light. In order to see the beam, [Steven] aims it through a glass of water tinted with highlighting-marker juice and onto a sheet of white paper. [Steven] originally used his homemade 30kV DC power supply to light up his TEA laser. He made the laser itself from aluminium foil, angled aluminium, transparency sheets, some basic hardware components, and a 100kΩ resistor.

Although the components are simple, adjusting them so that the laser actually works is quite a feat. [Steven] says he burned holes through several transparencies and pieces of foil before getting it right. Using a Wimshurst machine to power the TEA laser takes another level of patience. It takes about 25 cranks of the static electricity-producing machine to build up enough energy to attempt lasing.

Want to make your own TEA laser, perhaps in a different configuration? [Steven]’s design was based on one of [sparkbangbuzz]’s lasers, which we covered several years ago.

Continue reading “Legit Hack Creates TEA Laser Power By Mr. Wimshurst”

Coin-Op Weather

When you have access to your own CNC machine, you tend to make stuff first and ask questions later. That sounds like how [Rui Cabral] came up with a weather station stuffed into a miniature arcade game cabinet.

arcade28
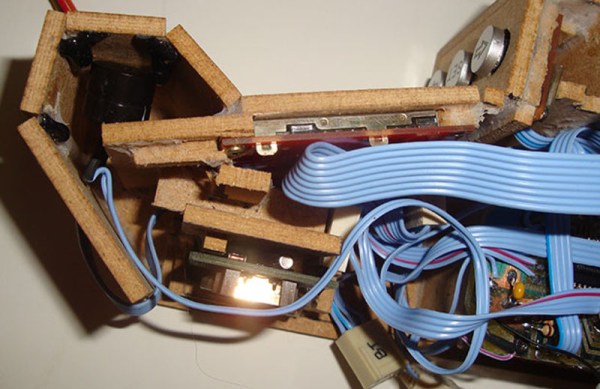
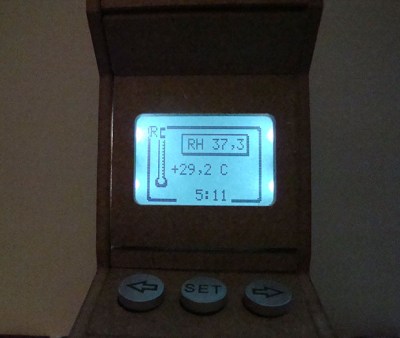
Standing only about 16 cm tall, the cabinet is quite detailed and resembles the familiar arcade form factor that has consumed countless quarters. It even appears to be made of particle board like the big boys. The screen cutout is filled by a 84×48 monochrome Nokia display, and the rest of the cabinet’s interior is stuffed with a CNC-milled PCB, temperature and humidity sensors, an RTC, and a Bluetooth module for uploading data to a phone. [Rui] even manages to work in an homage to the grand-daddy of all arcade games with a Pong splash screen.

Another good-looking display for this project might have been this ePaper badge made into a weather station. And we’ve featured even tinier arcade cabinets too, though perhaps not as functional.

[Rui] takes us on a video tour of his build after the break.

Continue reading “Coin-Op Weather”