MotorMouth

MotorMouth For Future Artificial Humans

When our new computer overlord arrives it’ll likely give orders using an electromagnetic speaker (or more likely, by texting instead of talking). But for a merely artificial human being, shouldn’t we use an artificial mouth with vocal cords chords, nasal cavity, tongue,  teeth and lips? Work on such a thing is scarce these days, but [Martin Riches] developed a delightful one called MotorMouth between 1996 and 1999.

It’s delightful for its use of a Z80 processor and assembly language, things many of us remember fondly, as well as its transparent side panel, allowing us to see the workings in action. As you’ll see and hear in the video below, it works quite well given the extreme difficulty of the task.

Continue reading “MotorMouth For Future Artificial Humans”

Santos Dumont And The Origins Of Aviation

The history of aviation is a fascinating one, spanning more than two thousand years starting from kites and tower jumping. Many hackers are also aviation fans, and the name of Alberto Santos Dumont may be familiar, but if not, here we talk about his role and accomplishments in the field. Santos Dumont is one of the few aviation pioneers that made contributions in both balloons, airships and heavier-than-air aircraft.

Continue reading “Santos Dumont And The Origins Of Aviation”

How Commercial Printed Circuit Boards Are Made

Most of us who have dabbled a little in electronics will have made our own printed circuit boards at some point. We’ll have rubbed on sticky transfers, laser-printed onto acetate, covered our clothing with ferric chloride stains, and applied ourselves to the many complex and tricky processes involved. And after all that, there’s a chance we’ll have ended up with boards that were over or under-etched, and had faults. For many the arrival of affordable online small-run professional PCB production from those mostly-overseas suppliers has been a step-change to our electronic construction abilities.

[Fran Blanche] used to make her own boards for her Frantone effects pedals, but as she admits it was a process that could at times be tedious. With increased production she had to move to using a board house, and for her that means a very high-quality local operation rather than one on the other side of the world. In the video below the break she takes us through each step of the PCB production process as it’s done by the professionals with a human input rather than by robots or ferric-stained dilettantes.

Though it’s twenty minutes or so long it’s an extremely interesting watch, as while we’re all used to casually specifying the parameters of the different layers and holes in our CAD packages we may not have seen how they translate to the real-world processes that deliver our finished boards. Some operations are very different from those you’d do at home, for example the holes are drilled as a first step rather than at the end because as you might imagine the through-plating process needs a hole to plate. The etching is a negative process rather than a positive one, because it serves to expose the tracks for the plating process before etching, and the plating becomes the etch resist.

If you’re used to packages from far afield containing your prototype PCBs landing on your doorstep as if by magic, take a look. It’s as well to know a little more detail about how they were made.

Continue reading “How Commercial Printed Circuit Boards Are Made”

DIY Thermal Camera That’s Better And Cheaper Than A FLIR

A few years ago, FLIR unleashed a new line of handheld thermal imagers upon the world. In a manufacturing triumph, the cheapest of these thermal imaging cameras contained the same circuitry as the one that cost six times as much. Much hacking ensued. Once FLIR figured out the people who would be most likely to own a thermal imaging camera can figure out how to upload firmware, the party was over. That doesn’t mean we’re stuck with crippled thermal imaging cameras, though: we can build our own, with better specs than what the big boys are selling.

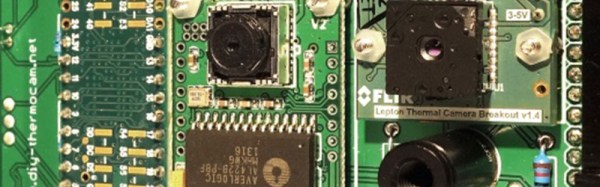
[Max] has been working on his DIY thermal imager for a while now. We first saw it about a year ago, and the results were impressive. This thermal camera is built around the FLIR Lepton sensor, providing thermal images with a resolution of 60 by 80 pixels. These thermal images were combined with a VGA resolution camera to produce the very cool enhanced imagery the commercial unit will get you. There’s also a 1/4-20 threaded insert on the bottom of [Max]’s version, making it far more useful in any experimental setup.

Now [Max] has unleashed his DIY Thermocam on the world of Open Hardware, and anyone can build their own for about €400 (about $425). The components required for this build include a FLIR Lepton sensor easily sourced from the Digikey or GroupGets, an Arducam Mini, a Teensy 3.6, and a mishmash of components that are probably kicking around your parts drawers.

If you want an overview of this project before digging in, [Max] has a project overview (PDF warning) going over the build. This is one of the better DIY projects we’ve seen recently, and the documentation is fantastic. If you’re thinking about buying one of those fancy thermal imaging cameras, here you go — this one is just as good and half off.