Google AIY: Artificial Intelligence Yourself

When Amazon released the API to their voice service Alexa, they basically forced any serious players in this domain to bring their offerings out into the hacker/maker market as well. Now Google and Raspberry Pi have come together to bring us ‘Artificial Intelligence Yourself’ or AIY.

A free hardware kit made by Google was distributed with Issue 57 of the MagPi Magazine which is targeted at makers and hobbyists which you can see in the video after the break. The kit contains a Raspberry Pi Voice Hat, a microphone board, a speaker and a number of small bits to mount the kit on a Raspberry Pi 3. Putting all of it together and following the instruction on the official site gets you a Google Voice Interaction Kit with a bunch of IOs just screaming to be put to good use.

The source code for the python app can be downloaded from GitHub and consists of a loop that awaits a trigger. This trigger can be a press of a button or a clap near the microphones. When a trigger is detected, the recorder function takes over sending the stream to the Google Cloud. Speech-to-Text conversion happens there and the result is returned via a Text-To-Speech engine that helps the system talk back. The repository suggests that the official Voice Kit SD Image (893 MB download) is based on Raspbian so don’t go reflashing a memory card right away, you should be able to add this to an existing install.

Continue reading “Google AIY: Artificial Intelligence Yourself”

We’ve Got It Down PAT: Appliance Electrical Safety Testing

Everywhere we look in our everyday lives, from our bench to our bedroom, there are the ubiquitous electrical cords of mains-powered appliances. We don’t give our electrical devices a second thought, but in addition to their primary purpose they all perform the function of keeping us safe from the dangerous mains voltages delivered from our wall sockets.

Of course, we’ve all had appliances that have become damaged. How often have you seen a plug held together with electrical tape, or a cord with some of its outer sheath missing? It’s something that we shouldn’t do, but it’s likely many readers are guiltily shuffling a particular piece of equipment out of the way at the moment.

In most countries there are electrical regulations which impose some level of electrical safety on commercial premises. Under those regulations, all appliances must be regularly tested, and any appliances that fail the tests must be either repaired or taken out of service

In the United Kingdom,where this piece is being written, the law in question is the Electricity At Work Regulations 1989, which specifies the maintenance of electrical safety and that there should be evidence of regular maintenance of electrical appliances. It doesn’t specify how this should be done, but the way this is usually achieved is by a set of electrical tests whose official name: “In-service Inspection & Testing of Electrical Equipment”, isn’t very catchy. Thus “Portable Appliance Testing”, or PAT, is how the process is usually referred to. Join me after the break for an overview of the PAT system.

Continue reading “We’ve Got It Down PAT: Appliance Electrical Safety Testing”

Mission Control For Kerbal

[Niko1499] had a plan. He’d built a cool hardware controller for the game Kerbal Space Program (KSP). He got a lot of positive reaction to it and decided to form a company to produce them. As many people have found out, though, that’s easier said than done, and the planned company fell short of its goals. However, [Niko1499] has taken his controller and documented a lot about its construction, including some of the process he used to get there.

If you haven’t run into it before, KSP is sort of half simulator, half game. You take command of an alien space program and develop it, plan and execute missions, and so on. The physics simulation is quite realistic, and the game has a large following.

When we first saw the photos, we thought it was an old Heathkit trainer, and–indeed–the case is from an old Heathkit. However, the panel is laser cut, and the software is Arduino-based. [Niko1499] covers a few different methods of letting the Arduino control the game by emulating a joystick, a keyboard, or by using some software to take serial data and use it to control the game.

Continue reading “Mission Control For Kerbal”

Reverse-Engineering The Peugeot 207’s CAN Bus

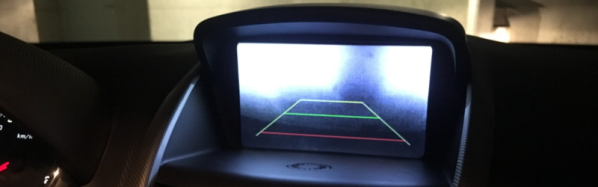
Here’s a classic “one thing led to another” car hack. [Alexandre Blin] wanted a reversing camera for his old Peugeot 207 and went down a rabbit hole which led him to do some extreme CAN bus reverse-engineering with Arduino and iOS. Buying an expensive bezel, a cheap HDMI display, an Arduino, a CAN bus shield, an iPod touch with a ghetto serial interface cable that didn’t work out, a HM-10 BLE module, an iPad 4S, the camera itself, and about a year and a half of working on it intermittently, he finally emerged poorer by about 275€, but victorious in a job well done. A company retrofit would not only have cost him a lot more, but would have deprived him of everything that he learned along the way.

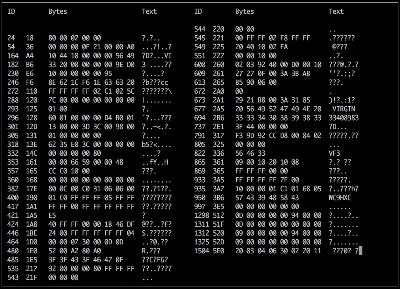
Adding the camera was the easiest part of the exercise when he found an after-market version specifically meant for his 207 model. The original non-graphical display had to make room for a new HDMI display and a fresh bezel, which cost him much more than the display. Besides displaying the camera image when reversing, the new display also needed to show all of the other entertainment system information. This couldn’t be obtained from the OBD-II port but the CAN bus looked promising, although he couldn’t find any details for his model initially. But with over 2.5 million of the 207’s on the road, it wasn’t long before [Alexandre] hit jackpot in a French University student project who used a 207 to study the CAN bus. The 207’s CAN bus system was sub-divided in to three separate buses and the “comfort” bus provided all the data he needed. To decode the CAN frames, he used an Arduino, a CAN bus shield and a python script to visualize the data, checking to see which frames changed when he performed certain functions — such as changing volume or putting the gear in reverse, for example.

The Arduino could not drive the HDMI display directly, so he needed additional hardware to complete his hack. While a Raspberry Pi would have been ideal, [Alexandre] is an iOS developer so he naturally gravitated towards the Apple ecosystem. He connected an old iPod to the Arduino via a serial connection from the Dock port on the iPod. But using the Apple HDMI adapter to connect to the display broke the serial connection, so he had to put his thinking cap back on. This time, he used a HM-10 BLE module connected to the Arduino, and replaced the older iPod Touch (which didn’t support BLE) with a more modern iPhone 4S. Once he had all the bits and pieces working, it wasn’t too long before he could wrap up this long drawn upgrade, but the final result looks as good as a factory original. Check out the video after the break.

It’s great to read about these kinds of hacks where the hacker digs in his feet and doesn’t give up until it’s done and dusted. And thanks to his detailed post, and all the code shared on his GitHub repository, it should be easy to replicate this the second time around, for those looking to upgrade their old 207. And if you’re looking for inspiration, check out this great Homemade Subaru Head Unit Upgrade.

Continue reading “Reverse-Engineering The Peugeot 207’s CAN Bus”

Model Of A Transmission Line

Transmission lines are the kind of thing that seems to confuse beginners. After all, the fact that short-circuits can have infinite impedance and open-circuits can behave like a short is not intuitive at all!. That’s why we like [Tinselkoala]’s latest video that shows a nice model of a transmission line. It helps to understand the line as inductors and capacitors in series-parallel connection.

Any pair of wires used to transmit electrical power have tiny amounts of inductance and capacitance. This is not a problem with DC or low-frequency AC, but when the frequency is sufficiently high, weird things start to happen. The energy tends to escape as radio waves, and current reflects from discontinuities such as connectors and cable joints.  For this reason, transmission lines for high frequency signals use specialized construction to minimize those effects and reduce power losses.

[Tinselkoala] has built a model of a transmission line using coils and capacitors to simulate the inductance and capacitance of the line, with LED’s placed between the coils. He feeds the system with the signal generator with frequencies from 10 kHz to 1 MHz. In his words, they act as simple “visual voltmeters” to show the peaks and nodes of the standing waves of voltage in the line.

It is relatively simple to build your own version if you want to experiment with this fascinating subject. You will only need some magnet wire, capacitors, resistors and LED’s. If the subject sounds interesting to you,  here you can find an excellent introduction to transmission lines.

Continue reading “Model Of A Transmission Line”

Rusty ARM

You’ve probably heard that Rust is a systems programming language that has quite the following growing. It purports to be fast like C, but has features like guaranteed memory and thread safety, generics, and it prevents segmentation faults. Sounds like just the thing for an embedded system, right? [Jorge Aparicio] was frustrated because his CPU of choice, an STM32 ARM Cortex-M didn’t have native support for Rust.

Apparently, you can easily bind C functions into a Rust program but that wasn’t what he was after. So he set out to build pure Rust programs that could access the device’s hardware and he documented the effort.

Continue reading “Rusty ARM”

BionicCobot and human working together

Pneumatic Rotary Vane Joints Lend A Gentle Helping Hand

Festo has released a video showing the workings of their BionicCobot, a pneumatic robot arm developed for lending a helping hand to humans at a workstation. Since it works intimately with humans, it has to be safe, producing no harmful movements, and reacting when encountering an obstacle such as an arm containing delicate human bone. This it does using pneumatics and rotary vanes.

Rotary vane in action

The arm has seven degrees of freedom, three in the shoulder, one in the elbow, another in the lower arm, and two in the wrist. But you won’t find any electric motor or gears. Instead each contains a rotary vane. Compressed air pushes on both sides of the vane. If the air pressure is the same on both sides of the vane then it doesn’t rotate. But with more pressure on one side than the other, the vane rotates. This is much like in a human arm, where two muscles work together to bend the arm, one muscle contracts while the other relaxes. Together they’re referred to as an antagonistic pair. In addition, each joint has a circuit board with two pressure sensors for monitoring the joint.

Using pneumatics, if an obstacle is encountered, the pressure can be released, making it instantly safe. And air being compressible, the joint can behave like a spring, further adding to the safeness. By controlling the pressure, the spring can be made more or less tense.

You can see it in action in the video below the break, along with more details such as how they use ROS, the popular, open system Robot Operating System which we’ve seen here a lot before, along with their Festo valve bank, one of which our own [James Hobson] used for his slick elysium exoskeleton. The video also covers how they handled running the hoses, the kinematics and the UI software.

Continue reading “Pneumatic Rotary Vane Joints Lend A Gentle Helping Hand”