Museum exhibits are difficult to make, and they’re always breaking down; especially the interactive ones. This is a combination of budget, building a one-off, and the incredibly harsh abuse they take from children.
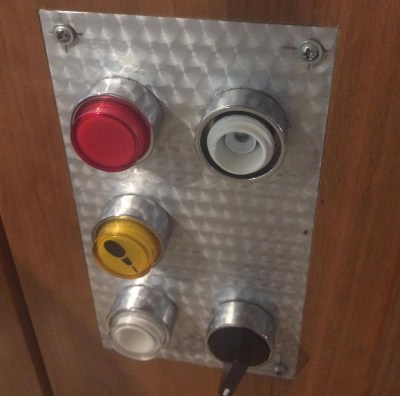
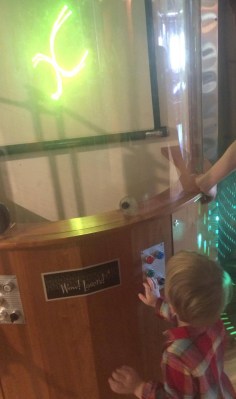
My first exhibit is an interactive laser show that turns waveforms from music into laser patterns, and different types of music have very different patterns. I knew from talking to the museum staff that industrial buttons were a necessity, but it turns out that industrial buttons are made under the assumption that tiny creatures won’t be constantly mashing, twisting, and (ew ew ew) licking the buttons. After a while, the buttons (and poor knob) were trashed.
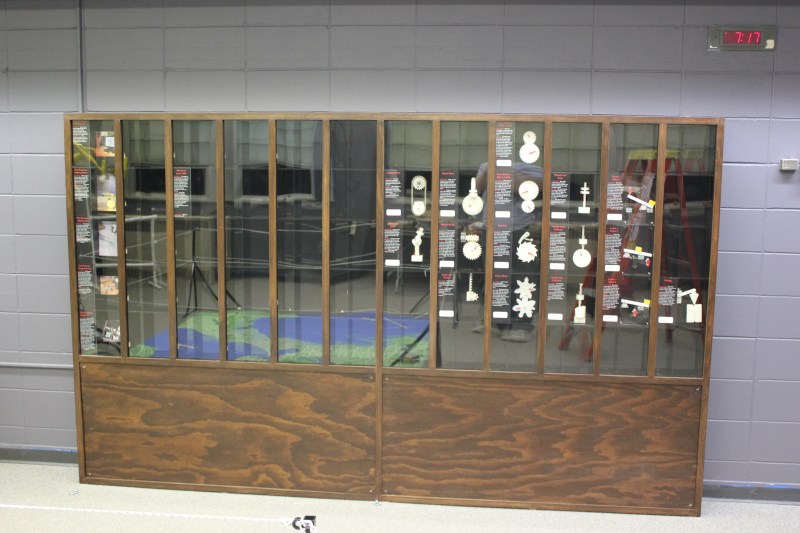
The second exhibit is also interactive, but in this case it’s just a simple button that turns on a thing for a while, then shuts it off. You can read more about the Periodic Table of Motion on the project page. Here I thought; let’s use capacitive touch, put the sensor behind two layers of acrylic for protection, and then there won’t be any moving parts to break. I built a bunch of units, tested it for weeks, then installed it. Instant failure despite my diligence.
Something is different about the installation from my test environment. It might be the second layer of acrylic contributing. Maybe it’s the power supply and a strange ground issue. Maybe the room’s fluorescent lights are creating an electromagnetic field that is interrupting the sensor, or the carpet is causing static buildup that is somehow causing the midichlorians to reverse polarity and discharge through the base plate of prefabulated aluminite. In some of the cells, the button doesn’t work. In other cells it is extremely sensitive. In one column of the table (columns share a common piece of acrylic among 5 cells), a single touch will trigger all 5.
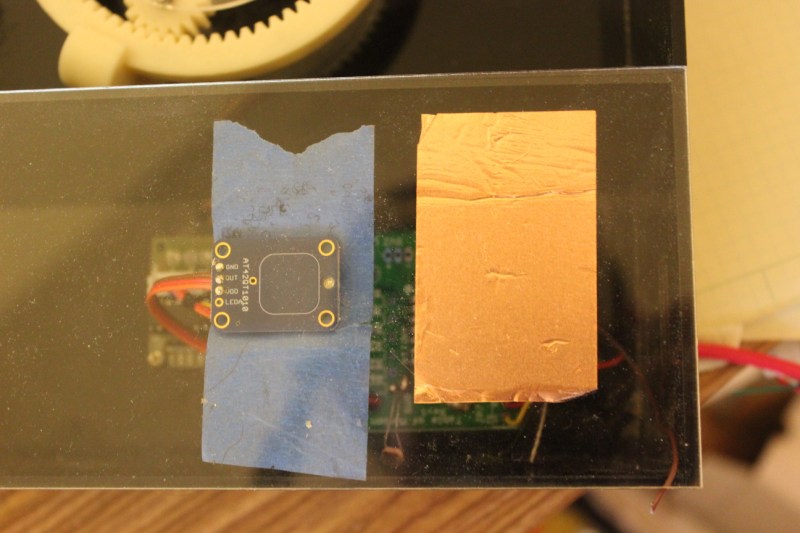
The circuit is an ATtiny with a 2.2M resistor between two pins, one of which connects via a short wire to a soldered connection to a piece of copper tape on the underside of an acrylic piece. The ATtiny is using the capsense library, which has features for automatic recalibration. Because of the way it is installed, I can’t reprogram them to adjust their sensitivity while inside the enclosure, so tweaking them post-install is not an option. I thought I could isolate the problem and use an existing capacitive touch sensor breakout of the AT42QT1010 hooked up to just power, but it had the exact same issue, meaning it’s either the power supply, the enclosure, or the room.
There are three paths I can go down now:
- Find the problem and solve it
- Switch to a photoresistor
- Petition Hackaday for a better solution
Finding the problem and solving it will be a long and difficult path, especially since the museum environment is somehow and inexplicably different from the test environment. The photoresistor option has promise; when the user puts their hand over the paper button the light level changes. Some early testing indicates that it is easy to detect instantaneous change, and a trailing average and adjusting threshold make it robust enough for changing lighting conditions throughout the day. Further, it’s a simple change to the code, and the existing circuit board will accommodate the adjustment.
As for the third option…
What have you done for child-compatible touch interfaces that are robust enough to handle uncertain environments and harsh abuse? What buttons, knobs, and other interactive elements have you used?


The best way to test things are to deliberately break them yourself. Used only recessed buttons with tougher springs and false knobs with heavy duty custom limiting with a connecting rod to the real one. custom buttons and levers utilizing magnetic reed switches are also a good option.
I think this would be a good time to try out a Capaciflector sensor. Ran across the configuration randomly years ago, and always thought it a clever way to null out the capacitance of the sensor and focus sensitivity on to one side only.
I did a interactive panel in a zoo. Had to be IP-rated and kid proof.
I used a serial acoustic wave sensor mounted under a melamine sheet with vinyl graphics printed on top. Absolutely kid-proof.
Would it not be easier to use a second layer of activation. A large button to a small switch, the button may get damaged but it would protect the electronics? that would allow the use of graphics for visual cues, or levers for examples of functions, and by limiting the travel of the front the damage to components is limited. for that matter you could use entire panels as the primary switch to activate. this could be adapted to use air pressure or Light or any number of other physical properties.
Great idea, that is how those tough arcade buttons work. The plastic button bottoms out so that the microswitch under it is never bottomed out. So all the pounding goes from the plastic button to the shell, then to the panel it is mounted in.
You’ve discovered what so many others have discovered, the hard way. Capacitive sensing is not a trivial task. It matters very much if your circuit is grounded and where. It matters what is under the feet of the people touching the buttons and if it is grounded. It matters what conductive structures are around the buttons and the people, and if it is grounded. It matters if the panel itself is prone to develop a static charge.
It matters what kind of capacitive sensing you are using. And if it is meant to be non-contact or contact sensing.
Remember door photo sensors from 1980s? Constant on ir so when door opens it triggers an event. Bit of black paper can block the beam. Tube of black paper for both emmiter and receiver to seperate different buttons. Only moving part to fail would be a spring for the button.
Use load cell +uC. Load cell don’t have moving parts.