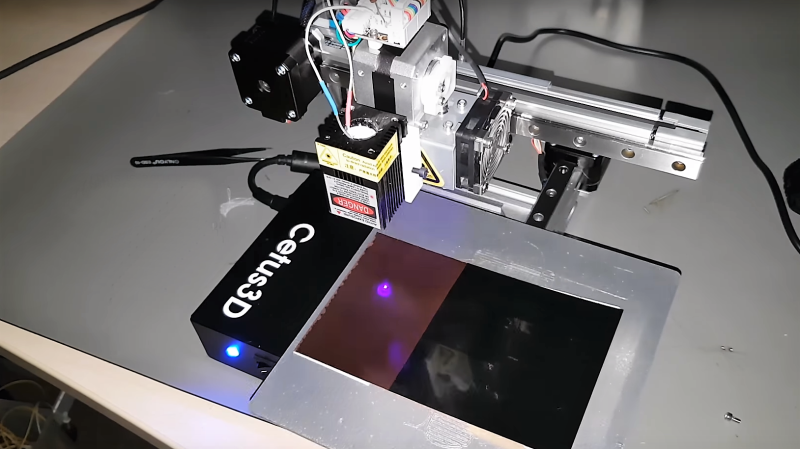
A funny thing happened on [Marco Rep]’s way to upgrading his 3D printer. Instead of ending up with a heated bed, his $300 3D printer can now etch 0.2-mm PCB traces. And the results are pretty impressive, all the more so since so little effort and expense were involved.
The printer in question is a Cetus3D, one of the newer generation of affordable machines. The printer has nice linear bearings but not a lot of other amenities, hence [Marco]’s desire to add a heated bed. But hiding beneath the covers was a suspicious transistor wired to a spare connector on the print head; a little sleuthing and a call to the factory revealed that the pin is intended for accessory use and can be controlled from G-code. With a few mods to the cheap UV laser module [Marco] had on hand, a printed holder for the laser, and a somewhat manual software toolchain, PCBs with 0.2-mm traces were soon being etched. The video below shows that the printer isn’t perfect for the job; despite the smooth linear bearings, the low mass of the printer results in vibration that shows up as wavy traces. But the results are more than acceptable, especially for $330.
This isn’t [Marco]’s first budget laser-etching rodeo. He recently tried the same thing using a cheap CNC laser engraver with similar results. That was a $200 dedicated engraver, this is a $300 3D printer with a $30 laser. It seems hard to lose at prices like these.


I’ve been doing this for a couple years, my suggestion would be to angle the laser a little bit because otherwise enough reflection will go back up into the diode that it’ll damage it over the course of a month or two.
What fraction of a month does it take to damage human eyes?
What fraction of a month does it take to properly enclose dangerous equipment?
Apparently longer than far too many people seem to have time for or care to do.
I’ve been doing similar with my K40 laser. You can avoid the wiggles if you cut isolation passes in vector mode rather than raster mode. I use 6 passes, each offset 0.15mm outside the previous. In total you get roughly 1mm of isolation.
What software do you use?
Are you using the method of painting a resist mask and burning off the parts to be etched? K40’s are IR lasers so wouldn’t activate the resist mask as I understand like a UV laser.
1mm of isolation is giant. I normally use 0,15mm or 0,2mm design rules (track and spacing). I am sure he uses a vector mode, but if the machine vibrates mechanically then it wiggles. I would expect the opposite: If you use raster mode you could avoid the wiggles, as every raster line starts at it’s starting point and the head moves with constant speed. At the expense of speed. But if you do vector much slower, it should also make less vibration.
Which software allows for raster mode? The isolation approach is garbage if one wants to get rid of larger areas of copper
I’m wondering about replacing the print head with a very small, very high rpm (maybe air-powered) motor and carbide engraving bit.
Like a dentist drill?
turbocarver
If you do, I recommend you to plan for dust management. The glass fiber dust is not nice to get everywhere.
Waaay to easy. And one would get away without hazardous etchants, without dangerous lasers, with a $200 DIY printer, could drill the holes as well and even go with glassfiberless PCBs. Can’t be good.
To receive attention by the community, a design has to be stupid, complicated, non-DIY’d, dangerous. Then become a hero by dealing with all the threats which wouldn’t even exist with a simple & sane approach.
Except there’s tons of reasons not to do that. Glass fiber dust is not good to breathe, for one. Also, routers are heavy and need a more rigid structure than laser cutters.
That’s not tons of reasons, thats tons of cheap excuses.
There’s PCB substrate without any glass fibers inside, known as “FR2”. And if that’s still too dusty, simply apply some water: https://vimeo.com/28673339#t=18s
I used this “hard paper” stuff (FR2) 30yrs ago while being in school, because I did not have the money to afford the expensive Epoxy material. But Epoxy is much more robust and stable.
With the UV laser you shpould be able to go down to less than 0,1mm resolution. I don’t think this is possible mechanically.
But anyway, mechanical PCB engraving machines also do exist.
Wondering if you can use the electromagnetic focusing head from a cd drive [ upgraded with a glass lens ] to do really fine adjustments. It should increase the resolution substantially and not require much beyond a few analogue outputs.
The problem here is less a precision problem than an accuracy problem. The system isn’t all that well damped when it’s not squirting plastic through the nozzle so the lines wave around a bunch.
Maybe add some optical mouse sensors
A ring of sensors to grab the reflected light. Compound eye pin hole camera style.
Feed that back into the cd drive focusing lens to act as stabilisation.
replace the laser of a CD head with a UV laser or even better use the head from a BluRay/HD DVD burner. It has a UV laser and the focusing optics and the focus detection sensor. The latter is a 4 quadrant photo diode and with the help of an astigmatic lens it delivers signals if you are out of focus on the long or short side. If in focus, you get equal signal from both diagonally opposite diode pairs.
May sound a dumb question, but it’s totality unsafe to use it without special glasses, right? And can those chineses filter glasses be trustable at all?
Building a simple sheet metal enclosure for it would be best, and its easy to test to see if its good enough.
If you go blind, it’s not good enough? “Warning: Do not stare into laser with remaining eye”
Glasses are for the very special case when you need to see the beam — doing twitchy alignments, etc — and are the only animal in the room. Putting the laser in the box is for general-purpose safety, because _nobody_ goes blind if the laser is in an opaque box.
They are not substitutes, but compliments. And the box is nearly absolutely necessary. Put lights and a webcam in the box, or build a window out of known-good acrylic filter, if you just want to watch.
Having a laser _cutter_, such a box withstands a laser beam how long? Half a second? And then you’re at the same point as with no box at all.
What it really needs now is another accessory to drill the holes!
And another accessory to through plate the holes with copper.
Which is the real problem of all this PCB prototyping solutions. The etching was never the problem.
That Cetus3D looks mighty slick, but I’m pretty sure the last thing I need in my life right now is yet another 3D printer.
But then again…
the monoprice $200 printer was on sale today on amazon for about $150 (‘cyber monday’). I was tempted but don’t need another 3d printer.
Did he just hold the UV-light insulator by the power cord ?!
There’s a dedicated place in hell for this kind of people.
Is there a software to expose an image of a PCB with a laser via GCode line by line? Maybe something like these small cheap chinese laser engravers?