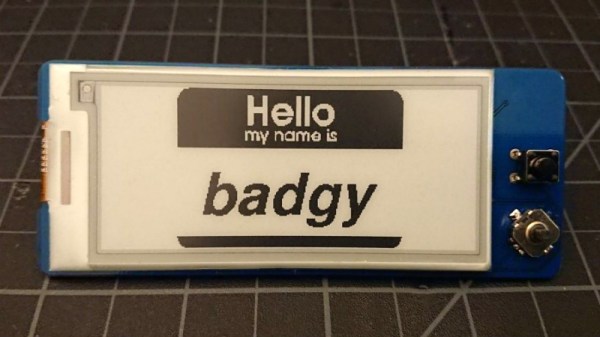
You’ve probably noticed that the hacker world is somewhat enamored with overly complex electronic event badges. Somewhere along the line, we went from using a piece of laminated paper on a lanyard to custom designed gadgets that pack in enough hardware that they could have passed for PDAs not that long ago. But what if there was a way to combine this love for weighing down one’s neck with silicon jewelry and the old school “Hello my name is…” stickers?
[Squaro Engineering] might have the solution with Badgy, their multi-function e-ink name…well, badge. Compatible with the Arduino SDK, it can serve as anything from a weather display to a remote for your smart home. Oh, and we suppose in an absolute emergency it could be used to avoid having to awkwardly introduce yourself to strangers.
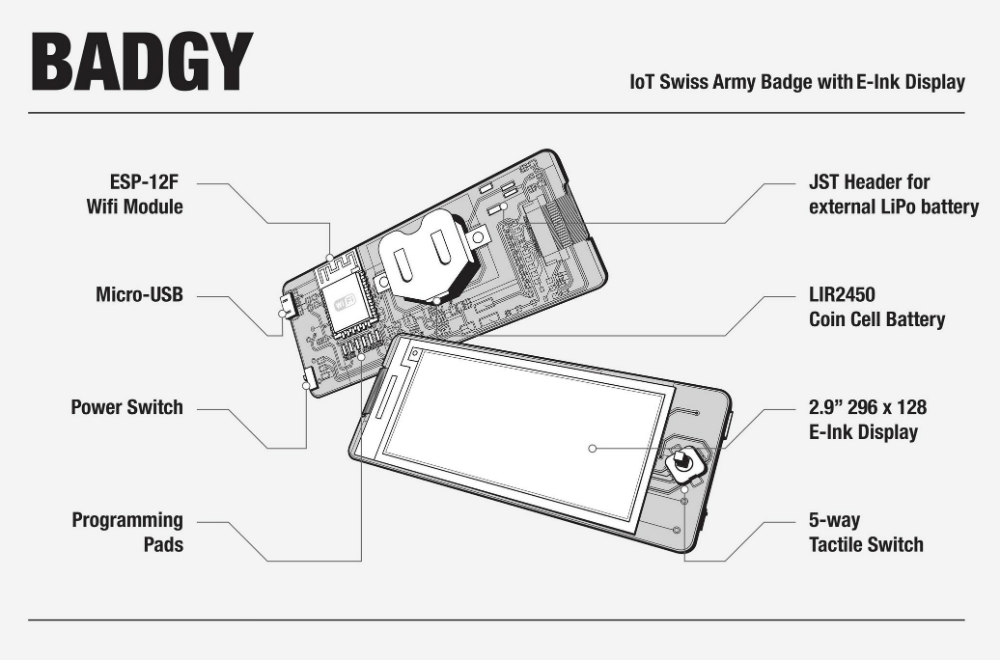
Powered by an ESP-12F, Badgy features a 2.9″ 296×128 E-Ink display and a five-way tactical switch for user input. The default firmware includes support for WiFiManager and OTA updates to make uploading your own binaries as easy as possible, and a number of example Sketches are provided to show you the ropes. Powered by a LIR2450 3.6 V lithium-ion rechargeable coin cell, it can run for up to 35 days in deep sleep or around 5 hours of heavy usage.
Schematics, source code, and a Bill of Materials are all available under the MIT license if you want to try your hand at building your own, and assembled badges are available on Tindie. While it might not be as impressive as a retro computer hanging around your neck, it definitely looks like an interesting platform to hack on.
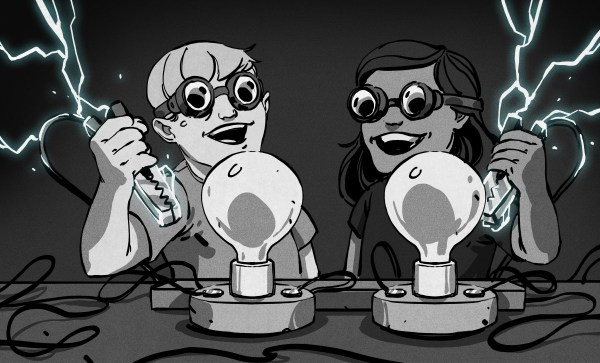
Heaven, for tech-inclined late-1970s British kids.
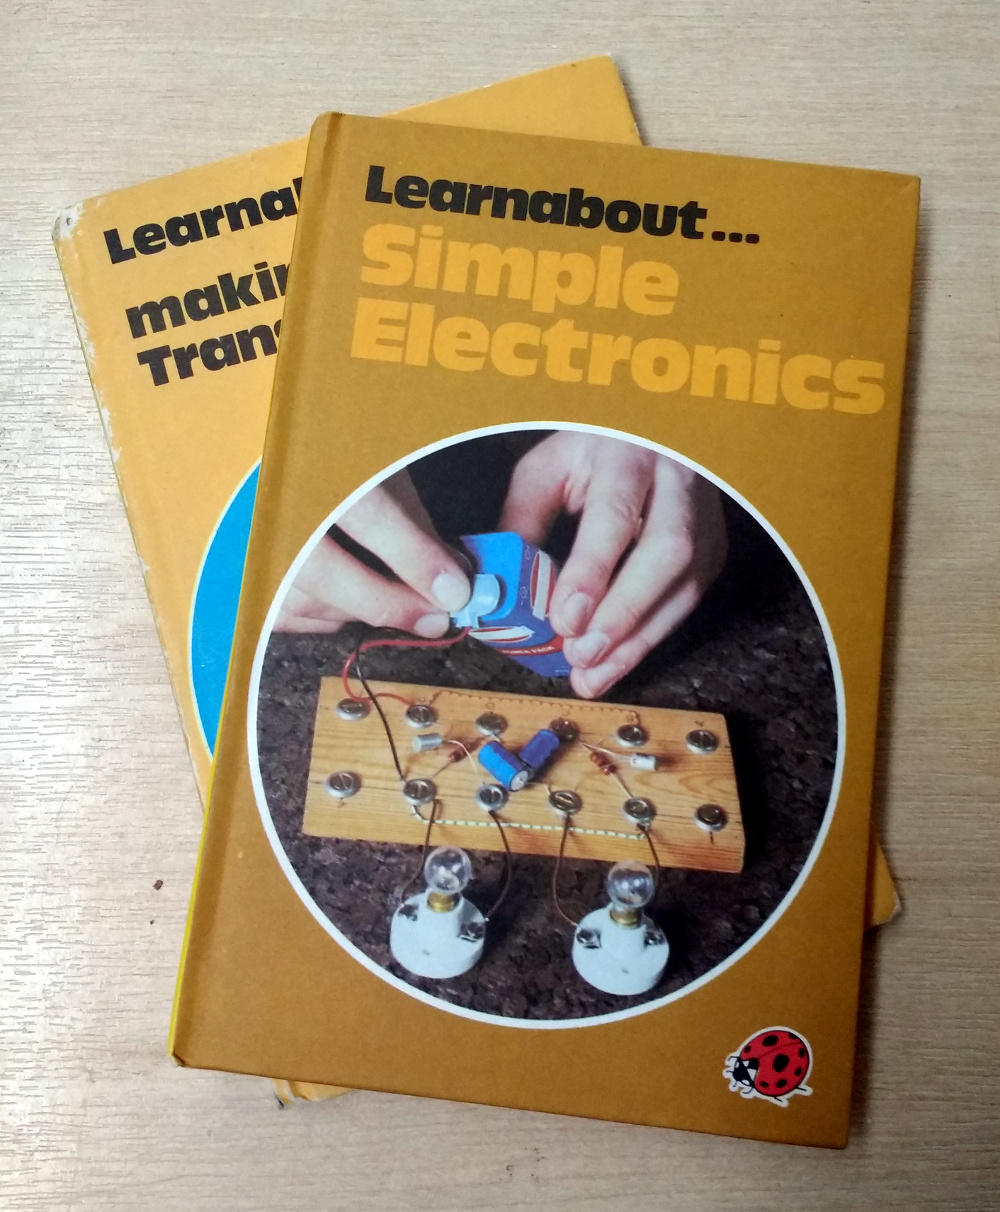
Early last spring, we featured a book review, as part of our occasional Books You Should Read series. Usually these are seminal tomes, those really useful books that stay with you for life and become well-thumbed, but in this case it was a children’s book. Making a Transistor Radio, by [George Dobbs, G3RJV], was a part of the long-running series of Ladybird books that educated, entertained, and enthralled mid-20th-century British kids, and its subject was the construction of a 3-transistor regenerative AM receiver. If you talk to a British electronic engineer of A Certain Age there is a good chance that this was the volume that first introduced them to their art, and they may even still have their prized radio somewhere.
Making a Transistor Radio was a success story, but what’s not so well-known is that there was a companion volume published a few years later in 1979. Simple Electronics was part of the imprint’s Learnabout series, and it took the basic premise of its predecessor away from the realm of radio into other transistor circuits. Transistor timers and multivibrators were covered, Morse code, and finally quite an ambitious project, an electronic organ.
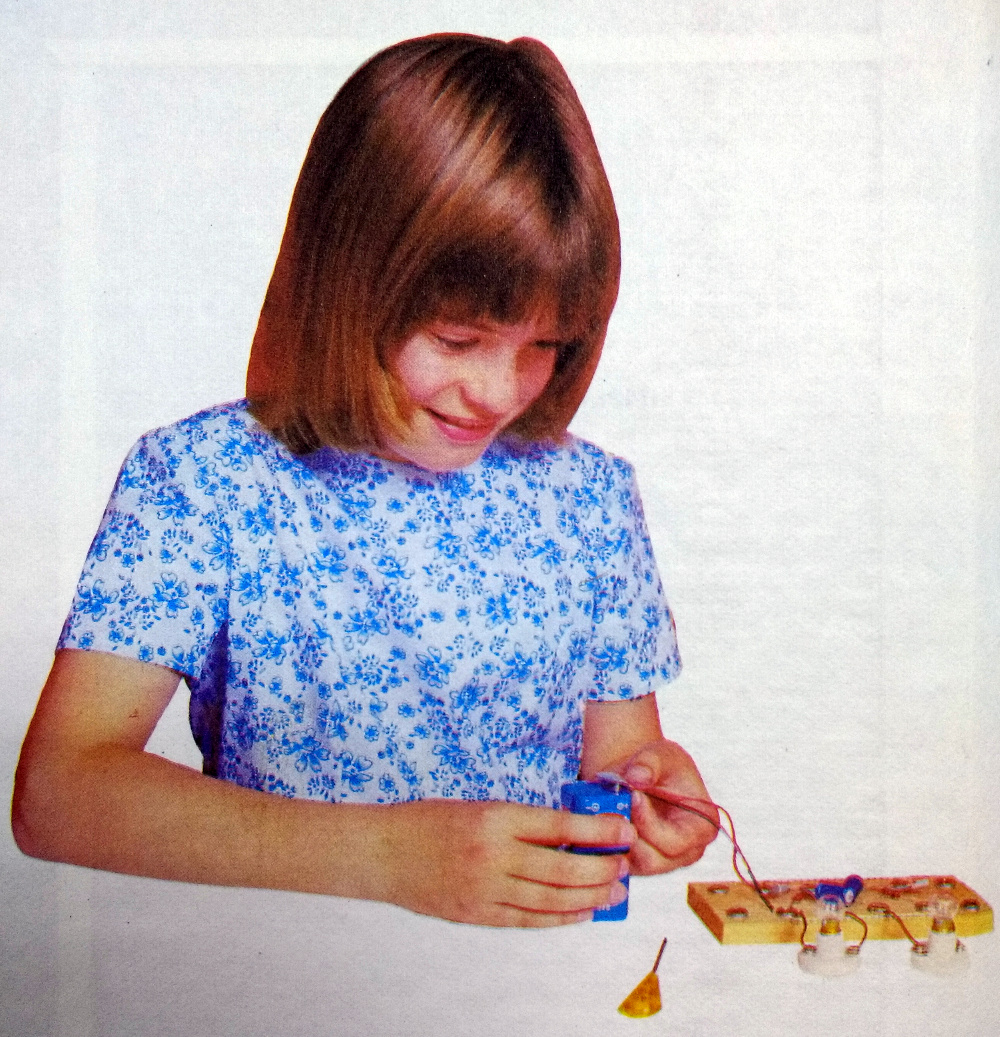
Opening the book it is evident that there has been a slight cultural shift since the first volume was published. The typography is much more modern in feel, and the picture of the child experimenter on the inside of the cover is a photograph of a late-70s young girl in place of the 1950s-style boy wearing a tie building the radio. The practical nature of the writing hasn’t changed though, while it states that some of the background information is not being repeated from Making a Transistor Radio we are taken straight into the deep end with a section on the tools required to work with the series’ signature screw cup on wooden baseboard construction technique.
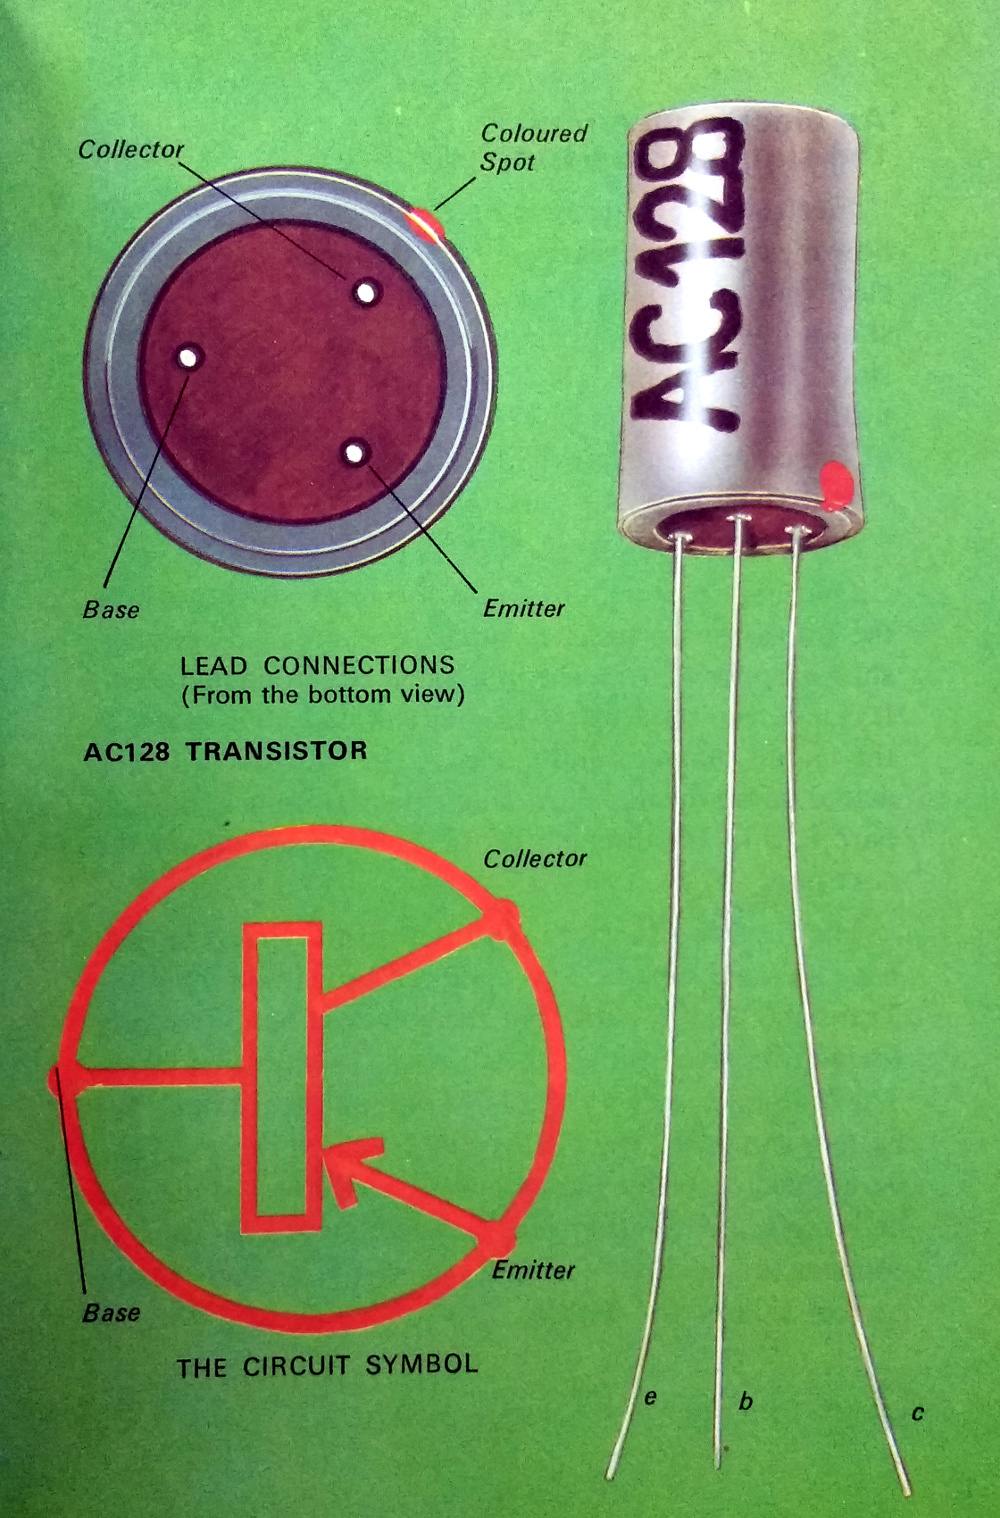
Construction was so much easier when transistors came with long leads.
The original book used germanium transistors from the Mullard OC series, OC71s and an OC44. These were some of the earliest British transistors, and as I can attest from building my radio in that period, difficult to obtain by the late 1970s. This book has therefore moved on to a later design, the AC128. Still a germanium PNP device, but this time in a metal can and crucially still available at the time due to having been a part used in more than one mid-70s colour TV set. We’re given a no-nonsense introduction to the device, told about its package, pinout, and schematic diagram. It’s refreshing to see a children’s book in which the child is introduced to such an adult subject as this without being constantly reminded that they are a child.
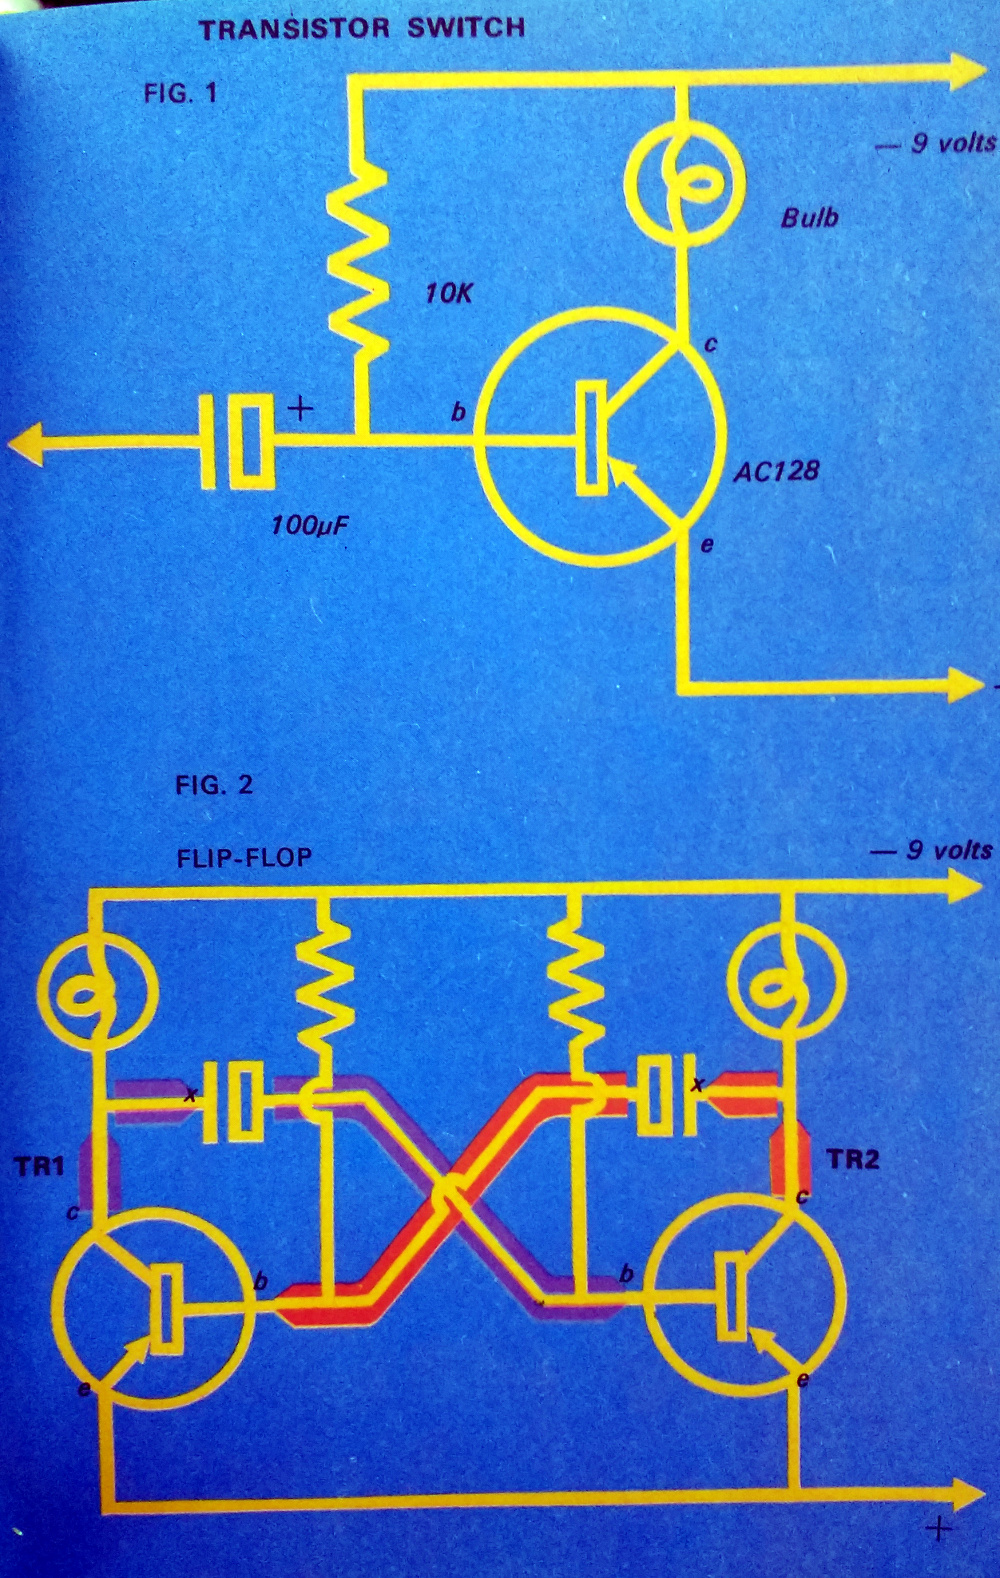
We then spend a couple of pages looking at a transistor as a switch. A 10K base resistor is used to bias an AC128 with a flashlight bulb as its collector load, and with a flying lead to the negative supply (remember this is a PNP transistor!) the bulb can be turned on and off. In typical form, we’re shown how to make a bulb holder from a paper clip should we not be able to source a dedicated component. The basic switch is then extended with an electrolytic capacitor to make a simple time delay switch, and finally we’re shown how two such circuits combine to make an astable multivibrator and flash a pair of bulbs.
The astable multivibrator, explained for kids.
For me, circa 1979 or 1980, this was something of an earth-shattering moment. For the first time, I understood how an oscillator worked. That transistor turned on, triggering the other transistor after a delay, which in turn triggered the first transistor after a further delay, and so on and so on. It’s a simple enough circuit, but to a kid who had only recently been introduced to electronics, it was an amazing moment of revelation to have an insight into how it worked. It probably gave me a lifetime bad habit in that the two-transistor astable has become my go-to circuit when I need a quick and dirty square wave. They can be assembled from commonly desolderable scrap components on a bit of PCB or tinplate in a matter of minutes, and I have used them for nasty logic clocks, harmonic-rich signal sources, PWM oscillators, switching power supplies, and many more applications all because of this book.
Enough reminiscences, and time to turn the page. For a bit of fun we’re shown the light flasher as a robot with flashing eyes, before substituting some of the components and adding a crystal earpiece for an audio oscillator. This is the first part of the serious business of the book, because it forms the basis of all the following projects. It’s also the furthest I got with the book as a child, because of a lack of enough AC128s for the complete organ project, and a lack of aptitude for music. I was shown how to use a soldering iron, discovered that scrap TV sets in dumpsters contained a goldmine of parts, and never looked back.
[George Dobbs] is a radio amateur, so of course once he has a legion of British kids with audio oscillators he then leads them into making a Morse Code practice oscillator with a filter and a key made from tinplate. In typical no-nonsense style we’re introduced to amateur radio, code, and basic operating procedure. There are even instructions for making a two-station setup using three-core mains flex, how many kids who built that went on to have callsigns of their own?
The organ project awaits, but before then we have time for a couple more circuits to get used to varying the pitch of the oscillator. A “violin” using a potentiometer, and a photoelectric cell each get their own page, after which you have to wonder: how many kids managed to get their parents to shell out for that ORP12 CdS cell?
Never lose the fascination you gain from your first project!
The organ is of the “Stylophone” variety, with notes picked out using a stylus over conductive pads on the keyboard. Skeleton preset potentiometers are used for tuning, with the alternative of filing notches in carbon resistors. This would not have been a cheap project at all on a pocket-money budget in 1979, did any readers build it? If they went for the final two pages, the same 1-transistor loudspeaker amplifier as that used in the transistor radio, and a vibrato circuit using a low-frequency version of the multivibrator, then pocket money would have been in very short supply indeed.
But to look at it this way probably misses the point of the book. Where the previous book was all about presenting a single project in stages, this one is more about teaching some basic transistor circuits in stages. When I was given a copy I had a basic idea about transistors from those OC71s in the radio, but when I’d read this one and built some of the circuits I had a much more varied grasp of solid-state electronics. I knew about RC circuits and oscillators, and the effect of changing the values of an RC circuit on frequency. Some of the things I learned from this book I still use today, and nearly a decade after reading it when I was a 1st year electronic engineering undergraduate I hit the ground running in our course on transistor circuits because of it.
Learnabout Simple Electronics has been out of print for well over three decades now, but if you want a copy you should be able to find it in second-hand book stores online. There’s also at least one PDF version available too, if all you want is a quick look.
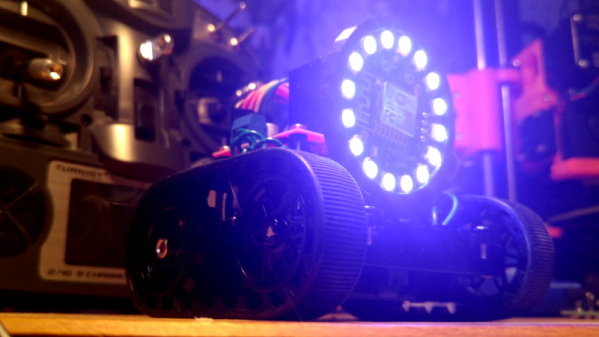
Audience interaction reached an all-time high in 2014 with Twitch Plays Pokemon, an online gaming stream where viewers were able to collaboratively command an emulated Game Boy playing Pokemon Red. Since then, the concept has taken off. Today, we see this extended to robots in the real world, with [theotherlonestar]’s Twitch Chat Controlled Robots.
The build is one that takes advantage of modern off-the-shelf components – an ESP8266 provides the brains, while a Pololu Zumo provides a ready to go robot chassis to save time on the mechanical aspects of the build. An L298N dual motor controller then handles motive power.
The real ingenuity though, is teaching the robots to respond to commands from Twitch chat. The chat is available in a readily parsable IRC format, which makes programming around it easy. [theotherlonestar] created a command set that enables the robots to be driven remotely by stream viewers, and then outfitted the ‘bots with hammers with which to fight, as well as a fedora to tip, if one is so inclined.
It’s a cool build, and one which shows further promise as Twitch continues to reduce stream & chat latency. We look forward to seeing future battles, but the first one already excites.
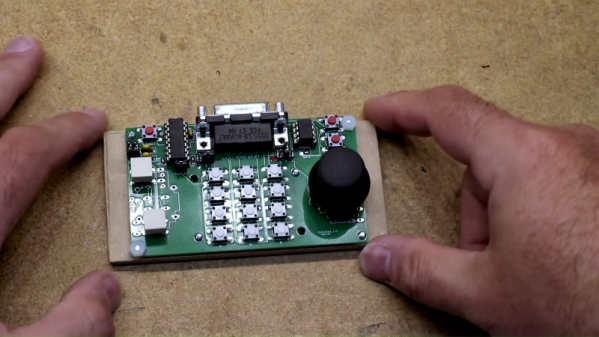
It may be nearly 40 years old, but the Atari 5200 still inspires legions of fans to relive the 8-bit glory days of their youth. There was much to love about the game console, but the joystick-and-keypad controllers were not among its many charms. The joystick didn’t auto-center, the buttons were mushy, and the ergonomics were nonexistent.
Retro-aficionados need not suffer in silence, though, thanks to this replacement controller for the Atari 5200. [Scott Baker] didn’t want to settle for one of the commercial replacements or, horrors, an adapter for the old PC-style joystick, so he rolled his own. Working from the original Atari schematics, [Scott] devised a plan for using a readily available thumbstick controller as the basis for his build. The essential problem was how to adapt the 10k pots on the new joystick to work in an environment expecting 500k pots, which he solved using an analog to digital and back to analog approach. The ADCs on an ATtiny85 convert each joystick pot’s voltage to a digital value between 0 and 255, which is sent to a 100K digital potentiometer. A little fiddling with RC constants brings it back in line with what the console expects. The thumbstick and buttons live on a custom PCB – kudos to [Scott] for designing an ambidextrous board. The video below shows the design and the finished product in action.
[Scott] is on a bit of a 5200 kick these days; he just finished up a Raspberry Pi multi-cartridge for the venerable console. His controller should make retro-gameplay on the console a little easier on the hands.
 [Squaro Engineering] might have the solution with Badgy, their multi-function e-ink name…well, badge. Compatible with the Arduino SDK, it can serve as anything from a weather display to a remote for your smart home. Oh, and we suppose in an absolute emergency it could be used to avoid having to awkwardly introduce yourself to strangers.