Interfacing An Old Engine Cowl Flaps Indicator To USB

[Glen Akins] had a WW2-era aircraft engine cowl flap indicator lying around (as you do) and thought it would make a jolly fine USB-attached indicator. The model in question is a General Electric model 8DJ4PBV DC Selsyn, which was intended for four-engined aircraft. For those not familiar with the purpose [Glen] explains in his detailed writeup, that piston-engine aircraft of that era were air-cooled, and during conditions of maximum engine power — such as during take-off — flaps on the side of the engine cowling could be opened to admit additional cooling airflow. These indicator dials were connected to a sender unit on each of the flap actuators, providing the pilots an indication of the flaps’ positions. Continue reading “Interfacing An Old Engine Cowl Flaps Indicator To USB”

Joy-Con Mod Gives Nintendo Switch Touchpad Control

While Valve’s Steam Controller ultimately ended up being a commercial flop, most users agreed its use of touch-sensitive pads in place of traditional analog joysticks or digital directional buttons was at least a concept worth exploring. Those same touchpad aficionados will likely be very interested in this modification by [Matteo Pisani], which replaces the analog joystick on a Nintendo Switch Joy-Con with a capacitive touch sensor.

As [Matteo] explains in his detailed write-up, the initial inspiration for this project was to create a permanent solution to joystick fatigue and drifting issues. He reasoned that if he removed the physical joystick completely, there would be no way for it to fail in the future. We’re not sure how many people would have taken the concept this far, but you can’t argue with the logic.

The original joystick is a fairly straightforward device, comprised of two analog potentiometers and a digital button. It’s connected to the Joy-Con’s main PCB with a 0.5 mm pitch flexible cable, so the first step for [Matteo] was to spin up a breakout for the cable in KiCad to make the development process a bit easier.

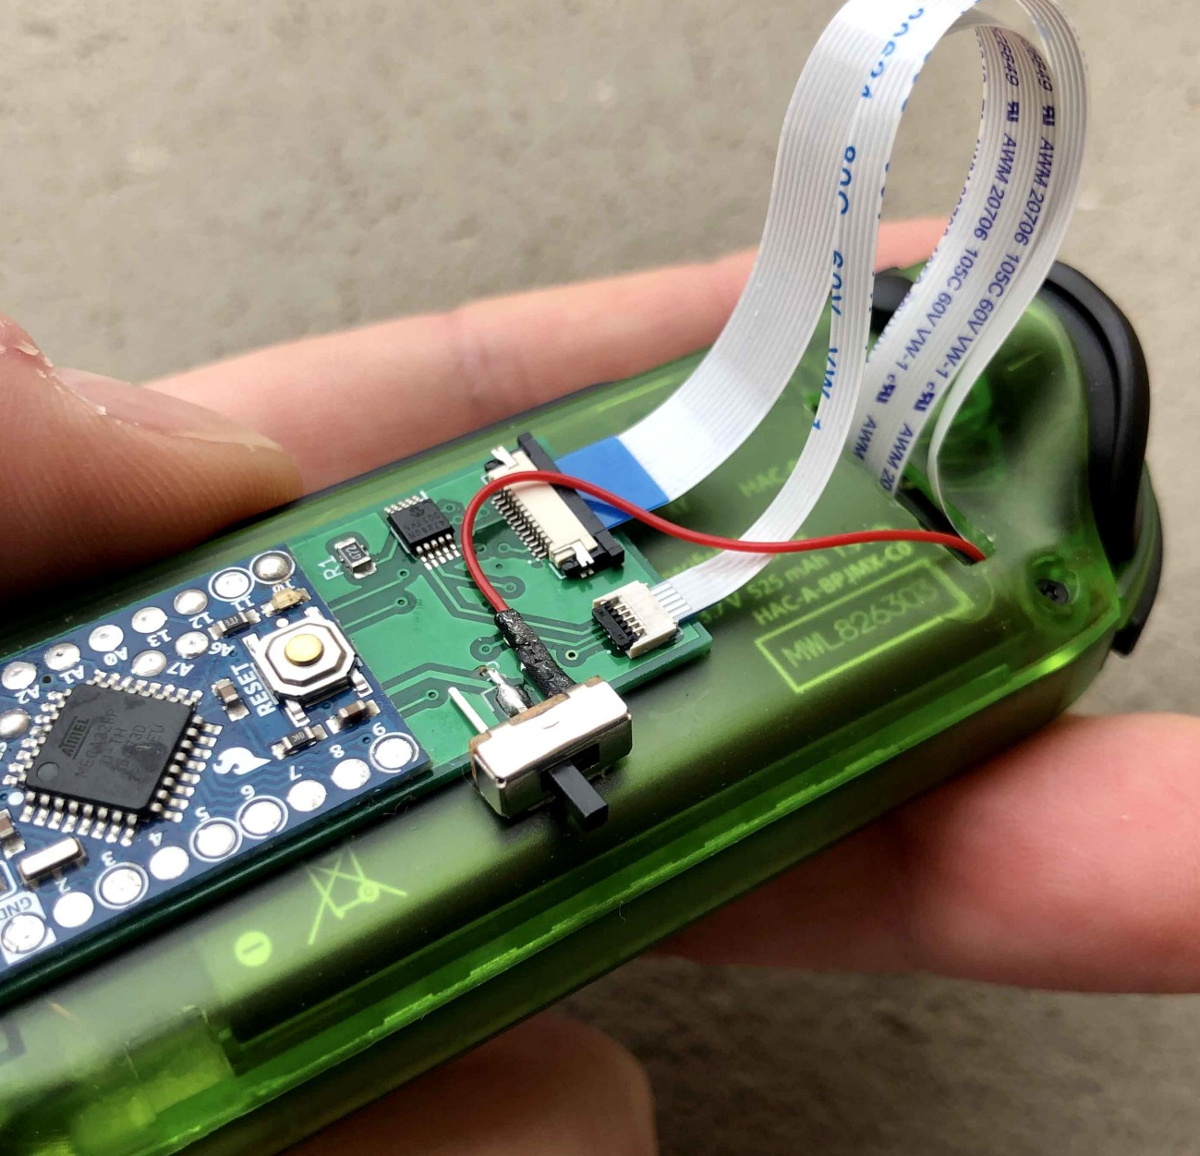
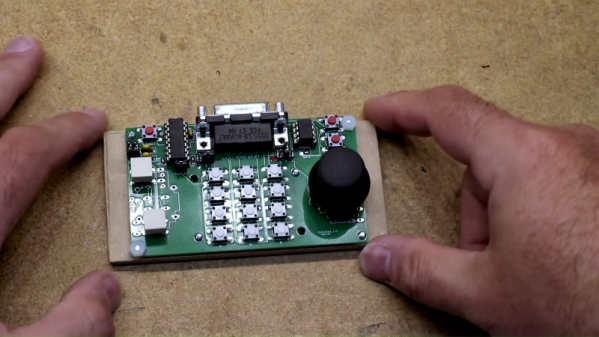
The board design eventually evolved to hold an Arduino Pro Mini, a digital potentiometer, and a connector for the circular touchpad. The Arduino communicates with both devices over I2C, and translates the high resolution digital output of the touch controller into an analog signal within the expected ranges of the original joystick. [Matteo] says he still has to implement the stick’s digital push button, but thanks to an impressive 63 levels of pressure sensitivity on the pad, that shouldn’t be a problem.

Now that he knows the concept works, the next step for [Matteo] is to clean it up a bit. He’s already working on a much smaller PCB that should be able to fit inside the Joy-Con, and we’re very interested in seeing the final product.

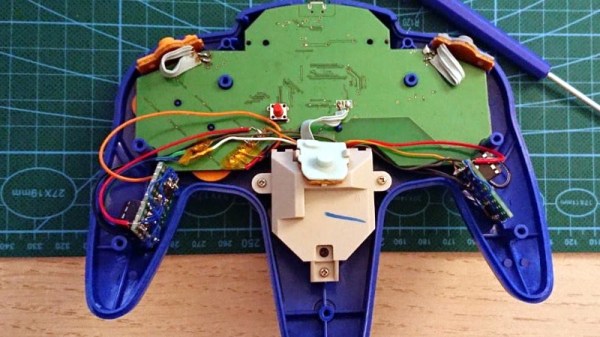
We’ve seen several interesting Joy-Con hacks since the Switch hit the market, including a somewhat less intense joystick swap. Between the Joy-Con and the legendary Wii Remote, Nintendo certainly seems to have a knack for creating input devices that catch the imagination of gamers and tinkerers alike.

Continue reading “Joy-Con Mod Gives Nintendo Switch Touchpad Control”

Perfecting A Bluetooth N64 Controller

Love it or hate it, the Nintendo 64 controller doesn’t seem to be going anywhere. Dedicated fans are still looking for ways to use the unique trilobed controller with modern systems, and they won’t be satisfied until they perfectly replicate the original experience. [Shyri Villar] has been working on perfecting a blend of original and modern hardware that looks very promising.

The project started when [Shyri] found that you could take the internals from a modern third party Bluetooth N64 controller made by 8BitDo and put them into the original controller’s case. This would give you the original buttons back, and overall a more authentic weight and feel. Unfortunately, this usually means dumping the original N64 joystick for the 8BitDo’s.

What [Shyri] wanted to do was install the 8BitDo PCB into an original N64 controller, but adapt Nintendo’s joystick to communicate with it. Unfortunately, since the original joystick used optical encoders and the 8BitDo version uses potentiometers, there’s something of a language gap.

To bridge the divide, both the X and Y dimensions of the joystick get their own PIC12F675 microcontroller and X9C103S digital potentiometer. The microcontrollers read the X and Y values from the original joystick’s encoders, and use the digital potentiometers to provide the 8BitDo with the expected analog input. Right now the electronics are held on two scraps of perfboard tucked into the side “wings” of the controller, but hopefully we’ll see a custom PCB in the future.

If you’re more interested in going back in time with your trusty N64 controller, then you might be interested in learning more about how one hacker managed to hook it up to the MSX.

Thumbs Up For This Custom Atari 5200 Controller

It may be nearly 40 years old, but the Atari 5200 still inspires legions of fans to relive the 8-bit glory days of their youth. There was much to love about the game console, but the joystick-and-keypad controllers were not among its many charms. The joystick didn’t auto-center, the buttons were mushy, and the ergonomics were nonexistent.

Retro-aficionados need not suffer in silence, though, thanks to this replacement controller for the Atari 5200. [Scott Baker] didn’t want to settle for one of the commercial replacements or, horrors, an adapter for the old PC-style joystick, so he rolled his own. Working from the original Atari schematics, [Scott] devised a plan for using a readily available thumbstick controller as the basis for his build. The essential problem was how to adapt the 10k pots on the new joystick to work in an environment expecting 500k pots, which he solved using an analog to digital and back to analog approach. The ADCs on an ATtiny85 convert each joystick pot’s voltage to a digital value between 0 and 255, which is sent to a 100K digital potentiometer. A little fiddling with RC constants brings it back in line with what the console expects. The thumbstick and buttons live on a custom PCB – kudos to [Scott] for designing an ambidextrous board. The video below shows the design and the finished product in action.

[Scott] is on a bit of a 5200 kick these days; he just finished up a Raspberry Pi multi-cartridge for the venerable console. His controller should make retro-gameplay on the console a little easier on the hands.

Continue reading “Thumbs Up For This Custom Atari 5200 Controller”

Hackaday Prize Entry: Ears On The Back Of Your Head

From context clues, we can tell that [TVMiller] has been in and around NYC for some time now. He has observed a crucial weakness in the common metropolitan. Namely, they deafen themselves with earphones, leaving them senseless in a hostile environment.

To fix this problem, he came up with a simple hack, the metrophone. An ultrasonic sensor is hung from a backpack. The user’s noise making device of choice is plugged into one end, and the transducer into the other. When the metropolitan is approached from the rear by a stalking tiger or taxi cab, the metrophone will reduce the volume and allow the user to hear and respond to their impending doom. Augmentation successful.

The device itself consists of an off-the-shelf ultrasonic sensor, an Arduino, and a digital potentiometer. It all fits in a custom 3D printed enclosure and runs of two rechargeable coin cells. A simple bit of code scales the volume to the current distance being measured by the ultrasonic sensor once a threshold has been met.

In the video after the break, you can observe [TVMiller]’s recommended method for tranquilizing and equipping a metropolitan in its natural habitat without disturbing its patterns or stressing it unduly.

Continue reading “Hackaday Prize Entry: Ears On The Back Of Your Head”

Digitally Controlled Pot Taper

Those twisty knobs connected to potentiometers aren’t necessarily a strict linear progression from one resistance to another. Potentiometers have a taper. Yes, sometimes it’s a linear taper that’s a straight line from one resistance to another, but you can find log (audio) taper pots, and anti-log taper pots. It’s been this way for a hundred years, and now we have a pot with a digitally controllable taper thanks to a guitar pedal that fits in your shoe.

For the last few years, [John] has been hard at work creating the SoulPedal, a shoe insert that’s the wireless, wearable alternative to expression pedals, wah pedals, and every other guitar effects pedal that uses an ankle. [John] got the idea by replacing the light-sensitive resistor in a wah pedal with a force sensitive resistor in his shoe. It worked, but there were wires. Now the SoulPedal is based on a TI SoC +Radio with all the niceties you would expect.

When designing the ‘base station pedal’, [John] realized he had a digital pot with two channels, and the entire device only uses one of these channels. Instead of letting that little bit of silicon go to waste, [John] wired these two digital pots in parallel, allowing the user to customize the taper of a digital pot. If you’re asking yourself, ‘why’, the answer is, ‘because he could.’

It’s an interesting application for sure, and while this digitally controllable pot can replicate the linear, log, and anti-log tapers, the really interesting thing will be to see what non-standard tapers sound and feel like.