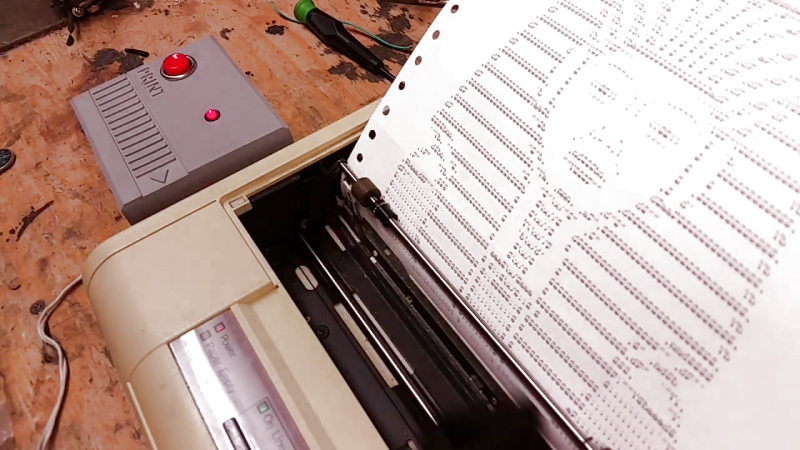
Readers of a certain age may fondly remember ASCII art emerging from line printers in a long-gone era of computing; for others, it’s just wonderfully retro. Well, when [Emily Velasco] found a vintage Kodak Diconix 150 inkjet at a local thrift store for $4, she knew what she had to do: turn it into a dedicated ASCII-art machine.
Dating to the mid-1980s, the diminutive printer she scored was an early example of consumer inkjet technology; with only 12 “jets,” it sported a resolution roughly equivalent to the dot-matrix impact printers of the day. [Emily] notes that this printer would have cost around $1000 in today’s money — this is from a time before printer companies started selling the printer itself as a loss leader to make revenue on the back end selling consumables. It seems you can’t escape the razor-and-blades model, though: [Emily] had to pay $16 for a new ink cartridge to revive the $4 printer.
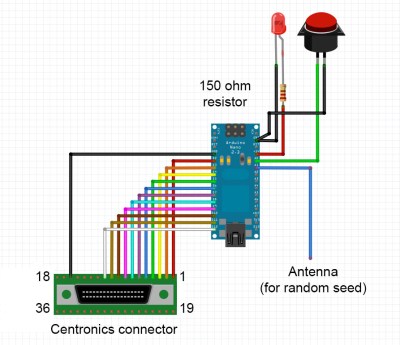
 With the new ink in place, and some tractor-feed paper acquired, [Emily] started work on the art generator. The concept is something that might have been sold on late-night TV ads: a “cartridge” you plug into your printer to make ASCII masterpieces. Starting with a stripped-down Centronics printer cable that matches the printer’s port, she added an Arduino nano to store and serve up the art. The user interface is foolproof: a single button press causes a random selection from one of ten ASCII images to be printed. The whole thing is ensconced within a slick 3D printed case.
One of the coolest aspects of this project is the lack of power supply. When she first hooked the Arduino to the printer’s parallel port, [Emily] noticed that it powered right up with no external supply, and in true hacker fashion, just ran with it. Upon reflection, it seems that power is being supplied by the printer status lines, Busy and/or Ack, through the input protection diodes of the Atmega328 on the nano.
We really like this project, and are more than a little bummed we tossed those old printers that were kicking around the Hackaday labs for years. If you still have yours, and would like turn out some rad ASCII art, the code for this project is up on GitHub.
We’re no strangers to [Emily]’s work, but if you aren’t familiar with it, check out her inspiring talk from the 2019 Hackaday Superconference. Meanwhile, don’t miss the excellent video about the ASCII art printer cartridge, after the break.


I have one of those kicking around somewhere… I think I paid $1 for it.
“Readers of a certain age may fondly remember ASCII art emerging from line printers in a long-gone era of computing;”
Raising a glass to rec.arts.ascii
Banners were easier to do back in the day.
Haha, this reminds me of the 8080 ( I think? Please correct me) origin story, the developers were surprised to discover the CPU was using no power, they had forgot to attach the power on the board, it was sipping the IO power XD
I like how it looks like an NES cart
Hats off to her for finding a replacement cartridge for that dinosaur.
With that droplet size, I think a refill with almost any kind of ink would have worked.
I considered it, and I still might try it. I saved the old cartridge just for that reason. I ended up buying a new cartridge this time because I wanted to eliminate at least one variable while trying to get it to work right.
I remember stories of using cheap fountain pen ink for early inkjets.How true they were – I am not sure.
I did just that for a Kodak Diconix (possibly 150plus) – as I recall it worked just fine, but the ink I used was blue and a bit pale.
I also loved that you could use C-size NiCd cells in the roller (technically the platen).
The fountain pen ink did not work well in a Canon BJ-10, though.
Putting the batteries inside the roller sounds really innovative.
Awesome! Neat Idea for recycling these printers. An alternate version using a PI would let you make an ASCII art photo boot.
Some of us remember Teletype art, done on Baudot printers, no computer involved.
There’s nothing special about an inkjet printer. It couid be done on a typewriter, though tedious. It started with Baudot printers, so any printer can do it, be it dot matrix, inkjet or laser.
That’s true. This thing will work on probably just about any parallel port printer as is, and it could be modified to work on other kinds of printers as well.
These were lovely little printers. I used one for years with my Radio Shack model 100 for portable computing. Silent printing, sharp clean printout. Standard batteries, which they hid inside the platen. There’s nothing like it today!
Okidata Microline dot-metrix printers from the 1980s use standard typewriter ribbons, still readily available today. These old printers were built like tanks, solid and heavy. It takes some practice to replace the ribbon without getting ink on your hands.
I meant to say that, a cloth ribbon is easier to replace than an inkjet cartridge.
One can take an old ribbon, spray it with a bit of WD-40, and leave it sealed in a plastic bag for a while. I used to do it in rotation, take the old one out, let it soak, and put the one soaking into the printer.
This dates from Teletype machines, or probably typewriters.
I did once find a 24 pin printer, but the ribbon was either hard to get or expensive. So I made a guess, bought a ribbon that was relatively expensive, and transplanted tge actual ribbon into the case from the old ribbon. Kind of messy, since it was just folded into the case, no take up wheels, but memory says it worked.
One could also try reinking the old ribbon. That was done in the old days, one company even sold a reinker gadget, but I don’t know the exact process. The WD-40 just rejuvenates a dried ribbon, tye ink still has to exist.
I had an Epson LX-800 and a Star Micronix NX Multitype. For their ribbons I’d carefully pry the top off, dribble on some stamp pad ink, apply a spritz of WD-40 then put the top back on. Grab the knob on top, stick a pen in the other side, then twirl around until the ribbon cycled through a few times and the ribbon was all black.
I suppose that carefully removing the ribbon, somehow cleansing it and the housing of all old ink, could have made it possible to re-ink with non-black stamp pad inks.
I miss the old Thinkjets I had, which I think this one was a cousin of, using the same mechanics maybe.
Problem with mine at the time, was they were serial versions, which most of the software drivers didn’t see. This was the period where you had one leg in DOS and one in Win3.1x still and needed a print driver per application. So most reliable way to print was just dumping straight textfiles to them, which sometimes had odd results if you didn’t notice a weird character.
Anyway, was great to get hardcopy late at night instead of my headache inducing 9 pin, which rather than having a case, seemed to have an acoustic amplifier.
Another small classic inkkjet was the old BJ-10e which I always wanted to get hold of, never did.
Think I still have a BJ-200 which is fairly small footprint, for if I ever need local hardcopy in a tight space. Otherwise I’ve gone Jean Michel Jarre…. it’s all lasers, nothing but lasers.
The ThinkJet was available in RS232C, Centronics parallel, and HP’s HPIB version of GPIB. Dunno about RS482 or RS485 serial.
What I’d like to see tried is doing a color image separation into RGBK then printing 4 times on a tractor feed transparency in a ThinkJet with Red, Green, Blue, then Black cartridges. Put the result on an overhead projector.
Dunno if the RGB inks were compatible with any transparencies and/or plain paper. Original black ThinkJet ink would only work properly with special ThinkJet paper and transparencies. The plain paper black ink came along sometime after the printers.
A slight correction, two years late I know, but this post was referenced in a January 22, 2022 post, “Online Tool Turns STLs Into 3D ASCII Art”. Anyway, a pedantic correction: GPIB was IEEE’s version of HP’s existing HPIB, not the other way around!
In 1984-1985, I wrote the firmware handling the device interfaces (including GPIB/IEEE-488) on rack-mounted, Intel 80286 SBCs. I was interested at the time to learn from the Intel documentation that their IEEE-488 chip was “Intel Inside!” — internally, the chip was a microprocessor (8051 maybe?) following code and a state diagram in ROM telling it what to do for different inputs and outputs.
(This story eventually leads back to printers.) The Commodore ViC-20, C=64, et al used a serial version of IEEE-488 to connect to peripherals. One of those was the *inexpensive* C= 1520 ink pen plotter/printer, which had 4 tiny ballpoint pens: black, red, green, and blue. The device could plot graphics or draw characters, so you could print out program listings and other text – on an approximately 4″-wide roll of paper. It was cool to watch in action. (I understand other computer brands also had ink pen printers.)
Some info from Sam Harbison, who was resonsible for some of the more famous ASCII printer art, back in the ’70s:
http://q7.neurotica.com/Oldtech/ASCII/