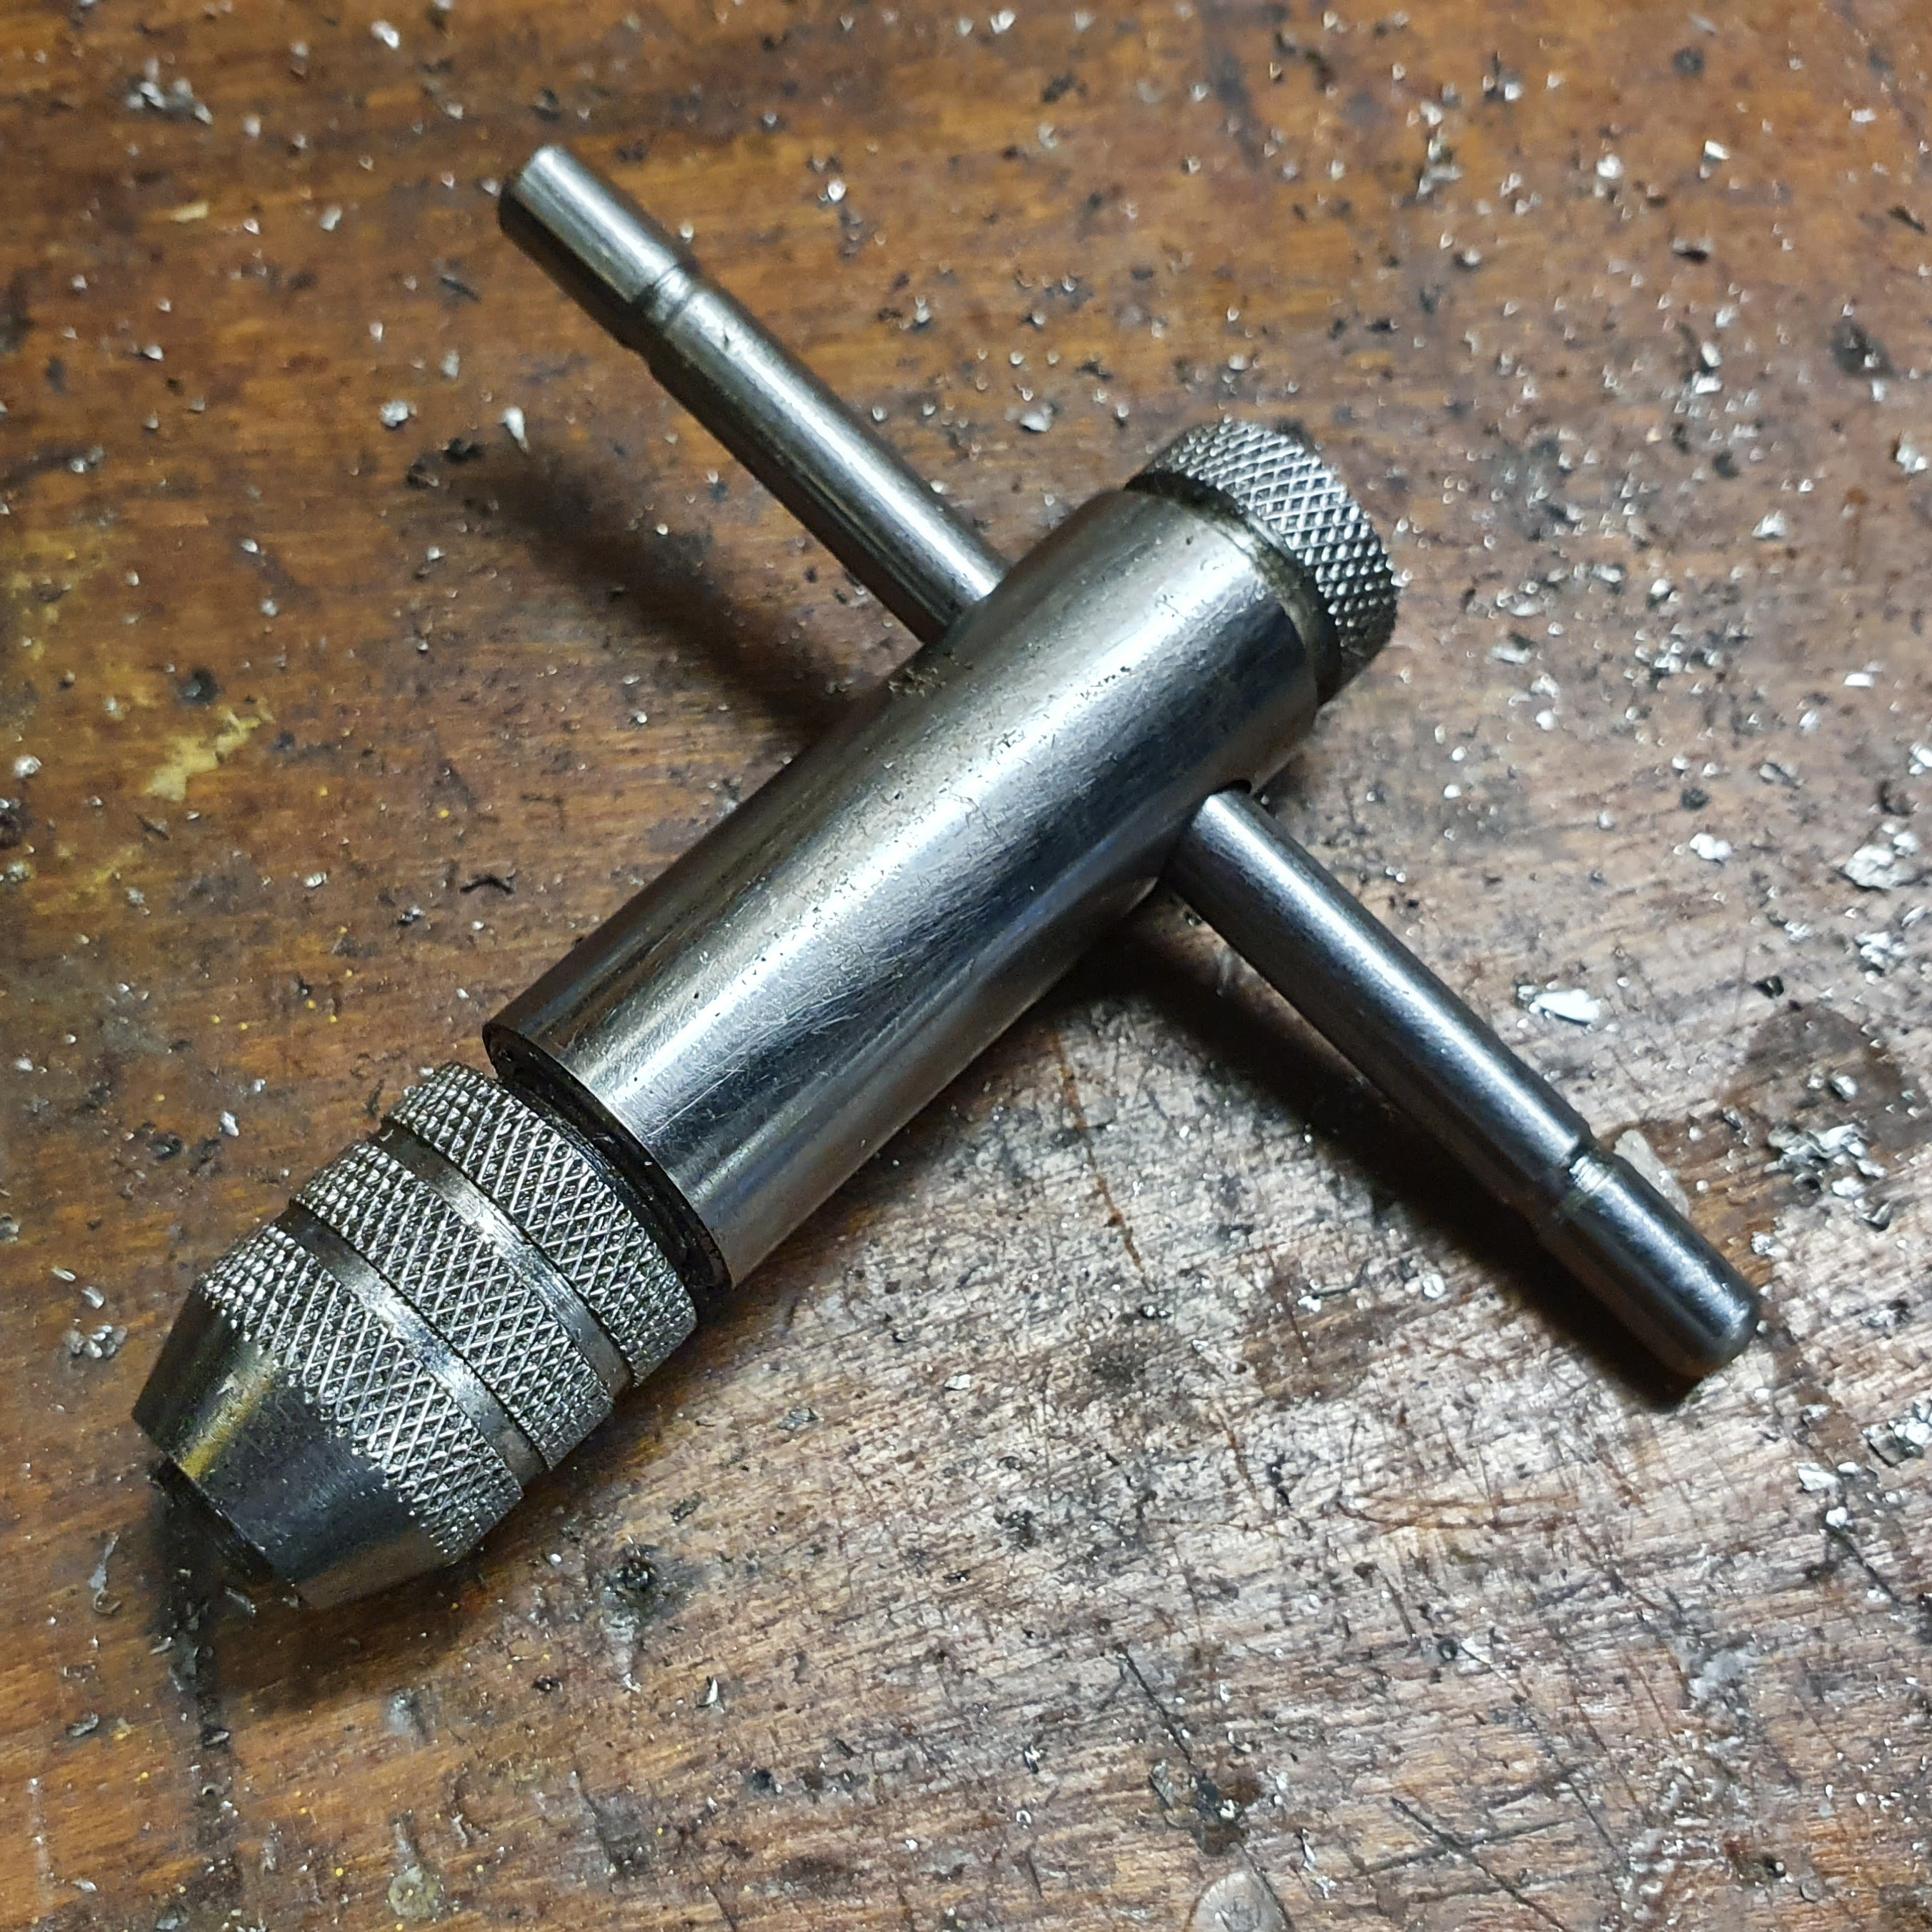
Need to cut threads into a hole? A tool called a tap is what you need, and a hand-operated one like the one shown here to the side is both economical and effective. A tap’s cutting bit works by going into a pre-drilled hole, and it’s important to keep the tool straight as it does so. It’s one thing to tap a few holes with steady hands and a finely calibrated eyeball, but when a large number of holes need to be tapped it can be worth getting a little help.
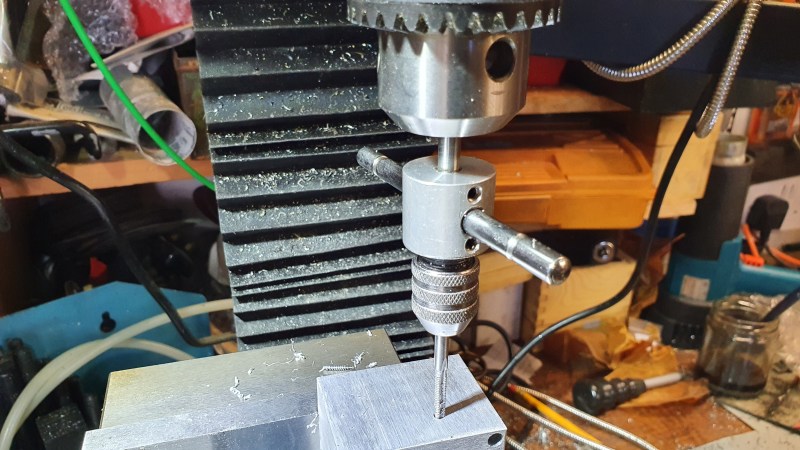
The usual tool to help keep a tap straight and pressed gently downwards is called a tap follower, but [Tony] had a lot of M4 holes to tap and no time to order one and wait for it to arrive. Instead, he converted a cheap tap into a tool that could be held in the chuck of his mill, with the freedom to slide up and down as needed. The result? A tap that’s hand-operated but certain to be orthogonal to the work piece, making the job of cutting a lot of threads much more pleasant.
Tapping isn’t just for metal, either. Cutting threads into wood is also done, and be sure to check out this simple method for making your own surprisingly effective wood taps in the shop with a threaded rod, or a lag screw. Of course, the need to tap a hole can be sidestepped by using threaded inserts in the right material, instead.


Simpler yet is a ‘bench block’. Thick piece of wood or metal with a perpendicular hole the diameter of the tap. For not too many holes in a flat surface, the easiest cheapest way. You can buy them ready made. You can make them. No need for a drill press. If you’re skilled and adventurous, just chuck the tap in your cordless drill and tap away. The tap will find its own way. Sometimes. Mostly. Often enough. If the tap is big enough so it won’t break and small enough that the drill can turn it.
Pretty much this. I’ve always made tap guides by chucking a junk hex-head bolt in the lathe, facing the head smooth and drilling through for the tap shank size. These days it would be OpenSCAD: place tall cylinder on disc, subtract a hole through both, slice, print.
There is a chuck in the picture. No need for any adapters
Precisely, this is what I did the last time I had to tap a hole
^ This… can someone explain why he didn’t simply chuck the tap in the drill press?
Turning a tap by hand while held in a drill press isn’t all that easy, especially as you need one hand to push the quill down against the spring.
If you just hold the hood of the chuck and twist then it loosens the chuck, for a start.
And power-tapping with a bench drill is difficult, they tend not to stop quicly enough.
I have never had a problem doing it, and I have done it a lot. If this tool makes it easier for you by all means build one and use it. Different people go about the same task differently. I generally only use the drill press to go in about an eighth of the way, between perhaps 3 and 5 turns before switching to a more conventional tap handle. I just want to make sure I get started straight.
The end of the tap is square and won’t center in a drill chuck.
@rob Thanks… my taps have a square top but a round shank that would easily fit in a chuck.
@andy Thanks… that makes the most sense… I assumed power-tapping, but with a tap, one can’t simply set the depth and keep spinning as with a drill bit.
The shanks are never round or they would bind.
Cheap taps are oval shape with opposing cutting surfaces and won’t center in a chuck.
Better ones have three cutting surfaces at 120 degrees and might center.
Some taps have the cutting surface spiral down the shank at 120 degrees and appear round.
There is a lot more to sheet or plate taps that is not mentioned here and then blind taps are different again.
Tap shanks are perfectly circular. There is no difficulty holding them in a chuck (though they are smooth and hard and tend to slip).
The cutting edges are relieved, so that part is not circular, but the shank is round with a square extension at the end.
Tapping collets typically grip the shank to centre the tap, with an extra section at the end to grip the square to prevent slipping. This is sometimes screw-actuated (rubberflex collets in tapping heads) but there are also ER collets with a square at the back for rigid-tapping in CNC machines.
I made a video about making a custom tap, and how to get the proper relief and cutting angles: https://youtu.be/fo7SwanH50I
Andy above is correct. Rob is just totally wrong.
I am a tool and die machinist, I’m quite certain I know taps better than most.
There are actually many kinds of taps, but the shank is always round, except for the small square shank at the end of the main shank.
I recently discovered a truly unique kind of antique tap that was only used in watchmaking factories over 120 years ago. They actually are triangular in cross section, and very tapered- extremely small for only the smallest of watch threads in the balance wheel. Think something the size of a sewing needle.
Standard watchmaking taps from Hammel Riglander and Bergeon often come in sets of 3- there’s a starter tap, then a middle tap that does most of the cutting, and then a third finishing tap that takes the threads to final size, often as a form tap, I believe.
I found these from a man who probably has the only supply of these left in the US, who owns the equipment used to originally make them.
There’s some crazy stuff in the tap world, and that’s not even going into form taps really, which work differently than cutting taps.
Cheap taps don’t have a shank as you call it. They have the square section and the cutting bit only.
The cutting bit isn’t round.
Terminology is different in different countries but I would have expected people to realise I was taking about the cutting section of the tap when I mentioned binding.
I am pretty cheap, so own many cheap taps, but I have never seen any like you describe.
Can you provide a link to an example? I am curious.
Most of the tap handles I’ve seen have a conical center in the top. Just put a center in the drill chuck, press down with the drill press handle and turn the tap handle.
Exactly. This is what I have done many many times. That is why that conical center hole is there!
What is required is not some new gadget, but simply knowledge.
Now power tapping is something else entirely.
Ding! That’s what I do too. On a metal lathe I made a pointed rod with a shoulder that bears against the drill chuck jaw tips. Drill hole, swap bit for pointed rod. Set end of tap into hole, pull on the quill handle to bring point into divot on top of tap handle. Turn tap handle while pulling down on quill handle.
Easy and simple and the tap will go in perfectly straight because nothing was moved after drilling.
I have a large fishing weight (probably a kilogram) that I attach with a string and a hook to the quill handle.
Also, as noted, it’s troublesome to hand-turn the chuck, as it tends to come loose. I have an older, belt-driven press, and I open the top, remove the belt, and and hand-turn the pulley, which also gives some mechanical advantage over turning the chuck.
Also not mentioned is oil — use it! I have a customized squeeze oil can mounted on my press — the sort with a flex tube that you can easily position. I used a concentric “choke cable” to operate the oiler from a foot pedal, so I can have both hands free. This is handy for tapping, but really nice for light milling with a cross-vice, or even for simple hole drilling.
My general procedure is to turn the pulley until I feel a certain amount of resistance, then back off a quarter turn or so to clear the chips, then repeat until done. If you just keep turning without occasional reversing, you’re sure to break your tap — especially smaller ones.
I normally use power tapping.
I’ve put a frequency inverter on my mill (with 1.5kW motor!) and I’ve adjusted the inverter in such a way that it has low torque at low RPM (So I adjusted the torque compensation the other way).
So I just put a tap in the chuck and adjust the frequency / rpm until the motor has enough torque to cut the thread. I can tap blind holes with this at least down to M5. The tap just stops when it hits the bottom, as the torque is not high enough to shear the tap.
Thanks!
Power tapping is obviously doable, but doesn’t work well with fine pitch, or in any materials that are hard (like tool steels) or in things that tap gummy (incolnel) or like to work harden easily (also incolnel).
I never do it when it’s a blind hole either, you really run a great risk bottoming and stripping threads, or worse, breaking the tap off in the hole.
It sucks on thick sheet metals, but works well on wood and plastics. Brass too.
I think there is an error in terminology here. The tool being shown is a tap wrench.
The “tap” is the actual cutting bit.
It’s an americanism, just like americans call drill bits drills.
I’m American, I just took it as lazy editing.
We call these T handle tap wrenches in industry
I would call it a tap wrench.
I just did a bunch of 4-40s in my drill press this morning, and did what I usually do: It’s really easy to remove the drive belt on my drill press, a 5-second one-hand operation.
So I put the tap in the chuck, remove the belt, and spin the top pulley by hand. The work is in the vise, of course, so I have a free hand for the quill feed. Dead easy, straight, and super quick. An x-y table makes lining things up quick too.
Putting the tap driver (wrench) on a sliding shaft to the chuck would free up the quill feed hand so you could hold the work with the free hand. This would make it so much quicker to move the work for multiple taps.
This is how I often tap on the machine, or if on a bridgeport, I set the spindle to neutral.
4-40 is something I only start the first few threads on the machine, then I typically use a lightweight tap wrench to finish them by hand, with copious cutting oil. That is a small fine thread, personally I find those require hand feel to finish safely off the machine, on which you lose a lot of the sensitivity
Fisher makes spring loaded reversible tap followers that are even simpler than this- just a tight spring loaded point, and opposite end a cone.
Put a tap wrench on tap, and put spring loaded point in rear of tap (or cone if its a small tap with a point ground on end instead of a center point), push your quill down on drill press, and turn tap wrench.
Same result- 10$ to buy, easier to make from scratch than this style. But you need a normal tap wrench too.
Picture shows a ratchet tap wrench, huh? What about reversing and clearing the schraf. With small taps I use a cordless driver and reverse often not trying to go it all one way. No broken taps result, quick too. With Ni Cad battery drills a dime a dozen you can rig one up to a sliding arm and make a drill press/tap tool. Foot pedal feed too.
“certain to be orthogonal to the work piece”? Orthogonal has a very broad definition. How about “normal to the bed”? Assuming it is trammed in to be normal to the bed. Maybe just “certain to be repeatable” is a better description. I have the feeling orthogonal is at the tipping point of becoming the next “use case”, and therefor meaningless.
And lets look at “pre-drilled hole”. What is that? Do you buy them by the dozen or by weight? Pre-drilling should be an operation you do before drilling. Maybe it is center-punching. Or maybe aligning the drill. And if not, how is it different from drilling? Is it just a redundancy like the common “what you wanna do is you wanna” of many a Youtube tutorial? “You wanna pre-drill this hole so you will have a hole where you are gonna wanna drill a hole”?
So there!
> Cutting threads into wood is also done
I love tapping hardwood (then using brass bolts with various heads). Significantly harder to pull out than screws.
Try your pre-drill with the next size smaller or two sizes smaller from that recommended in the table for tapping metal.
Wood gets hot too. And you still have to back out regularily. Watch out for breaking your tap.
Funny.
Adam Savage did a whole 40min piece on this, just a few days ago.
https://youtu.be/XVEww6Ylw5c
Adam Savage just did a vid on keeping taps aligned… https://www.youtube.com/watch?v=XVEww6Ylw5c&t=1361s&ab_channel=AdamSavage%E2%80%99sTested
It’s a spastic, supremely painful video, but the content is great.
My grandpa would just put the tap in the drill chuck and let it pull the drill press chuck with it.
Hi everyone – if I may throw my 2 cents in . . .
Back in November of 2008 I won a contest on Makezine for Hacked Gadgets Workbench home workshop. Here’s the link.
http://hackedgadgets.com/2008/11/16/hacked-gadgets-workbench-contest-winner/#more-1775
The reason I am referencing this is because if you look a little further than the 1/2 way mark (search for Annexe -B-), you’ll read a few tips I have picked up over the years on tapping (12 years machinist + 24 years CNC trade school teacher). Basically, buy ONLY machine taps (NOT manual taps), use a tapping block to make the tap square (as Bob said in the first post), buy ratchet tap handles (I have a large and small one), use a lubricant, etc. Also, to keep things organized, I use transparent endmill cases (clear tubes with end caps) to keep the tap, the tap drill, the clearance drill and an example nut and bolt. That way you don’t have to waste your time to find stuff.
The link in the reference is broken. It would be possible to remove a broken tap with a homemade EDM machine, maybe something like this :
https://www.instructables.com/id/EDM-Electrical-Discharge-Machining/
Thanks for a peek at your shop, one worthy consideration for your resources links would be McMaster-Carr at
https://www.mcmaster.com/