World Radio Lets Your Fingers Do The Walking

Listening to radio from distant countries used to take a shortwave rig, but thanks to the Internet we can now pull in streams from all over the globe from the comfort of our own desktop. With a few clicks you can switch between your local news station and the latest in pop trends from Casablanca. But as convenient as online streaming might be, some folks still yearn for the traditional radio experience.

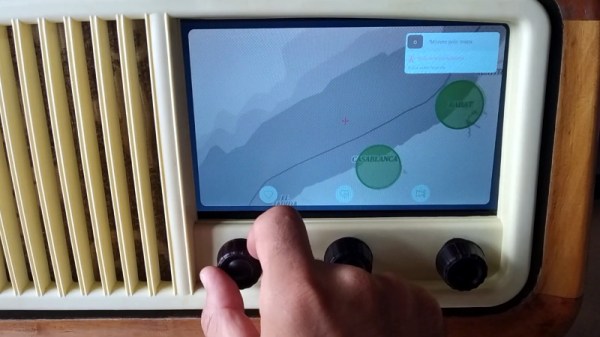
For those people, the Raspberry Pi World Radio by [Abraham Martinez Gracia] might be the solution. Built into the body of a 1960s Invicta radio, this Internet radio uses a very unique interface. Rather than just picking from a list of channels, you use the knobs on the front to pan and zoom around a map of the world. Streaming channels are represented by bubbles located within their country of origin, so you’ll actually have to “travel” there to listen in. The video after the break gives a brief demonstration of how it works in practice.

We’ll admit it might become a bit tedious eventually, but from a visual standpoint, it’s absolutely fantastic. [Abraham] even gave the map an appropriately vintage look to better match the overall aesthetic. Normally we’d say using a Raspberry Pi 4 to drive a streaming radio player would be a bit overkill, but considering the GUI component used here, it’s probably the right choice.

Of course we’ve seen Internet radios built into vintage enclosures before, and we’ve even seen one that used a globe to select the station, but combining both of those concepts into one cohesive project is really quite an accomplishment.

Continue reading “World Radio Lets Your Fingers Do The Walking”

Learn About Historic Firearm Design With A 3D Printer

Over the last century, very little of the basic design of firearm cartridges has changed, but the mechanics of firearms themselves have undergone many upgrades. The evolution of triggers, safeties, magazines, and operating mechanisms is a fascinating field of study. Hands-on experience with these devices is rare for most people, but thanks to people like [zvc], you can 3D print accurate replicas of historical firearms and see how all the parts fit together for yourself.

[zvc] is slowly building up a library of 3D models, with nine available so far, from the Mauser C96 “Broomhandle” pistol to the modern M4 rifle. Except for springs and some fasteners, almost every single part of [zvc]’s models are 3D printed, down to the takedown pins and extractors. With the obvious exception of being able to fire a live round, it looks like all the components fit and work together like on the real firearms. None were ever designed with 3D printing in mind, so a well-tuned printer, lots of support structure, and post-processing are required to make everything work. The surface finish will be a bit rough, and some smaller and thin-walled components might be susceptible to breaking after the repeated operation or excessive force. The models are not free, but all prices are below €10.

These models do demonstrate one of the real superpowers of 3D printing: functional mock-ups and prototypes. The ability to do rapid iterative design updates and to have the latest design in hand within a few hours is invaluable in product development. [Giaco] used this extensively during the development of his kinetic driver. When you buy 3D printable models online, always make sure what possible pitfalls exist.

Toy O-Scope Is Dope

Not many of our childhood doll and action figure’s accessories revolved around lab equipment except maybe an Erlenmeyer flask if they were a “scientist.” No, they tended to be toasters, vehicles, and guns. When we were young, our heroes made food, drove sexy automobiles, and fought bad guys. Now that we’re older, some of our heroes wield soldering irons, keyboards, and oscilloscopes. [Adrian Herbez] made a scale model oscilloscope that outshines the beakers and test tube racks of yesteryear. Video also shown below. Continue reading “Toy O-Scope Is Dope”

Adding Luxury Charging Features To An Entry-Level EV

The Nissan Leaf is the best-selling electric car of all time so far, thanks largely to it being one of the first mass produced all-electric EVs. While getting into the market early was great for Nissan, they haven’t made a lot of upgrades that other EV manufacturers have made and are starting to lose customers as a result. One of those upgrades is charge limiting, which allows different charging rates to be set from within the car. With some CAN bus tinkering, though, this feature can be added to the Leaf.

Limiting the charging rate is useful when charging at unfamiliar or old power outlets which might not handle the default charge rate. In Europe, which has a 240V electrical distribution system, Leafs will draw around 3 kW from a wall outlet which is quite a bit of power. If the outlet looks like it won’t support that much power flow, it’s handy (and more safe) to be able to reduce that charge rate even if it might take longer to fully charge the vehicle. [Daniel Öster]’s modification requires the user to set the charge rate by manipulating the climate control, since the Leaf doesn’t have a comprehensive user interface.

The core of this project is performed over the CAN bus, which is a common communications scheme that is often used in vehicles and is well-documented and easy to take advantage of. Luckily, [Daniel] has made the code available on his GitHub page, so if you’re thinking about trading in a Leaf for something else because of its lack of features it may be time to reconsider.

Continue reading “Adding Luxury Charging Features To An Entry-Level EV”

A Bit Of DIY Helps Cut Straight And Happy Threads

A cheap and effective ratcheting tap.

Need to cut threads into a hole? A tool called a tap is what you need, and a hand-operated one like the one shown here to the side is both economical and effective. A tap’s cutting bit works by going into a pre-drilled hole, and it’s important to keep the tool straight as it does so. It’s one thing to tap a few holes with steady hands and a finely calibrated eyeball, but when a large number of holes need to be tapped it can be worth getting a little help.

The usual tool to help keep a tap straight and pressed gently downwards is called a tap follower, but [Tony] had a lot of M4 holes to tap and no time to order one and wait for it to arrive. Instead, he converted a cheap tap into a tool that could be held in the chuck of his mill, with the freedom to slide up and down as needed. The result? A tap that’s hand-operated but certain to be orthogonal to the work piece, making the job of cutting a lot of threads much more pleasant.

Tapping isn’t just for metal, either. Cutting threads into wood is also done, and be sure to check out this simple method for making your own surprisingly effective wood taps in the shop with a threaded rod, or a lag screw. Of course, the need to tap a hole can be sidestepped by using threaded inserts in the right material, instead.

The Egg-laying Wool-Milk Pig

Last week, I wrote about two recent projects of mine that serve as cautionary tales in keeping projects simple — you probably can’t simplify everything, so it’s worth the time to find out which simplifications have the most bang for the buck. This week, I’d like to share a tale of lack of design focus.

German has the eierlegende Wollmilchsau: a mystical animal that lays eggs, while producing wool, milk, and meat to boot. It’s a little bit like the English “jack of all trades, master of none” except that the eierlegende Wollmilchsau doesn’t do each job badly, it plainly can’t exist. This is obviously a bad way to start a design.

The first surfboard that I made by myself was supposed to be an eierlegende Wollmilchsau. It was going to be a longboard, because we had months with smaller waves that just weren’t all that suitable for shortboarding, but it was also going to turn sharply off the rails like a shortboard. To help it turn, it was going to have tons of camber (bend like a banana), and small fins. And along the way, I thought I’d make it thin to cut through the water.

Of course what I ended up with, not helped by my heavy fiberglassing hand, was a plow that dug into the water, would turn unexpectedly when you managed to get it onto the rails, and couldn’t pick up a small wave to save its life due to the camber and aforementioned plowing. I surfed it anyway, as a matter of pride, but I had no illusions of it being anything but the the worst board I owned. And that’s comparing it to the $30 used rasta-graphic plank that had been taking on water for at least five years, unrepaired, and was rotting out from the inside. At least it had design focus.

My surfboard didn’t suffer from feature creep, where you start piling on features until the project crumbles from overload, but rather from wanting to have my cake and eat it too. Or from failing to realize that certain design goals were necessarily tradeoffs. The “raily” behavior that I wanted when it was in bigger waves was necessarily “diggy” in small waves. Good boards trade off these features, and getting the balance between them is the art of shaping a board.

So when you start up a new project, think about which facets of your design are jointly achievable, and which are necessarily tradeoffs. Ignoring tradeoffs is a recipe for disaster, designing an eierlegende Wollmilchsau. But viewed constructively, it’s exactly these nuanced decisions that separates the simply possible from the truly marvelous. May you identify your trades, and make them well!

PLA-F Blends PLA And ABS

In the early days of 3D printing, most people used ABS plastic. It is durable and sticks well to simple surfaces. However, it smells and emits fumes that may be dangerous. It also tends to warp as it cools which causes problems when printing. PLA smells nicer and since it is made from corn is supposed to be less noxious. However, PLA isn’t as temperature resistant and while it will stick better to beds without heat, it also requires more airflow to set the plastic as it prints. [Kerry Stevenson] recently reviewed PLA-F which is a blend of the two plastics. Is it the best of both worlds? Or the worst?

[Kerry]  did several tests with interesting results. He did a temperature test tower and found the material printed well between 190 and 240 °C. He did note some stringing problems, though.

Continue reading “PLA-F Blends PLA And ABS”