Web Pages (and More) Via Shortwave

If you are a ham radio operator, the idea of sending pictures and data over voice channels is nothing new. Hams have lots of techniques for doing that and — not so long ago — even most data transmissions were over phone lines. However, now everyone can get in on the game thanks to the cheap availability of software-defined radio. Several commercial shortwave broadcasters are sending encoded data including images and even entire web pages. You can find out more at the Swradiogram website. You can also find step-by-step instructions.

WINB in Pennsylvania and WRMI Florida both have shows that include interspersed data. To play along, you’ll need a decoder like Fldigi or TIVAR. If you don’t have sufficient radio gear, you can probably borrow some from the Internet.

Continue reading “Web Pages (and More) Via Shortwave”

It’s Not A Computer If It Doesn’t Have A Cartridge Slot

For viewers of sci-fi TV and films from the 1960s onwards, the miniaturisation of computer hardware has been something of a disappointment. Yes, it’s amazing that we can get 1.21 Jigabytes onto a memory card that fits comfortably under a postage stamp, but we were promised a different future. One of satisfyingly chunky data modules that activated everything from starships to handheld data recorders to malevolent rogue supercomputers, and one that has so far only materialised in the form of cartridges for game consoles.

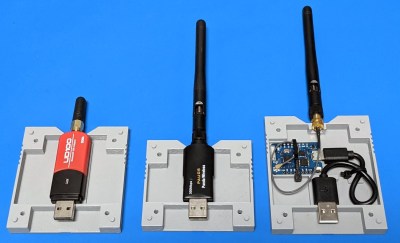
Our colleague [Tom Nardi] has the solution for his cyberdeck though, in the form of 3D-printed cartridge shells that hide regular USB hardware and mate with a concealed USB socket in the slot. So far he’s designed cartridges for Flash drives, WiFi and Bluetooth adapters, a Wemos D1 Mini, a receptacle, and a parametric reference design.

It’s a bit of pleasing retro fun, but behind it all could be a surprisingly practical and useful expansion system. Each cartridge contains enough space for a lot of extra electronics, so it’s almost the ideal format for building a USB-driven project inside. Best of all since the interface is USB, it still works with conventional USB plugs and sockets. We like the idea, and it’s one that would be a good addition to any cyberdeck project.

We’re far more used to seeing home-made cartridges on game consoles.

Continue reading “It’s Not A Computer If It Doesn’t Have A Cartridge Slot”

Networked Nightlights Glow Together

Nightlights are a great way to calm children who may be afraid of the dark, as well as to avoid stubbing your toe on furniture in the hallway. However, in this day and age of connected everything, they can do so much more. [Andy] came up with a great way to do just that, creating an advanced networked solution to suit his needs.

[Andy’s] nightlight serves not just in the usual fashion, but also as an indicator for his children. Depending on the time of day, the colour changes, indicating whether it’s time for bed, or also, if it’s too early to get out of bed in the morning and start watching cartoons. Each nightlight around the house runs on an ESP8266, which lights up using a set of WS2812B LEDs. The ESP8266 decides on colour values based on commands from a basic webserver running on a Raspberry Pi, updated every minute. This gives [Andy] the flexibility to make changes in one place, that then automatically roll out across the Nightlight Network (TM).

It’s a fun way of teaching the kids not to ruin a good Saturday sleep in, as well as serving as a fun colourful nightlight, too. Of course, luxury smart nightlights are becoming a thing, as this teardown of a Bluetooth unit shows. If you’ve built your own, be sure to drop us a line!

3D-Printed Press-Forming Tools Dos And Don’ts

Press-forming is a versatile metal forming technique that can quickly and easily turn sheet metal into finished parts. But there’s a lot of time and money tied up in the tooling needed, which can make it hard for the home-gamer to get into. Unless you 3D-print your press-form tooling, of course.

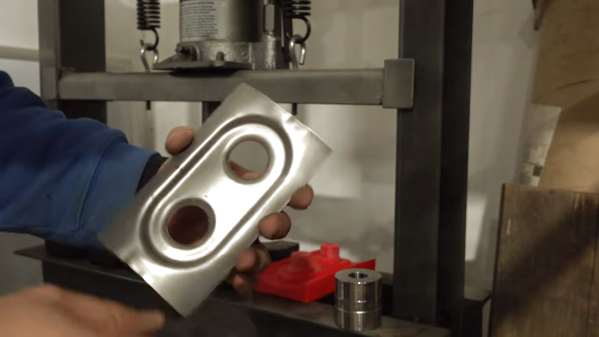
Observant readers will no doubt recall our previous coverage of press-forming attempts with plastic tooling, which were met with varying degrees of success. But [Dave]’s effort stands apart for a number of reasons, not least of which is his relative newbishness when it comes to hot-squirt manufacturing. Even so, he still came up with an interesting gradient infill technique that put most of the plastic at the working face of the dies. That kept print times in the reasonable range, at least compared to the days of printing that would have been needed for 100% infill through the whole tool profile.

The other innovation that we liked was the idea to use epoxy resin to reinforce the tools. Filling the infill spaces on the tools’ undersides with resin resulted in a solid, strong block that was better able to withstand pressing forces. [Dave] didn’t fully account for the exothermic natures of the polymerization reaction, though, and slightly warped the tools. But as the video below shows, even suboptimal tools can perform, bending everything he threw at them, including the hydraulic press to some extent.

It sure seems like this is one technique to keep in mind for a rainy day. And hats off to [Dave] for sharing what didn’t work, since it points the way to improvements.

Continue reading “3D-Printed Press-Forming Tools Dos And Don’ts”

Putting The Magic Smoke Back In A Cooked Scooter

When [Vitor Melon] found out there was a custom firmware (CFW) available for his Xiaomi Mijia M365 Pro electric scooter that would increase his top end speed, naturally he installed it. Who wouldn’t want a little more performance out their hardware? But while the new firmware got the scooter running even better than stock, he does have a cautionary tale for anyone who might decide to ride their Mijia a bit harder than the fine folks at Xiaomi may have intended.

Now to be clear, [Vitor] does not blame the CFW for the fact that he cooked the control board of his Mijia. At least, not technically. There was nothing necessarily wrong with the new code or the capabilities it unlocked, but when combined with his particular riding style, it simply pushed the system over the edge. The failure seems to have been triggered by his penchant for using the strongest possible regenerative breaking settings on the scooter combined with a considerably higher than expected velocity attained during a downhill run. Turns out that big 40 flashing on the display wasn’t his speed, but an error code indicating an overheat condition. Oops.

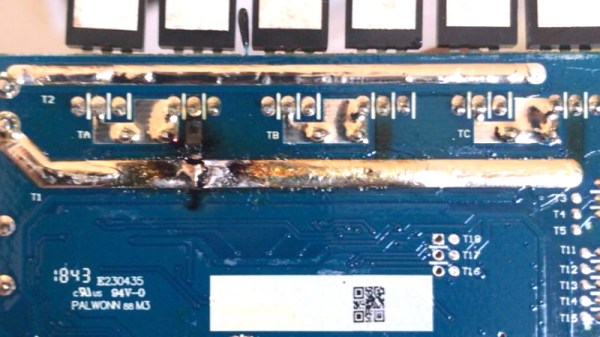
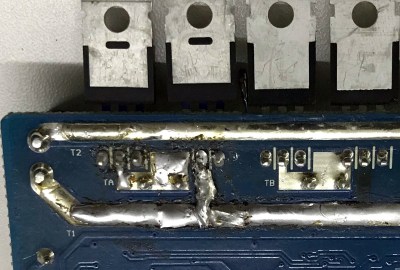
Results of the PCB repair.

After a long and embarrassing walk home with his scooter, complete with a passerby laughing at him, [Vitor] opened the case and quickly identified the problem. Not only had the some of the MOSFETs failed, but a trace on the PCB had been badly burned through. Judging by the discoloration elsewhere on the board, it looks like a few of its friends were about to join in the self-immolation protest as well.

After a brief consultation with his graybeard father, [Vitor] replaced the dead transistors with higher rated versions and then turned his attention to the damaged traces. A bit of wire and a generous helping of solder got the main rail back in one piece, and he touched up the areas where the PCB had blackened for good measure.

A quick test confirmed the relatively simple repairs got the scooter up and running, but how was he going to prevent it from happening again? Reinstalling the original firmware with its more conservative governor was clearly no longer an option after he’d tasted such dizzying speeds, so instead he needed to find out some way to keep the controller cooler. The answer ended up being to attach the MOSFETs to the controller’s aluminum enclosure using thermal pads. This allows them to dissipate far more heat, and should keep a similar failure from happening again. You might be wondering why the MOSFETs weren’t already mounted this way, but unfortunately only Xiaomi can explain that one.

With their rapidly rising popularity hackers have been coming up with more and more elaborate modifications for electric scooters, and thanks to their wide availability on the second hand market, it’s likely the best is still yet to come when it comes to these affordable vehicles.

Balanced Design And How To Know When To Quit Optimizing

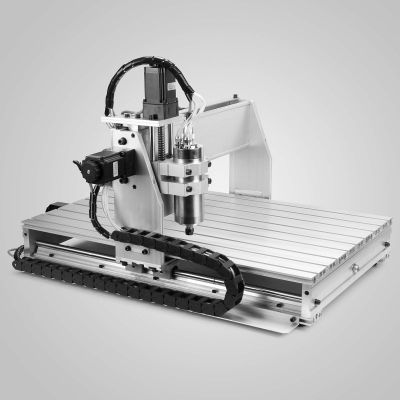
I got a relatively inexpensive 6040 CNC machine, and have been spending most weekends making the thing work, and then cutting stuff, learning the toolchain, and making subsequent improvements. Probably 90% of my machine time has been on making improvements. It’s not that the machine was bad — I got the version with ballscrews and a decently solid frame — but it’s that it somehow didn’t work together as a whole. It’s just an incredibly unbalanced design.

Let’s start with the spindle motor. It’s a 2.2 kW water-cooled beast that is capable of putting tons of work into a piece and spinning at very high speed. Yet to keep up with the high speed spindle, the motors that move it around would have to be capable of high speeds as well — it’s a feeds and speeds thing if you’re not a CNC geek. And they can’t. Instead, the stepper motors that came with the kit are designed for maximum force at low speeds. Which can make sense for some machines, but for one with a slightly flexible X-axis like this one, that’s wasted as well. The frame just can’t handle the low-end grunt that the motors are capable of, so it can’t take advantage of the spindle’s power either. The design is all over the place.
Over the last two months’ of weekends, I’ve been going through this iterative procedure of asking “what is my limiting factor right now?”, working on fixing that thing up, running it some, and then asking the question again. And it’s a good general procedure, and I believe that it’s getting me to the machine I want at the minimum cost of time, money, and effort.

At first, it was the driver hardware/software with its emulated USB parallel port, so I swapped out the controller for an Arduino running GRBL, soldered directly to the DB-25 that comes out of the back. At least it can put out pulses fast enough to order the motors around, but they would still stall out at high speeds. Swapping the stepper motors out for a high-speed pair only cost me €40, which makes you wonder why they didn’t just put the right motors on in the first place. The machine now travels fast enough to make use of the high-speed spindle, and I’m flying through plywood and plastics without leaving burn marks. It’s a huge win for not much money.

The final frontier is taking big bites out of aluminum. The spindle can do it, but I fear I’m up against the frame’s rigidity on the X-axis. For whatever reason, they went with unsupported rods on the X, which are significantly more flexible than an axis that’s backed up by more metal. And this is where the limiting factor may actually be my time and patience, rather than money. I just can’t bear to disassemble and reassemble the thing again. So for now, it’s going to be small nibbles, taking advantage of the machine’s speed, if not yet the spindle’s full horsepower.

But it’s odd, because this machine is a bundle of good parts. It’s just that they haven’t been chosen to work together optimally; the frame doesn’t work with the stepper motors, which don’t work with the spindle. If they went through my procedure of saying “what’s the limiting factor?” they could have saved themselves €100 by just shipping it with a wimpier spindle, which would have been a balanced, if anemic, machine. Or they could have built it with the right motors for more speed. Or supported rails for more grunt. Or both!

I’ll never know why they quit optimizing their design when they did. Maybe they never got past the slow USB/parallel port speed? But I’m near the end of my path, and I can tell because the limiting ingredient isn’t a simple upgrade, or even mere money anymore, but my own willpower.

How can you tell when you’re at the top of a mountain in a dense fog? A step you take in any direction would lead you downhill. How can you tell when you’re satisfied with a project’s state? When you don’t have the need, or desire, to undertake the next most obvious improvement.

Time’s Almost Up For The FrankenFMs: The Impending Switchoff Of Analog TV

In a time when multi-channel digital TV is the norm it’s a surprise to find that a few low-power analog stations are still clinging on in some American cities. These are sometimes fill-in stations for weak signal areas, or more usually the so-called “FrankenFM” stations who transmit static images or digital patterns and derive income from their sound channel lying at the bottom end of the FM band to form unintended radio stations. Their days are numbered though, because the FCC is requiring that they be turned off by July 13th. There’s a way forward for the broadcasters to upgrade to low-power digital, but as you might expect they’re more interested in retaining the FrankenFM frequency from which they derive income.

The industry is represented by the LPTV coalition, who have requested permission to retain their FM frequency alongside their digital service. This has faced stiff opposition from other broadcasters, who see the very existence of the FrankenFM stations as a flagrant flouting of the rules that shouldn’t be rewarded. The FCC have yet to make a ruling, so there remains a slim chance that they may win a reprieve.

The sad tale of the few lingering analog TV stations in the USA is a last flickering ember of a once-huge industry that has been eclipsed without anyone but a few vintage technology geeks noticing, such has been the success of digital broadcasting. But analog TV is a fascinating and surprisingly intricate system whose passing however faint is worth marking.

Header: Tiia Monto, CC BY-SA 3.0.