
You’re wandering through a thrift store and spot an old router for ten bucks. Worthless, right? But in this case, it was a Google OnHub, which, at the time, was pretty premium and still isn’t anything to sneeze at. Of course, Google abandoned it long ago, and it runs Chrome, so pass, right? Of course I didn’t. In fact, I bought two for less than $20. The question is always the same: what do you do with it?
OpenWrt will run on the device. That’s a good start, but merely replacing the firmware isn’t much of a project. The more interesting question is whether the hardware can still do something useful. I had a specific need: connect a wired workstation to a reasonably distant WiFi network without running cable and without suffering the usual double-NAT headaches that come from turning the router into yet another subnet. For this, the OnHub turned out to be nearly perfect.
The Hardware
The OnHub was Google’s first Wi-Fi router, built by TP-Link and ASUS in different versions. Mine was the TP-Link model, and one was missing a bit of plastic cowl trim. Under the hood, it has a Qualcomm IPQ8064 dual-core processor — a dual-core ARMv7 — multiple radios, gigabit Ethernet, and enough memory to run OpenWrt comfortably: 1 GB of RAM and 4 GB of flash. The processor also has two network offload processors, but it isn’t clear to me that the stock OpenWrt build uses them.
These devices were expensive when new, but now show up regularly at thrift stores and surplus sales. Installing OpenWrt was straightforward. You do need to remove a screw that covers the magic switch at the bottom, but that’s not a big problem. You can just peel the rubber foot back if you don’t want to remove it. However, the interesting part came afterward.
Here’s what Google had to say about it back in the day, although you might prefer a teardown.
The Goal
The objective was deceptively simple. I wanted to connect the OnHub to my wireless network and have one or two Ethernet ports. I didn’t want to relay WiFi to WiFi since that is notoriously slow. I also wanted the PCs on the Ethernet to “feel” like they were on the main network, not on some NAT’ed subnet. That means the OnHub needed to relay DHCP as well as normal traffic seamlessly.
The case where you want to rebroadcast wireless to another wireless network is easy but slow. Another easy case is when you create a new subnet and let the router handle traffic between you and the main router, just as your normal router routes traffic to the Internet. But having double NAT is inefficient and massively inconvenient. Port forwarding is a pain. Device discovery is difficult. What I really wanted was a wired-to-wireless bridge.
Enter relayd
OpenWrt provides a package called relayd that creates essentially a pseudo-bridge between a wireless client interface and a wired LAN. I say “pseudo” because a true Layer 2 bridge isn’t possible with most Wi-Fi client modes. Instead, relayd performs a collection of tricks involving proxy ARP, DHCP relaying, and packet forwarding to create the illusion that everything is on the same network.
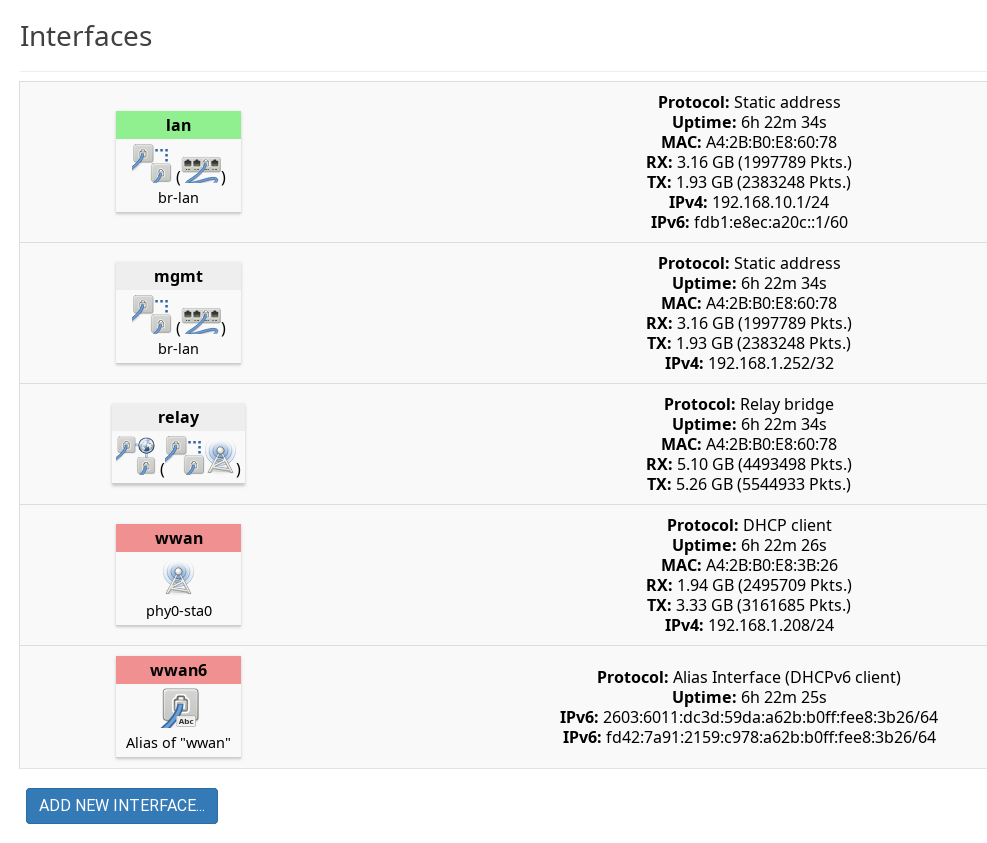
When it works, it works surprisingly well. The default configuration had a LAN interface, a WWAN interface, a WAN interface, and a WAN6 interface. For my purposes, I wanted to connect the regular WiFi to WWAN and I wanted the LAN to be on a different subnet than my main 192.168.1.x network. I set the LAN to 192.168.10.1 and forced the DNS to 8.8.8.8 so the router could access the Internet temporarily through WWAN, which was the only one that had a DNS server set by the main router. I also told the LAN to stop handing out DHCP addresses. That meant that, temporarily, I had to force my PC to 192.168.10.2 to be able to talk to the router.
The reason I needed all this setup is that relayd isn’t installed by default, so I used the router’s package management to install it along with a few other useful packages. (You can use opkg from the command line or the Web-based LuCI interface.) For that, the LAN needed Internet access and DNS resolution.
Once that’s installed, it is pretty easy to create a relay interface. Most of the default settings were OK; I just had to tell it to bridge LAN: and WWAN:. However, there is a “Local IPv4 address” which is supposed to give you an escape hatch to talk to the router because you can’t get back to the 192.168.10.x network once the bridge is working.
So this IP address is one that the relay recognizes shouldn’t be routed. However, I didn’t find it reliable. My first attempt was to modify the main router’s DHCP to stop handing out addresses above .250. That would give me a few IP addresses I could use without fear of conflict, and I had picked 192.168.1.252.
Sometimes it worked. Sometimes it didn’t. I never figured out why. Instead, I just created a static IP interface for 192.168.1.252. That was enough to ensure I could always access the OnHub via that address. There is one catch, though. You don’t want any other traffic going there, so it is important to set that interface to 192.168.1.252 with a netmask of 255.255.255.255. In other words, that interface is ONLY for that address.
The workstation received an address from the main router and could communicate normally with devices elsewhere on the network. At least for IPv4.
The IPv6 Rabbit Hole
I noticed that my workstation was only getting an IPv4 address, but it usually got both IPv4 and IPv6. Practically, it didn’t matter, but I wanted to understand what was going on. After a bunch of packet captures, I realized that in addition to the default WWAN interface, I needed a WWAN6 interface that used DHCPv6. This was analogous to the default WAN6 interface that I wasn’t using.
I also had to modify the IPv6 DHCP server settings on WWAN and LAN even though I had the DHCP server turned off. In particular, the WWAN6 interface became the “designated master,” and both WWAN6 and LAN had all the IPV6 modes set to “relay mode” so they would pass setup traffic from the main network to the subordinate network.
At first, it didn’t work. Turns out I had created a WWAN6 interface for IPv6, but that interface was not assigned to the WAN firewall zone. As soon as WWAN6 was added to the WAN zone, everything started working.
The Result
Would a decade-old router still be useful? Surprisingly, yes.
The wireless connection negotiated around 700 Mbps PHY rate using 80 MHz channels with a WiFi7 TP-Link router. Actual throughput landed around 250 Mbps. That’s not record-setting performance, but it’s more than adequate for web browsing, SSH, remote development, backups, and general network use. It was also much better than I was getting with the motherboard’s WiFi or several USB adapters.
There were some tweaks. You’d think enabling packet steering should improve performance by distributing work across CPUs. On this hardware, it increased jitter noticeably. Disabling it produced more consistent latency with little impact on throughput.
After a fair amount of debugging, the final system worked. Of course, I had to keep going. I deleted unused interfaces and added lots of OpenWrt goodies like mindlna and tailscale. The minidlna server posed a few small problems, though.
 Attaching
 minidlna to the LAN caused it to advertise a 192.168.10.x address which was, of course, unreachable. Attaching it to WWAN worked better. Again, tcpdump is your friend. The other problem is that if a USB stick is in the unit at power-up, it tries to boot from it. I’m still trying to work that out. As for tailscale, be sure to turn off the tailscale DNS, or you’ll be sorry. It also hid the DLNA servers from the network, so fixing that is a problem for another day.
For reference, here was my final list of interfaces.
And the moral of the story: Next time you spot an abandoned router at a thrift store, don’t just ask whether OpenWrt will run on it. Ask what problem it can solve. I may turn the other unit into a usbip setup.


wouldn’t you ‘just’ install a wifi dongle on the remote workstation? :)
I mention towards the end that those were slow and added a lot of latency/jitter which was causing me a lot of problems.
Keeping it from being E-waste.
Here’s the environmental devil’s advocate:
These devices draw 36 watts (3 amps at 12 volts). That’s >10x more electricity than a simple Wifi dongle. And unlike a wifi dongle, they do not go to sleep when the PC does.
If you are the kind of environmentalist that worries about carbon emission rather than trash, this is a case where it’s better to leave the device in the waste bin than to repurpose it as a wifi dongle.
Concerns about power cosumption? Oh, please! That’s so 2020!
In times of LLM data centres, home user power consumption has become totally insignificant by comparison ! 🥲
But if we’re really looking for power wasters here, it’s the gaming PCs.
By that logic, no one should turn off their lights because there’s a cement factory running somewhere…
I just meant to say it’s a drop in the ocean.
LLMs are wasting so much power each day it’s the equivalent of burning large parts of the rain forest every day.
In this relation, an user with a 36 watts device compares to a child with a single birtday candle on a birthday cake. It’s insignification, simply.
Even tens of thousands of children with candles on their birthday cakes won’t make much of a difference.
Before LLMs, however, it did make some small difference.
But again, not anymore.
Saving power nolonger is enough, simply.
People would now have to “produce” power and feed it into the power grid to make a difference.
Solar modules are one way to support the power grid, for example.
Ideally, people do not use the power grid for themselves anymore.
Instead, they would use solar chargers for mobile devices and use their own power sources for stationary things.
Some radio amateurs do that to power the equipment in their ham shack.
They have solar panels, solar chargers and some 12v lead-gel batteries or 13,8v car batteries.
When it comes to environmental impact, you are right – the difference is insignificant.
When it comes to my personal electric bill? That is where I notice a difference.
Are you out of your mind? Just because it has a 12V/3A adapter does NOT mean it draws 36W all day long. The device most likely uses around 5W on the reg.
have wifi routers really gotten that much better in the last ten years that people are honestly asking whether a ten year old router could “still be useful”? most of my network equipment is at least that old — though it all has gigabit ethernet and 802.11n — but am i missing out? and how?
Why not a regular layer3 routing (if layer2 bridging was impossible) with 192.168.10.0/24 on the wired side and without a NAT? Wasn’t it possible to add an appropriate entry to the routing table of the main router?
That was my first thought as well. A subnet does NOT perform NATting between other subnets on the network. NAT is done between two separate networks.
Give the new router a 192.168.2.0/24 address with 192.168.1.1 being the gateway.
Done. No NAT involved.
I think like most routers, this device has no hardware support (in OpenWRT at least) for switching packets between Ethernet and the wireless radios. It has to be done in software using relayd in this instance.
Sometimes I use old cheap routers without modifying firmware as cheap/slow Ethernet switches and access points. Disable DHCP and don’t plug into the uplink port. Good enough for some devices.
Disable the router’s DHCP server, I mean.
Unfortunately OnHub devices are particularly poor for this; the only management interface was a discontinued cloud app. The device cannot be configured unless you wipe the OEM firmware.
And they only have 2 ethernet ports.
The lack of ports isn’t a problem, use a switch.
But the whole point here was to use an otherwise disused router as a switch (or as an access point, but that doesn’t need multiple Ethernet ports).
OpenWRT nuthin’! With these specs you should be running a full OpenEmbedded/Yocto image. Who needs the cut-down Busybox version of everything when you can run the real tools?
Probably you can have OpenWRT up and running from a prebuilt binary in half an hour vs. spending a week getting a basic Yocto config to boot because it sucks. (And the “real tools” are all available via opkg if your device has the space to install them.)
Openwrt supports 802.11s which operates at layer 2 and it seems to support most hardware, including the QCA chips in the OnHub. It’s meant for mesh networks but in my experience it works great as a point to point wireless bridge and it’s super easy to configure, you can just add the interface to your LAN bridge after setting it up in the wireless tab and you’re done
Unfortunately, the main router did not support that.
Why didn’t you change the router into an “Access Point” instead?
“I didn’t want to relay WiFi to WiFi since that is notoriously slow.”
This reminds me of when I was too poor to buy my own Internet. I did roughly the same as above with some TP-Link router, installed dd-wrt, and set the thing up in my window repeating the grocery store’s open AP from across the street. Worked well enough at night, not so much during the day and forget about gaming online lol. Thank God for affordable fiber these days, I couldn’t imagine going back.
Did something similar for a broke neighbour across the street when she was down on her luck for a few months. Some old routers with larger antennas, wasn’t very fast but better than nothing
Since you had two of them, use one as a wds ap and wire it to your current ap and the other as a wds client. That’ll give you a transparent layer 2 bridge
I thought about that but I haven’t fired up the second one yet. But that may be part 2 lol.