Hoverboards Are Here – If You’re Crazy Enough To Try

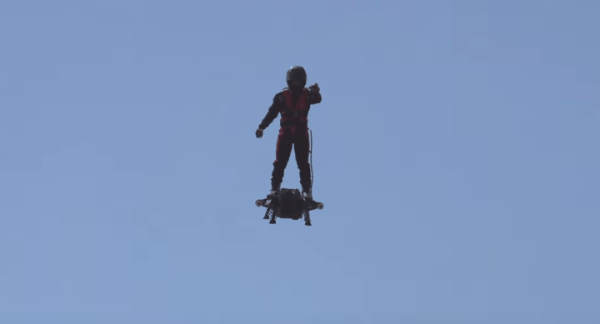
A new video has been stirring questions on the internet this week. It shows a test of the Flyboard Air, a device that is somewhere between a Back to the Future Hoverboard and Green Goblin’s glider. The video depicts pilot [Frank Zapata] taking off, flying around, and landing an a platform not much larger than a milk crate. Plenty of folks are calling the video a fake. After a few back of the napkin calculations though, we’re coming out to say we think it’s real. Details are few and far between, so much of the information in this article is educated guessing based upon the video.

Here’s our hypothesis: Flyboard Air is a jet powered platform with little or no built-in intelligence. Balance, stability and control are all handled by the pilot. A hand controller simply provides throttle to adjust altitude, take off, and land.

jetfeetLet’s start with the jet powered part. During the video, [Frank] looks down at his board and the water below. Between his sneakers we can see two round openings – which look a lot like jet intakes. At the end of the video, [Frank] flies over the camera. stopping the action shows a split second where four exhaust holes are visible on the bottom of the board. These jets look quite a bit like model aircraft jet engines.

We don’t know exactly which engines [Frank] is using, but as an example, the Jet-Cat P 400 RX-G packs 88 lbs of thrust into a shell less than 6 inches in diameter, weighing less than 8 lbs. Four of those engines would provide 352 lbs of thrust. That’s plenty to lift [Frank], the board, and a few gallons of Jet-A strapped to his back.

Why no built-in intelligence? Even the smallest quadcopters have gyros, accellerometers, and PID loops keeping them upright. The problem boils down to the physics of jet engines. Active stability in a fixed pitch rotary blade system requires very fast throttle response. Quadcopters have this with their brushless motors. Turbines however, have throttle lag on the order of seconds. You can’t beat physics. Accelerating 3 or 4 pounds metal from 78,000 RPM (~70% throttle) to 98,000 RPM (~100 % throttle) takes time.

flyboard1Standing on a column of uncontrolled thrust would take quite a bit of skill on the part of the pilot. As it turns out, [Frank] is one of the world’s most experienced thrust riders. His previous invention, the Flyboard uses a personal watercraft to create a column of thrust which the rider stands on. These boards have become tremendously popular at vacation spots in the last few years. There are plenty of videos on [Frank’s] YouTube channel showing the amount of control a skilled ride has over the board. Loops, spins, and other aerobatics look easy.

With that much skill under his belt, [Frank] would have no problem keeping balanced on four jet engines.

Such a skilled rider means that control wouldn’t really be needed on the board. We’re betting that the only electronics are the remote throttle control and the Engine Control Computers (ECU) needed to keep the jets running and synchronized. The two electric ducted fans on the sides of the Flyboard Air appear to be running all the time, only shutting down when [Frank] lands the board.

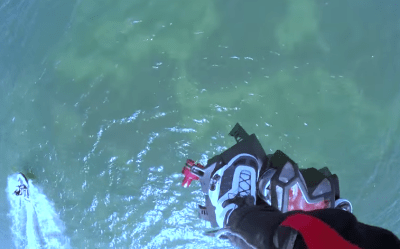
One final thought – taking off and landing a jet vertically is difficult. Ground effects destabilize the craft. Engines can suck in their own exhaust, stalling them. These are problems faced by the harrier jump jet and the joint strike fighter. [Frank’s ] solution is not never get too close to the ground. If you watch closely, he takes off and lands from a perforated metal platform mounted off the back of a van. The metal doesn’t reflect enough thrust to cause the Flyboard to become unstable or stall.

So is the video real? We think so. This is an amazing achievement for [Frank Zapata]. Is it practical or safe? Heck no! Nor is it cheap – those engines cost €8,845.00 each.  That said, we’d love a chance to ride the Flyboard Air – after a few hours of training on the original Flyboard of course.

Continue reading “Hoverboards Are Here – If You’re Crazy Enough To Try”

Open Source Robotics With WireBeings

Everyone needs a cute robotic buddy, right? [Matthew Hallberg] created WireBeings, an open source 3D printed robotic platform. Looking like a cross between Wall-E and Danbo, WireBeings is designed around the Arduino platform. We do mean the entire platform. You can fit anything from an Arduino micro to a Mega2560 stacked with 3 shields in its oversized head. There’s plenty of room for breadboards and custom circuits.

WireBeings is designed to be 3D printed. All the non-printable parts are commonly available. Gear motors, wheels, the ubiquitous HC-SR04 ultrasonic sensor, and a few other parts are all that is needed to bring this robot to life. Sketches are downloaded via USB. Once running, WireBeings can communicate via an HC-06 Bluetooth module.  If the Arduino isn’t enough power for whatever project you’re working on, no problem. [Matt] designed WireBeings to carry a smartphone. Just connect the robot and phone via Bluetooth, and let the phone’s processor do all the heavy lifting. What if you don’t have a spare phone? Check our report on hacks using prepaid Android Smartphones.

We could see WireBeings as the centerpiece for a “learn Arduino” class at a hackerspace. Start with the classic blinky sketch on one of the robot’s eyes. Build from there until the students have a fully functioning robot.

There is definitely room for improvement on the WireBeings project. [Matt] made the rookie mistake of going with a single 9-volt battery to power his creation. While a 9V is fine for the Arduino, those motors will quickly drain it. [Matt’s] planning on moving to a LiPo in the future. Why not stop by the project page and give him a hand?

Continue reading “Open Source Robotics With WireBeings”

Hacklet 103 – Piezo Projects

The piezoelectric effect is simple in its rules: Apply mechanical stress to a material and you generate an electric charge. The inverse is also true: Apply a voltage to a material, and it changes shape. This doesn’t work for everything, though. Only certain materials like crystals, some ceramics, and bone have piezoelectric properties. The piezoelectric effect is used quite a bit in electronics, so it’s no surprise that plenty of hacker projects explore this physical phenomena. This week’s Hacklet is all about some of the best projects utilizing the piezoelectric effect on Hackaday.io!

strumWe start with [miro2424] and StrumPad. Strumpad lets you play a MIDI instrument by strumming, just like a guitar. A music keyboard acts as the guitar fretboard here – keys can be pressed to choose notes, but no sound is generated. When the strumpad is strummed, six copper strips act as capacitive sensors. Touching the strips determines which notes will be played. A piezo disc hiding below the circuit board detects how hard the notes have been strummed or tapped. The ATmega328 running the strumpad then passes the velocity and note-on MIDI messages on to a synth.

stmNext up is [Dan Berard] with Scanning Tunneling Microscope. Inspired by a project from [John Alexander], [Dan] created his own Scanning Tunneling Microscope (STM). The key to an instrument like this is precise movement. [Dan] achieves that by using a normal piezo disk. These disks are used as speakers and buzzers in everything from smoke detectors to greeting cards, so they’re common and cheap. [Dan] cut his piezo disk electrode into quadrants. Carefully controlling the voltage applied to the quadrants allows [Dan] to move his STM tip in X, Y, and Z. Incredibly, this microscope is able to create images at the atomic scale.

touchboard[Thatcher Chamberlin] is next with Low-Cost Touchscreen Anywhere. [Thatcher] used a trio of Piezo disks to make any flat surface touch sensitive. The three sensors are placed at 3 corners of a rectangle. Touches with the rectangle will create vibrations in the surface that are transmitted to the piezo sensors. By measuring the vibration time of arrival, it should be possible to determine where the surface was touched. This kind of measurement requires a decent processor, so [Thatcher] is using the ARM Cortex-M0 in NXP’s LPC1114FN28. Initial tests were promising, but we haven’t heard much from [Thatcher] on this project. If you see him online, tell him to hurry up! We’re hoping to turn our parking lot into a giant electronic chess board!

contFinally, we have [Jose Ignacio Romero] with Low Power Continuity Tester. [Jose] used a Piezo element in a slightly more mundane way – as a buzzer. Who needs a whole multimeter when you’re just trying to check continuity on a few circuits? This continuity tester uses a PIC12LF1571 processor to find open and short circuits. The 5 10 bit ADC in the PIC is plenty of resolution for this sort of tester. In fact, [Jose] even included a diode test, which emits a short beep if the leads are placed across a working diode. The PIC processor uses so little power that this tester should run for around 800 hours on a CR2032 watch battery.


If you want to see more piezo projects check out our brand new piezo projects list! If I missed your project, don’t get buzzed! Drop me a message on Hackaday.io, and I’ll add it to the list. That’s it for this week’s Hacklet. As always, see you next week. Same hack time, same hack channel, bringing you the best of Hackaday.io!

Hacklet 102 – Laundry Projects

Ah laundry day. The washing machine, the dryer, the ironing, and the folding. No one is a fan of doing laundry, but we (I hope) are all fans of having clean clothing. Hackers, makers, and engineers are always looking for ways to make a tedious task a bit easier, and laundry definitely is one of those tedious tasks. This week we’re checking out some of the best laundry projects on Hackaday.io!

laundrifyWe start with [Professor Fartsparkles] and Laundrify. Anyone who’s shared a washer and dryer with house or apartment mates will tell you how frustrating it can be. You bring your dirty laundry downstairs only to find the machines are in use. Wait too long, and someone has jumped in front of you. Laundrify fixes all that. Using a current sensor, Laundrify can tell if a machine is running. An ESP8266 monitors the current sensor and sends data up to the cloud – or in this case a Raspberry Pi. Users access this laundry as a service system by opening up a webpage on the Pi. The page includes icons showing the current status of each machine. If everything is in use, the users can join a queue to be notified when a machine is free.


borgmachineNext up is [Jose Ignacio Romero] with Borg Washing Machine. [Jose] came upon a washer that mechanically was perfect. Electrically was a different story. The biggest issue was the failing mechanical timer, which kept leaving him with soapy wet clothing. Washing machine timers boil down to mechanically timed multipole switches. They’re also expensive to replace. [Jose] did something better – he built an electronic controller to revitalize his washer. The processor is a PIC16F887. Most of the mains level switching is handled by relays. [Jose] programmed the new system using LDmicro, which is a ladder logic implementation for microcontrollers. For the uninitiated, ladder logic is a programming language often used on industrial Programmable Logic Controller (PLC) systems. The newly dubbed borg machine is now up and running better than ever.


hackitgreen

Next we have [Michiel Spithoven] with Hot fill washing machine. In North America, most washing machines connect to hot and cold water supplies. Hot water comes from the home’s water heater. This isn’t the case in The Netherlands, where machines are designed to use electricity to heat cold water. [Michiel] knew his home’s water heater was more efficient than the electric heater built into his machine. [Michiel]  hacked his machine green by building an automated mixing manifold using two solenoid valves and a bit of copper pipe. The valves are controlled by a PIC microprocessor which monitors the temperature of the water entering the machine. The PIC modulates the valves to keep the water at just the right temperature for [Michiel’s] selected cycle. [Michiel] has been tracking the efficiency of the new system, and already has saved him €97!


laundrespFinally we have [Mark Kuhlmann] with LaundrEsp. [Mark’s] washing machine has a nasty habit of going off-balance and shutting down. This leaves him with soggy clothing and lost time re-running the load. [Mark] wanted to fix the problem without directly modifying his machine, so he came up with LaundrEsp. When the machine is running normally, a “door locked” light is illuminated on the control panel. As soon as the washer shuts down – due to a normal cycle ending or a fault, the door unlocks and the light goes out. [Mark] taped a CdS light detecting resistor over the light and connected it to an ESP8266. A bit of programming with Thinger.io, and [Mark’s] machine now let’s him know when it needs attention.

If you want to see more laundry projects check out our brand new laundry project list! If I missed your project, don’t take me to the cleaners! Drop me a message on Hackaday.io, and I’ll have your project washed, folded, and added to the list in a jiffy. That’s it for this week’s Hacklet. As always, see you next week. Same hack time, same hack channel, bringing you the best of Hackaday.io!

HVAC Techs – Hackers Who Make House Calls

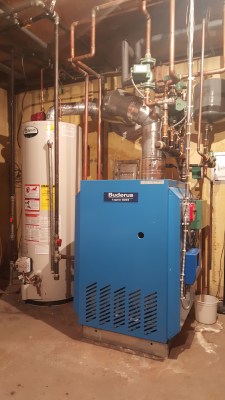
It’s been said that hackers are enamored with complex networks. In the 60s and 70s, the telephone network was the biggest around, singing a siren song to an entire generation of blue-boxing phone phreaks. I started a bit closer to the house. As a child I was fascinated by the heating system in the basement of our home: a network of pipes with a giant boiler in the middle. It knew when to come on to provide heat, and when to kick on for hot water. I spent hours charting the piping and electrical inputs and outputs, trying to understand how everything worked. My parents still tell stories of how I would ask to inspect the neighbors heating systems. I even pestered the maintenance staff at my nursery school until they finally took me down to see the monstrous steam boiler which kept the building warm.

My family was sure I would grow up to be a Heating Ventilation and Air Conditioning (HVAC) tech. As it turned out, electronics and embedded systems were my calling. They may not have been too far from the truth though, as these days I find myself designing systems for a major manufacturer of boiler controls and thermostats.

Recently a house hunt led me to do some HVAC research on the web. What I found is that HVAC techs have created a great community on the internet. Tradesmen and women from all over the world share stories, pictures, and videos on websites such as HVAC-Talk and HeatingHelp.

Continue reading “HVAC Techs – Hackers Who Make House Calls”

Hacklet 101 – Pinball Projects

There’s something about pinball that draws in hackers, makers, and engineers. Maybe it’s the flashing lights, the sounds, the complex mechanical movements. Could it be the subtle tactics required to master the game? Whatever the reason, everyone loves pinball, and more than a few hackers have dedicated their time and money toward building, restoring, and hacking pinball machines. This week’s Hacklet is all about the best pinball projects on Hackaday.io!

trekpinWe start with [zittware] and Star Trek: The Mirror Universe Pinball. [Zittware] worked with [clay], [fc2sw], and [steve] to create this awesome project. They took a 1978 Bally Star Trek pinball machine, and rebuilt an evil mirror universe version. The electronics include nixie tubes and a bulletproof power supply based upon an ATX computer setup. New play field elements and hardware were created on a CNC. Evil graphics were created with the help of Photoshop. The game is completely playable, and was a crowd favorite in the Hackaday Sci-Fi contest. The electronics and cabinet work are all open source. Unfortunately those pesky copyright laws prevent the team from sharing the artwork.

riiingpinNext up is [Erland Lewin] with RINNIG Pinball Simulator. Some hackers have the space for a few real pinball machines. For the rest of us, there is virtual pinball. [Erland Lewin] built this mini virtual pinball machine from plywood, some real pinball hardware, and a lot of ingenuity. The play field is a 24″ dell computer monitor, while the back glass is a 20″ monitor. A final 15″ monitor takes the place of the Dot Matrix Display (DMD) often found on pinball machines. The whole system is driven by an Intel i3 computer. [Erland] is going to try to use the on-board graphics. If he runs into trouble, he can always switch to a discrete graphics card. The machine has turned out great, and his sons love playing classic pinball machines on their own “kid sized” table.

pinboxIf virtual pinball is still a bit large for you, [Loyal J] has you covered with Pinbox Jr. Desktop computer virtual pinball has been a thing since the days of Windows XP. Somehow tapping keyboard keys isn’t quite the same as hitting real flipper buttons. Pinbox Jr. is a prototype pinball controller built inside a cardboard box. A Teensy 3.1 translates the buttons to USB keyboard inputs. Two large arcade buttons act as the flippers while two smaller buttons are available for game options and other functions.  [Loyal J] even added a triple axis accelerometer so pinbox responds to rough play with a tilt! All this project needs is a solenoid to replicate that real pinball feel.

optimusAt the top of the virtual pinball mountain stands [Randy Walker] with Optimus-Pin. Optimus is a full-sized virtual pinball cabinet. It’s a 3 screen affair, much like RINNIG Pinball up top. [Randy] took things to the next level with an absolutely gorgeous custom cabinet. The Transformers inspired artwork was created on commission by commercial artist [Javier Reyes]. Optimus really recreates the feel of playing pinball with 8 solenoids placed in strategic positions around the cabinet. Even the whirring of play-field motors is replicated by a hidden Volkswagen wiper motor. Optimus also comes with a complete light show including RGB LED strips, strobes, and a shaker to rattle the entire cabinet.

If you want to see more pinball projects check out our brand new pinball projects list! If I missed your project, don’t be shy! Just drop me a message on Hackaday.io. That’s it for this week’s Hacklet. As always, see you next week. Same hack time, same hack channel, bringing you the best of Hackaday.io!

Raspberry Pi Zero Contest Grand Prize Winners!

The Raspberry Pi Zero Contest presented by Adafruit and Hackaday came to a close last week, as the clock struck 11:59 am on Sunday, March 13, 2016. Since then our team of judges has been working to pick the top three entries. It was a hard job sorting through nearly 150 amazing creations.  In the end though, the judges were able to pick three grand prize winners. Each winner will receive a $100 gift card to The Hackaday Store.  So let’s get to the winners!

[JohSchneider] and [Markus Dieterle] both won Pi Zero boards and went on to win $100 gift certificates. [shlonkin] didn’t win a Pi Zero, but persevered and continued working on the classroom music teaching aid even without a Zero board. The top winners aren’t the only ones who are doing well. Everyone who entered has a head start on a great project for The 2016 Hackaday Prize.

I’d like to thank Hackaday’s own [Dan Maloney], [Kristina Panos], [Sophi Kravitz] and [Brian Benchoff] who joined me to judge the contest. The entire Hackaday staff is indebted to [Limor Fried] and [Phil Torrone] over at  Adafruit for coming up with 10 live videos, and providing 10 hard to find Pi Zero boards for our winners. The biggest thanks go to the entrants. If I could send a prize out to each and every one of you, I would!