Hackaday Prize Entry: Elderly Autonomous Fall Detection

For his Hackaday Prize entry, [having11] is building a simple and cheap fall detection notification button that can be worn by senior citizens, young kids, or others affected by medical conditions. [having11] did some fact-finding, and it appears that falls are one of the leading causes of injury for seniors, according to data available from the Centres for Disease Control and Prevention (CDC).

This device will sense a fall and send a text message or email to a recipient caregiver, loved one, or friend. The notification can also be manually triggered using a pushbutton. There’s a 5-second delay before it actually sends the alert, allowing a false trigger to be canceled. On receiving the alert, the recipient can decide how to proceed and if the situation requires a call to emergency services.

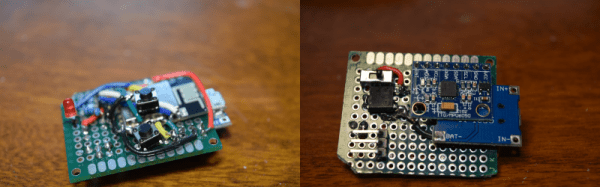
The device uses an ESP8266, a MPU6050 MEMS gyro-accelerometer combo, and MyDevices Cayenne IoT service. The Cayenne IoT service is free for Makers and non-commercial use at the moment. The only other components needed are a few discretes and a small LiPo battery, keeping the cost of the device under $10. The whole assembly is housed in a 3D-printed enclosure. The next steps would probably be to make it more compact and design a housing that can be worn as an arm or chest band or on a waist belt. An important requirement of such monitoring devices is being able to notify when/before it is unable to fulfill its primary requirements. Towards that end, maybe adding a low battery and low WiFi signal strength indicators would be nice.

If you have more suggestions on making this better, chime in with your comments below.

Continue reading “Hackaday Prize Entry: Elderly Autonomous Fall Detection”

Dumb STB Gets Smart

[Vincent Deconinck] gave a fresh lease of life to an old set top box by adding a few Euro’s worth of hardware and some software smarts. The device in question is an old VOOcorder – a Cisco set-top box provided by VOO, his cable service provider in Belgium.

The VOOcorder doesn’t have any WiFi hardware or browser / app based interfaces. It’s a simple device controlled either via an IR remote or front panel buttons. [Vincent] added an ESP8266 and hooked it up to the IR receiver on the set-top box. He also set it up as an SPI slave to the front panel VFD display controller and connected it to the debug serial interface of the VOOcorder as well. The software, on the other hand, required a lot more work consisting of code running on the ESP itself, several HTML pages and JavaScript code for the browser front end, and a few scripts running in the background.

The result was bidirectional interactivity from within a browser, allowing him to send commands and receive status information as well as providing a user-friendly search interface. Further, his browser interface was integrated with information from the service providers website letting him do scheduling and recording of programs. The stuff that interested us is how he sniffed out the IR signals, figured out the SPI protocol used by the front panel controller, and implemented SPI-slave mode for the ESP8266. [Vincent] was surprised that such a cheap device could handle three distinct web servers while parsing two message streams without a hitch.

It’s a great hack showing us how to use super cheap electronics to upgrade and modernize old hardware. Check out the two videos after the break – showing a demo of the hack in action, and a walk through of the hardware modifications.

Continue reading “Dumb STB Gets Smart”

Stunning Fake Polaroid Camera Performs Magic

It’s high time us Muggles got our hands on the hardware used to take Magical Photographs as seen in The Daily Prophet. The first pioneering step in that direction has been taken by [Abhishek] who built this moving picture taking polaroid-ish camera, which he’s calling the “Instagif NextStep”. It’s a camera that records a short, three second video, converts it to GIF and ejects a little cartridge which displays the animated photo.

This amazing piece of hardware has been painstakingly built, and the finished product looks great. The nice thing about building such projects, in [Abhishek]’s own words, is that “it involves a bunch of different skill sets and disciplines – hardware, software, 3D modeling, 3D printing, circuit design, mechanical/electrical engineering, design, fabrication etc that need to be integrated for it to work seamlessly.”
Continue reading “Stunning Fake Polaroid Camera Performs Magic”

A Very Accurate Current Probe

There’s many different ways of measuring current. If it’s DC, the easiest way is to use a shunt resistor and measure the voltage across it, and for AC you could use a current transformer. But the advent of the Hall-effect sensor has provided us a much better way of measuring currents. Hall sensors offers several advantages over shunts and CT’s – accuracy, linearity, low temperature drift, wider frequency bandwidth, and low insertion loss (burden) being some of them. On the flip side, they usually require a (dual) power supply, an amplification circuit, and the ability to be “zero adjusted” to null output voltage offsets.

[Daniel Mendes] needed to measure some fairly high currents, and borrowed a clip-on style AC-DC current probe to do some initial measurements for his project. Such clip on current probes are usually lower in accuracy and require output DC offset adjustments. To overcome these limitations, he then built himself an invasive hall sensor current probe to obtain better measurement accuracy (Google Translated from Portugese). His device can measure current up to 50 A with a bandwidth stretching from DC to 200 kHz. The heart of his probe is the LAH-50P hall effect current transducer from LEM – which specialises in just such devices. The 25 mV/A signal from the transducer is buffered by an OPA188 op-amp which provides a low output impedance to allow interfacing it with an oscilloscope. The op-amp also adds a x2 gain to provide an output of 50 mV/A. The other critical part of the circuit are the high tolerance shunt resistors connected across the output of the LAH-50P transducer.

The rest of his design is what appears to be a pretty convoluted power supply section. [Daniel] wanted to power his current probe with a 5V input derived from the USB socket on his oscilloscope. This required the use of a 5 V to 24 V boost switching regulator – with two modules being used in parallel to provide the desired output power. A pair of linear regulators then drop down this voltage to +15 / -15 V required for the trasducer and op-amp. His blog post does not have the board layout, but the pictures of the PCB should be enough for someone wanting to build their own version of this current sensor.

Hackaday Prize Entry : Cosmic Particle Detector Is Citizen Science Disguised As Art

Thanks to CERN and their work in detecting the Higgs Boson using the Large Hadron Collider (LHC), there has been a surge of interest among many to learn more about the basic building blocks of the Universe. CERN could do it due to the immense power of the LHC — capable of reaching a beam energy of almost 14TeV. Compared to this, some cosmic rays have energies as high as 3 × 10²⁰ eV. And these cosmic rays keep raining down on Earth continuously, creating a chain reaction of particles when they interact with atmospheric molecules. By the time many of these particles reach the surface of the earth, they have mutated into “muons”, which can be detected using Geiger–Müller Tubes (GMT).

[Robert Hart] is building an array of individual cosmic ray detectors that can be distributed across a landscape to display how these cosmic rays (particles, technically) arrive as showers of muons. It’s a citizen science project disguised as an art installation.

The heart of each individual device will be a set of three Russian Geiger–Müller Tubes to detect the particles, and an RGB LED that lights up depending on the type of particle detected. There will also be an audio amplifier driving a small 1W speaker to provide some sound effects. A solar panel is used to charge the battery, which will feed the converters that generate the logic and high voltages required for the GMT array. The GMT signals pass through a pulse shaper and then through the logic gates, finally being amplified to drive the LEDs and the audio amplifier. Depending on the direction and order in which the particles pass through the GMT’s, the device will produce a bright flash of one of 4 colors — red, green, blue or white. It also triggers generation one of three musical notes — C, F, G or a combination of all three. The logic section uses coincidence detection, which has worked well for his earlier iterations. A coincidence detector is an AND logic which produces an output when two input events occur sufficiently close to each other in time. He’s experimented with several design versions, before settling on a trio of 555 monostable multivibrators to provide the initial pulse shaping, followed by some AND gates. A neat PCB design brings it all together.

While the prototypes are housed in wooden cases, he’s going to experiment with various enclosure and mounting options to see which works best — bollard lamp posts, spheres, something that hangs on a tree or tripod or is put in the ground like a paving block. Future prototypes and installations may include a software, pulse summing and solid-state detectors. Embedded below is a video of his current version of the detector, but there are several other interesting videos on his project page that are worth looking at. And if this has gotten you interested, check out this CERN brochure — LHC, The guide for a simple explanation of particle physics and information on the LHC.

Continue reading “Hackaday Prize Entry : Cosmic Particle Detector Is Citizen Science Disguised As Art”

“You Had One Job”, Bot

Only a Human would understand the pithy sarcasm in “You had one job”. When [tterev3]’s RopeBot the Robot became sentient and asked “What is my purpose?”, [tterev3] had to lay it out for him quite bluntly – “You cut the rope”. He designed RopeBot (YouTube video embedded below) for one job only – single mission, single use.

A couple of years back, [tterev3] had put up some thick ropes for a low ropes course in his backyard. Over time, the trees grew up, and the ropes became embedded in the tree trunks. Instead of risking his own life and limbs to try cutting them down, he designed RopeBot to do the job for him. It’s built from scavenged electronics and custom 3D printed parts. A geared motor driving a large cogged pulley helped by two smaller, idler wheels helps the bot to scurry up and down the rope. A second geared motor drives a cam reciprocating mechanism, similar to industrial metal cutting saws. A common utility knife is the business end of the bot, helping slice through the rope. A radio receiver and controller is the brains of the bot which drives the two motors through a motor driver board. The remote controller, assembled on a piece of foam, has three switches for Up, Down and Cut. Everything is held together on the 3D printed frame and tied down with a generous use of zip ties, with rubber bands providing spring tension where needed. When the rope has been cut, the RopeBot comes down for a smashing end. It might not look fancy, but it gets the job done. We spy some real ball bearings on the three pulleys meaning [tterev3] didn’t skimp on good design just because it’s a disposable robot. Obviously, he spent a fair amount of time and effort in designing RopeBot.

Once the job is done, most of the electronics and hardware can be recovered and used again while the 3D printed parts could be recycled, making this a really cost-effective way of handling the problem. Like the Disposable Drones we covered earlier, these kind of “use and discard” robots not only make life easier for Humans, but also ensure low economic and ecological impact.

Continue reading ““You Had One Job”, Bot”

Hackaday Prize Entry : DEER — An Electronic Repellent

Ultrasonic repellent devices used to keep away insects, rodents, birds, and even large animals have been around for quite a while, but their effectiveness depends on who you ask.  Some critters just don’t seem affected, while some others definitely will avoid being around such a device. Deploying a few of these devices to scare off animals seems to be working quite well for [Ondřej Petrlík]. Around where he lives, the fields of tall grass need to be mowed down during the spring. Unfortunately, the tall grass is ideal for young, newborn animals to stay hidden and safe. The mowing machines would often cripple and hurt such animals, and [Ondřej] desperately wanted to solve the problem and prevent these mishaps.

He built an electronic repeller to keep away wild animals and their young from his farm/ranch/range back in the Czech Republic. He used an Arduino Mini to drive a large piezo transducer to scare away the wild animals from the vicinity of the device. He likely used a high enough frequency beyond human range, but we’ll know more when he publishes his code and details. There are also a few large 10mm LED’s – either to visually locate the device or help drive the animals away in conjunction with the ultrasound, with an LDR that activates the LEDs at night. Using the Arduino helps to turn on the transducer at random intervals, and hopefully, he is using a range of different frequencies so the animals don’t become immune to the device.

His first prototype was cobbled together using vanilla, off the shelf parts. An Arduino, a step up converter, an LDR, a couple of LEDs, a reed switch for powering it on via a magnet, and a large ultrasonic transducer, all powered by three alkaline AA batteries. He stuffed it all inside a weatherproof molded enclosure, holding it all together with a lot of hot glue. This didn’t make it very rugged for the long-term, outdoor field use. While the prototype worked well, he needed several of the devices to be placed all around his farm. To make assembly easy and make it more reliable, he designed a custom PCB to fit in the weather proof enclosure. This allowed him to easily mount all the required parts for a more reliable result. His project is still a work in progress, so if you have worked with these types of ultrasonic repellent devices to keep away animals, and have any insights that may help him, do chime in with your comments. [Ondřej] seems pretty satisfied with the results so far.